Yamaha RX-V367 Owners Manual - Page 15
Connecting a video monitor, Listening to TV audio
 |
UPC - 027108935737
View all Yamaha RX-V367 manuals
Add to My Manuals
Save this manual to your list of manuals |
Page 15 highlights
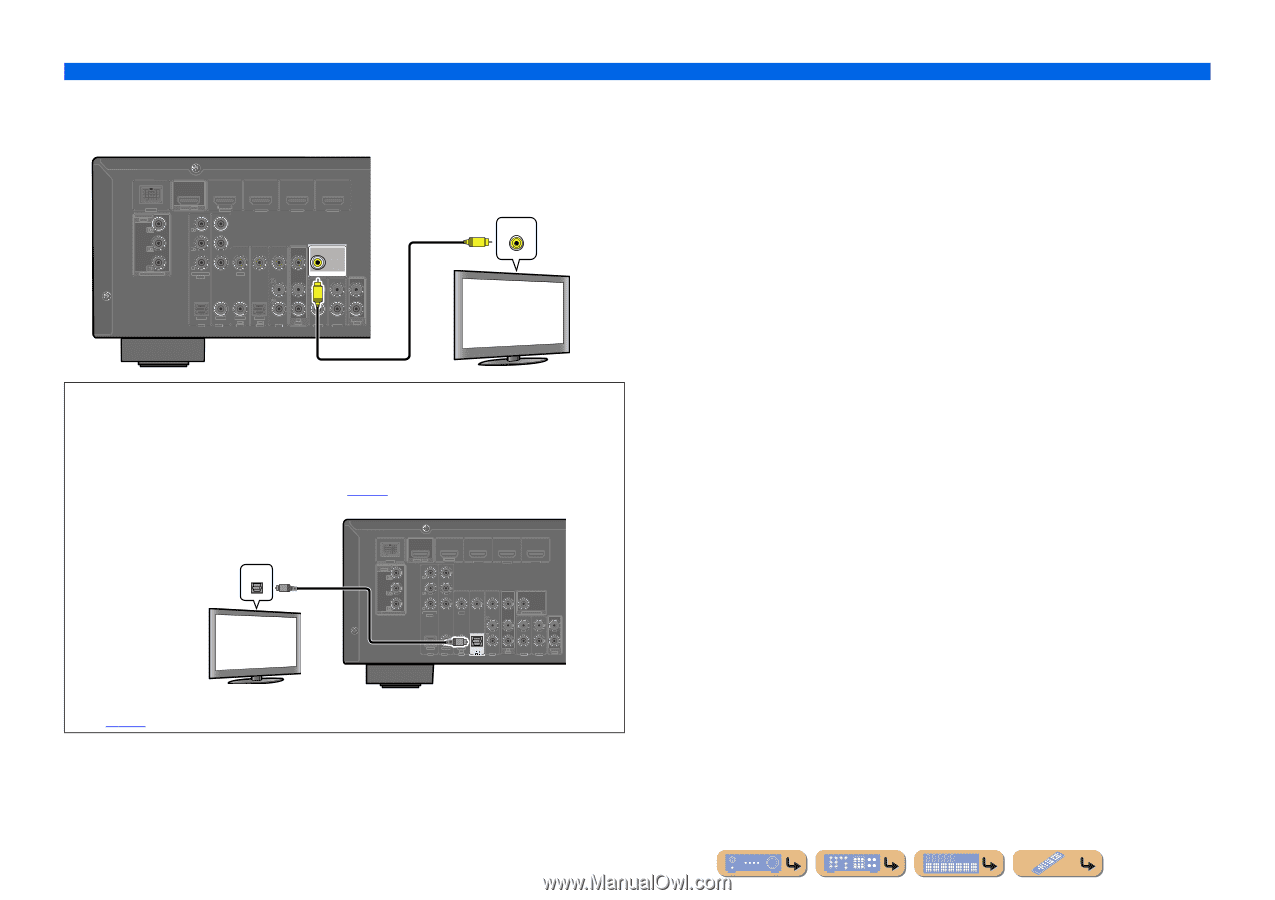
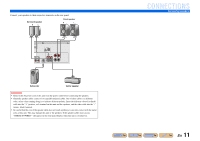
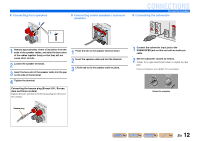
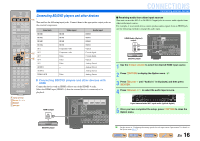
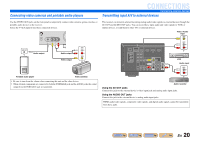
■ Connecting a video monitor Connect the video pin cable to the VIDEO (MONITOR OUT) jack. DOCK COMPONENT VIDEO PR HDMI OUT PR (BD/DVD) HDMI 1 HDMI 2 PB PB Y MONITOR OUT Y COMPONENT VIDEO VIDEO HDMI 3 HDMI 4 MONITOR OUT V OPTICAL AV 1 COAXIAL AV 2 COAXIAL (CD) AV 3 OPTICAL ( TV ) AV 4 AV 5 AV OUT AUDIO 1 AUDIO 2 AUDIO OUT Video input VIDEO V TV ■ Listening to TV audio To transmit sound from the TV to this unit, connect its AV1-5 or AUDIO1-2 jacks to the TV's AUDIO OUT jacks. If the TV supports optical digital audio output, we recommend that you connect the TV audio output to the receiver's AV4 jack. Connecting to AV4 allows you to switch the input source to AV4 with just a single key operation using the SCENE function (☞p. 26). Audio output (Optical) OPTICAL TV O O DOCK COMPONENT VIDEO PR HDMI OUT PR (BD/DVD) HDMI 1 HDMI 2 PB PB Y MONITOR OUT Y COMPONENT VIDEO VIDEO HDMI 3 HDMI 4 MONITOR OUT OPTICAL AV 1 COAXIAL AV 2 COAXIAL (CD) AV 3 OPTICAL AV 5 AV OUT AUDIO 1 AUDIO 2 AUDIO OUT You can control your TV using the receiver's remote control by entering the TV's remote control code (☞p. 50). CONNECTIONS Connecting external devices En 15
-
 1
1 -
2
-
3
-
4
-
5
-
6
-
7
-
8
-
9
-
 10
10 -
 11
11 -
 12
12 -
 13
13 -
 14
14 -
 15
15 -
 16
16 -
 17
17 -
 18
18 -
 19
19 -
 20
20 -
21
-
22
-
23
-
24
-
25
-
26
-
27
-
28
-
29
-
30
-
31
-
32
-
33
-
34
-
35
-
36
-
37
-
38
-
39
-
40
-
41
-
42
-
43
-
44
-
45
-
46
-
47
-
48
-
49
-
50
-
51
-
52
-
53
-
54
-
55
-
56
-
57
-
58
-
59
-
60
-
61
-
62
-
63
-
64
-
65
-
66
-
67
-
68
-
69
-
70
-
71
-
72
-
73
-
74
-
75
-
76
-
77
-
78
-
79
-
80
 |
 |