Yamaha RX-V473 Owners Manual - Page 85
Updating the unit’s firmware, If UPDATE SUCCESS PLEASE POWER OFF
 |
View all Yamaha RX-V473 manuals
Add to My Manuals
Save this manual to your list of manuals |
Page 85 highlights
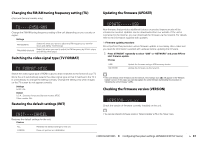
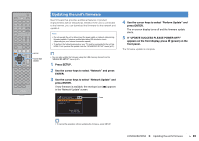
CODE SET SOURCE RECEIVER HDMI 1 2 3 4 AV 1 2 3 4 5 6 AUDIO A V-AUX USB TUNER NET B ZONE FM AM PRESET TUNING INFO MEMORY MOVIE SLEEP BD DVD SUR. DECODE STRAIGHT MUSIC ENHANCER DIRECT SCENE TV NET RADIO SETUP OPTION SETUP ENTER VOLUME RETURN DISPLAY TOP MENU MODE POP-UP MUTE MENU Cursor keys ENTER 1 2 3 4 5 6 7 8 9 INPUT MUTE 0 10 TV TV VOL TV CH ENT Updating the unit's firmware New firmware that provides additional features or product improvements will be released as needed. If the unit is connected to the Internet, you can download the firmware via the network and update it. Note • Do not operate the unit or disconnect the power cable or network cable during firmware update. Firmware update takes about 20 minutes or more (depending on your Internet connection speed). • To perform the following procedure, your TV must be connected to the unit via HDMI. If not, perform the update from the "ADVANCED SETUP" menu (p.81). 4 Use the cursor keys to select "Perform Update" and press ENTER. The on-screen display turns off and the firmware update starts. 5 If "UPDATE SUCCESS PLEASE POWER OFF!" appears on the front display, press z (power) on the front panel. The firmware update is complete. • You can also update the firmware using the USB memory device from the "ADVANCED SETUP" menu (p.81). 1 Press SETUP. 2 Use the cursor keys to select "Network" and press ENTER. 3 Use the cursor keys to select "Network Update" and press ENTER. If new firmware is available, the envelope icon (p) appears in the "Network Update" screen. Network Update Perform Update Firmware Version System ID p x.xx xxxxxxxx Update:ENTER Back:RETURN Icon • To cancel the operation without updating the firmware, press SETUP. CONFIGURATIONS ➤ Updating the unit's firmware En 85
-
 1
1 -
2
-
3
-
4
-
5
-
6
-
7
-
8
-
9
-
10
-
11
-
12
-
13
-
14
-
15
-
16
-
17
-
18
-
19
-
20
-
21
-
22
-
23
-
24
-
25
-
26
-
27
-
28
-
29
-
30
-
31
-
32
-
33
-
34
-
35
-
36
-
37
-
38
-
39
-
40
-
41
-
42
-
43
-
44
-
45
-
46
-
47
-
48
-
49
-
50
-
51
-
52
-
53
-
54
-
55
-
56
-
57
-
58
-
59
-
60
-
61
-
62
-
63
-
64
-
65
-
66
-
67
-
68
-
69
-
70
-
71
-
72
-
73
-
74
-
75
-
76
-
77
-
78
-
79
-
 80
80 -
 81
81 -
 82
82 -
 83
83 -
 84
84 -
 85
85 -
 86
86 -
 87
87 -
 88
88 -
 89
89 -
 90
90 -
91
-
92
-
93
-
94
-
95
-
96
-
97
-
98
-
99
-
100
-
101
-
102
-
103
-
104
-
105
-
106
-
107
-
108
-
109
-
110
-
111
-
112
-
113
-
114
-
115
-
116
-
117
-
118
-
119
-
120
-
121
-
122
-
123
-
124
-
125
-
126
-
127
-
128
-
129
-
130
-
131
-
132
-
133
 |
 |