Yamaha RX V661 MCXSP10 Manual
Yamaha RX V661 - AV Receiver Manual
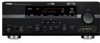 |
UPC - 027108927411
View all Yamaha RX V661 manuals
Add to My Manuals
Save this manual to your list of manuals |
Yamaha RX V661 manual content summary:
- Yamaha RX V661 | MCXSP10 Manual - Page 1
U RX-V661 AV Receiver OWNER'S MANUAL - Yamaha RX V661 | MCXSP10 Manual - Page 2
INSTRUCTIONS Important safety instructions CAUTION RISK OF ELECTRIC SHOCK DO NOT OPEN CAUTION: TO REDUCE THE RISK OF ELECTRIC SHOCK, DO NOT REMOVE COVER (OR BACK). NO USER-SERVICEABLE PARTS INSIDE. REFER SERVICING TO QUALIFIED SERVICE . When installing an outside antenna system, extreme care should - Yamaha RX V661 | MCXSP10 Manual - Page 3
SERVICE GROUNDING ELECTRODE SYSTEM (NEC ART 250. PART H) FCC INFORMATION (for US customers) 1 IMPORTANT NOTICE: DO NOT MODIFY THIS UNIT! This product, when installed as indicated in the instructions contained in this manual, meets FCC requirements. Modifications not expressly approved by Yamaha - Yamaha RX V661 | MCXSP10 Manual - Page 4
manual carefully. Keep it in a safe place for future reference. 2 Install this sound the user and antennas disconnected from a wall outlet or the unit during a lightning storm. 14 Do not attempt to modify or fix this unit. Contact qualified Yamaha service personnel when any service TROUBLESHOOTING turn - Yamaha RX V661 | MCXSP10 Manual - Page 5
INFORMATION Troubleshooting 96 Resetting the system 103 Glossary 104 Sound field program information 106 Parametric equalizer information 107 Specifications 108 Index 110 APPENDIX (at the end of this manual) Front panel i Remote control ii List of remote control codes iii "1SPEAKERS - Yamaha RX V661 | MCXSP10 Manual - Page 6
panel or the remote control. Refer to the attached sheet or the pages at the end of this manual for the information about each position of the parts. • The symbol " ☞ " with page number(s) indicates the corresponding reference page(s). We Want You Listening For A Lifetime Yamaha and the Electronic - Yamaha RX V661 | MCXSP10 Manual - Page 7
transmission) as well as multi-channel digital audio based on HDMI version 1.2a iPod controlling capability ◆ DOCK terminal to connect a Yamaha iPod universal dock (such as the YDS-10, sold separately), which supports iPod (Click and Wheel), iPod nano, and iPod mini ◆ Playback information displaying - Yamaha RX V661 | MCXSP10 Manual - Page 8
is without batteries for more than 2 minutes, or if exhausted batteries remain in the remote control, the contents of the memory may be cleared. When the memory is cleared, insert new batteries, set up the remote control code and program any acquired functions that may have been cleared. 4 En - Yamaha RX V661 | MCXSP10 Manual - Page 9
theater. Front right Video monitor speaker Front left speaker Subwoofer Surround right speaker Preparation: Check the items In these steps, you need the following supplied accessories. ❏ AM loop antenna ❏ Indoor FM antenna Center speaker DVD player Surround left speaker Surround back right - Yamaha RX V661 | MCXSP10 Manual - Page 10
speaker wires touch each other. 4 Do not let the bare speaker wires touch any metal part of this unit. 5 Connect the subwoofer cable to the SUBWOOFER PRE OUT jack of this unit and the input jack of the subwoofer. Subwoofer AV receiver 6 En Input jack Subwoofer cable SUBWOOFER PRE OUT jack - Yamaha RX V661 | MCXSP10 Manual - Page 11
ANTENNA AM GND MD/CD-R MD/CD-R DVD DTV/CBL CD DVD 1 2 3 4 5 6 DIGITAL OUTPUT OPTICAL COAXIAL DIGITAL INPUT FRONT B/ZONE2/ R EXTRA SP L FRONT A R L FM 75 UNBAL REMOTE your video monitor. Video monitor AV receiver Digital coaxial audio output jack Digital coaxial audio cable Video - Yamaha RX V661 | MCXSP10 Manual - Page 12
an external amplifier ☞ P. 22 • Connecting a DVD player via analog multichannel audio connection ☞ P. 22 • Connecting a Yamaha iPod universal dock ☞ P. 23 • Using the REMOTE IN/OUT jacks ☞ P. 23 • Using the VIDEO AUX jacks on the front panel ☞ P. 23 • Connecting an outdoor FM/AM antenna ☞ P. 24 - Yamaha RX V661 | MCXSP10 Manual - Page 13
connected DVD player is a Yamaha product and has capability of the SCENE control signals with the REMOTE OUT jack of this unit (see page 23), this unit can automatically activate the DVD player and start playback when you press the FSCENE1 button. Refer to the instruction manual of the DVD player - Yamaha RX V661 | MCXSP10 Manual - Page 14
in order to receive infrared signals from the remote control. To turn on this unit from the standby mode, press the desired FSCENE buttons (or FSCENE) or AMAIN ZONE ON/OFF on the front panel (or HPOWER on the remote control). See page 25 for details. ■ Using various sound features • Using various - Yamaha RX V661 | MCXSP10 Manual - Page 15
only) ☞ P. 4 ANTENNA AM GND FM 75 UNBAL REMOTE TRIGGER +12V IN OUT 15mA MAX. ANTENNA terminals Connect the FM and AM antenna. ☞ P. 24 REMOTE IN/OUT jacks Connect the remote control input and output jacks of the Yamaha components. ☞ P. 23 HDMI connectors Connect the HDMI components. ☞ P. 16 - Yamaha RX V661 | MCXSP10 Manual - Page 16
(6 ft) FL FR 1.8 m (6 ft) C Subwoofer (SW) The use of a subwoofer with a built-in amplifier, such as the Yamaha Active Servo Processing Subwoofer System, is effective not only for reinforcing bass frequencies from any or all channels, but also for high fidelity sound reproduction of the LFE (low - Yamaha RX V661 | MCXSP10 Manual - Page 17
turned off (see page 25). • Do not let the bare speaker wires touch each other or let them touch any metal part "EXTRA SP ASSIGN" parameter in "SOUND MENU" (see page 72). y You can also select the the EXTRA SP terminals in "AUTO SETUP" (see page 29). Subwoofer FRONT B/ZONE2/ R EXTRA SP L FRONT - Yamaha RX V661 | MCXSP10 Manual - Page 18
one speaker system. Check if your speakers support biamplification. To make the bi-amplification connections, connections, set "BI-AMP" to "ON" in "ADVANCED SETUP" (see page 95). Front speakers Right Left 4 Tighten the knob to secure the instruction manuals of the speakers for details. - Yamaha RX V661 | MCXSP10 Manual - Page 19
the luminance (Y) and chrominance (PB, PR) video signals transmitted on separate wires of component video cables. y This unit is equipped with the video conversion function. See pages 17 and 81 for details. English 15 En - Yamaha RX V661 | MCXSP10 Manual - Page 20
or cause noise. • Audio signals input at input jacks other than the HDMI IN 1 or HDMI IN 2 jack of this unit cannot be digitally output at the HDMI OUT jack. • If you turn off the power of the video monitor connected to the HDMI OUT jack via a DVI connection, this unit may fail to establish the - Yamaha RX V661 | MCXSP10 Manual - Page 21
S VIDEO Digital output Analog output VIDEO Through Video conversion ON (see page 81) Notes • 2-channel as well as multi-channel PCM, Dolby Digital and DTS signals input at the HDMI IN 1 or HDMI IN 2 jack can be output at the HDMI OUT jack only when "SUPPORT AUDIO" is set to "OTHER" (see page 77 - Yamaha RX V661 | MCXSP10 Manual - Page 22
. y You can choose to play back HDMI audio signals on this unit or on another HDMI component connected to the HDMI OUT jack of this unit. Use the "SUPPORT AUDIO" parameter in "SOUND MENU" to select the component to play back HDMI audio signals (see page 77). Notes • Some video monitors connected - Yamaha RX V661 | MCXSP10 Manual - Page 23
jacks. • When "VIDEO CONV." is set to "ON" (see page 81), the converted video signals are output only at the MONITOR OUT jacks. To record a source, make S-video out HDMI out Component video out RL C S V O PR PB Y AUDIO DVD DVD DVD 3 6 OPTICAL COAXIAL DIGITAL INPUT HDMI DVD IN1 - Yamaha RX V661 | MCXSP10 Manual - Page 24
video out Video out ■ Connecting a set-top box L Audio in R L Audio out R DVD recorder, PVR Satellite receiver, cable TV receiver or HDTV decoder S-video out Video out Component video out HDMI out Audio out Optical out O LR PR PB Y V S AUDIO DTV/CBL DTV/CBL 4 OPTICAL DIGITAL INPUT - Yamaha RX V661 | MCXSP10 Manual - Page 25
the DIGITAL OUTPUT jack, select the corresponding setting for "OPTICAL OUT", "OPTICAL IN", or "COAXIAL IN" in "I/O ASSIGNMENT" (see page 78). high-output MC cartridge. To connect a turntable with a lowoutput MC cartridge to the PHONO jacks, use an in-line boosting transformer or an MC-head amplifier. - Yamaha RX V661 | MCXSP10 Manual - Page 26
the SUR.BACK PRE OUT jacks differ depending on the "EXTRA SP ASSIGN" setting (see page 72). 4 SUBWOOFER PRE OUT jack Connect a subwoofer with a built-in amplifier. 5 CENTER PRE OUT jack Center channel output jack. ■ Connecting a multi-format player or an external decoder This unit is equipped with - Yamaha RX V661 | MCXSP10 Manual - Page 27
AUX S VIDEO VIDEO L AUDIO R OPTICAL REMOTE IN OUT S VIDEO VIDEO L AUDIO R OPTICAL Remote control out Remote control in S V L R O S-Video output Video Audio Optical output output output Infrared signal receiver or Yamaha component Yamaha component Game console or video camera - Yamaha RX V661 | MCXSP10 Manual - Page 28
install an outdoor antenna. Consult the nearest authorized Yamaha dealer or service center about outdoor antennas. Connecting the power cable (U.S.A. model) AC OUTLETS To the AC wall outlet AM loop antenna (supplied) ANTENNA AM GND FM Indoor FM antenna (supplied) Outdoor AM antenna Use a 5 to - Yamaha RX V661 | MCXSP10 Manual - Page 29
turn on this unit. When you turns on this unit by pressing BMASTER ON/OFF, the main zone is turned on. y When you turn on this unit, there will be a 4 to 5-second delay before this unit can reproduce sound. ■ Turning to receive infrared signals from the remote control. ■ Turning on the main zone from the - Yamaha RX V661 | MCXSP10 Manual - Page 30
Digital) or PCM (Pulse Code Modulation) digital audio signals. 2CD HDMI IN 1 or HDMI IN 2 jacks (see page 16). 5 SILENT CINEMA indicator Lights up when headphones are connected and a sound field program is selected (see page 46). 6 DOCK indicator Lights up when you station your iPod in a Yamaha iPod - Yamaha RX V661 | MCXSP10 Manual - Page 31
L/R SP" (see page 73) in "SOUND MENU". • To use the presence speakers, set "EXTRA SP ASSIGN" to "PRESENCE" (see pages 29 or 72). Connections Using the remote control The remote control transmits a directional infrared ray. Be sure to aim the remote control directly at the remote control sensor on - Yamaha RX V661 | MCXSP10 Manual - Page 32
disconnected from this unit. ❏ This unit and the video monitor are turned on. ❏ The connected subwoofer is turned on and the volume level is set to about half way (or slightly less). ❏ The crossover frequency controls of the connected subwoofer is set to the maximum. ❏ The room is sufficiently quiet - Yamaha RX V661 | MCXSP10 Manual - Page 33
initial factory settings. Notes • "RELOAD" or "UNDO" is available only when you have previously run "AUTO SETUP" and confirmed the results. • "RELOAD" or "UNDO" is not available when you change the setting of "BI-AMP" in the advanced setup (see page 95) or "EXTRA SP ASSIGN" in "SOUND MENU" (see page - Yamaha RX V661 | MCXSP10 Manual - Page 34
each channel. problems during the "AUTO SETUP" procedure, "WARNING" and the number of warning messages appears in the above of "RESULT" (see page 32). • Depending on the listening environment, "SWFR PHASE:REV" appears during the "AUTO:CHECK" procedure and "SUBWOOFER PHASE" in "SOUND MENU" (see - Yamaha RX V661 | MCXSP10 Manual - Page 35
speaker size Results of the parametric equalizer of each speaker Results of the speaker output level y If you are not satisfied with the results or want to manually adjust each parameter, run "MANUAL SETUP" (see page 69). Notes • The distances displayed in the "DISTANCE" results may be longer than - Yamaha RX V661 | MCXSP10 Manual - Page 36
between the warning displays. WARNING:W-1 Reverse Channel FL -- CENTER PL PR SL SR SBL SBR [ ]/[[]:Select [ENTER]:Return y • For details about each warning message, see the "AUTO SETUP" section in "Troubleshooting" on page 101. • When the corresponding warning message - Yamaha RX V661 | MCXSP10 Manual - Page 37
SCENE templates for various situations of using this unit. As the initial factory setting, the following SCENE templates are assigned to each SCENE button: you need to set the input source of the SCENE template on the remote control. See page 84 for details. 1 Press and hold the FSCENE (or FSCENE) - Yamaha RX V661 | MCXSP10 Manual - Page 38
iPod TUNER (FM/AM) Radio Listening 4 XM XM Listening * To enjoy XM Satellite Radio programs, you need to connect the XM Mini-Tuner Dock (sold separately) and activate the service (see page 53). DOCK iPod Listening * To listening to the iPod, you need to connect a Yamaha iPod universal - Yamaha RX V661 | MCXSP10 Manual - Page 39
the high fidelity sound of the you enjoy FM or AM control signals and is connected to the REMOTE OUT jack of this unit, this unit operates the DVD player or CD player worked with the SCENE features. *2 You can select "V-AUX" as the input source even if your iPod is stationed in the Yamaha - Yamaha RX V661 | MCXSP10 Manual - Page 40
active sound field programs, STRAIGHT or Pure Direct mode. • NIGHT: The night listening mode (see page h repeatedly to recall the desired SCENE template on the menu screen. 4 Press the FSCENE button again to confirm the of the SCENE template on the remote control. See page 84 for details. • You - Yamaha RX V661 | MCXSP10 Manual - Page 41
CD player supports CDs encoded in DTS. Also, check the sound output level of your MENU" to "DTS" before the playback (see page 80). y Before performing operations, set the operation mode selector on the remote control to KAMP. Basic procedure 1 Turn on the video monitor connected to this unit. y See - Yamaha RX V661 | MCXSP10 Manual - Page 42
"INPUT MENU" to set the parameters for MULTI CH INPUT (see page 80). Note Sound field programs and the night listening mode cannot be selected when the component connected to the MULTI CH INPUT jacks is selected as the input source. Selecting the front speaker set Use this feature to turn the front - Yamaha RX V661 | MCXSP10 Manual - Page 43
no sound is output. Displaying the current status of this unit on a video monitor You can display the operating information of this unit on a video monitor. 1 Turn on the video monitor connected to this unit. 2 Set the operation mode selector to KAMP and then press ODISPLAY on the remote control - Yamaha RX V661 | MCXSP10 Manual - Page 44
LMUTE on the remote control to mute the audio output. Press LMUTE again to resume the audio output. y • You can also rotate 0VOLUME on the front panel or press JVOLUME +/- to resume the audio output. • You can adjust the muting level by using the "MUTE TYPE" parameter in "SOUND MENU" (see page 76 - Yamaha RX V661 | MCXSP10 Manual - Page 45
Press NSET MENU on the remote control again to exit from "SET MENU". ■ Audio information FORMAT SAMPLING CHANNEL BITRATE FLAG HDMI RES. HDMI ERROR Resolution of the HDMI signals input or output at the HDMI IN/OUT jacks of this unit. Error message for HDMI sources or connected HDMI devices. See - Yamaha RX V661 | MCXSP10 Manual - Page 46
of precise digital decoders that allow you to enjoy multi-channel playback from almost any stereo or multi-channel sound source. This unit is also equipped with a Yamaha digital sound field processing (DSP) chip containing several sound field programs which you can use to enhance your playback - Yamaha RX V661 | MCXSP10 Manual - Page 47
BASIC OPERATION ■ For audio music sources y For audio music sources, we also recommend using the Pure Direct mode (see page 48). Sound field programs Notes • The available sound field parameters differ depending on the settings of the speakers. • "DIALG.LIFT" is available only when "EXTRA SP - Yamaha RX V661 | MCXSP10 Manual - Page 48
It uses the reflection data that limits the effects range per channel in order to offer a powerful playing environment with a being- "SPEAKER SET" is set to "PRESENCE" (see page 72). LEINVTEE/CRLTUABIN 23 ENTERTAINMENT Music Video HiFi DSP This sound field offers an image of a concert hall for - Yamaha RX V661 | MCXSP10 Manual - Page 49
EXTRA SP ASSIGN" in "SPEAKER SET" is set to "PRESENCE" (see page 72). MOVIE 4 MOVIE Standard This program creates a sound field emphasizing the surrounding feeling without disturbing the original acoustic positioning of multi-channel audio such as Dolby Digital and DTS. It has been designed with - Yamaha RX V661 | MCXSP10 Manual - Page 50
down multi-channel sources to 2 channels. See page 49 for details. DIRECT STEREO 5 STEREO 7ch STEREO HiFi DSP Use this program to output sound from all speakers. When you play back multi-channel sources, this unit downmixes the source to 2 channels, and then outputs the sound from all speakers - Yamaha RX V661 | MCXSP10 Manual - Page 51
appropriate channels without any additional effect processing. Press ESTRAIGHT (or SSTRAIGHT) to select "STRAIGHT". STRAIGHT ■ Deactivating the "STRAIGHT" mode Press ESTRAIGHT (or SSTRAIGHT) so that "STRAIGHT" disappears from the front panel display. The sound effect is turned back on. Sound field - Yamaha RX V661 | MCXSP10 Manual - Page 52
the sound field program - displaying the OSD - adjusting the "SET MENU" see page 73). • The available speaker channels differ depending on the setting of the speakers. 2 Press Dl / h to adjust the speaker output level. • Press Dh to increase the value. • Press Dl to decrease the value. Control - Yamaha RX V661 | MCXSP10 Manual - Page 53
channel sources to 2 channels and enjoy playback in 2-channel stereo. Press PSTEREO on the remote control repeatedly to select "2ch Stereo". y • You can use a subwoofer with this program when "LFE/BASS OUT" is set to "SWFR" or "BOTH" (see preserve ease-of-listening for all sounds. • Select "OFF" if - Yamaha RX V661 | MCXSP10 Manual - Page 54
two preset stations with each other. Note Orient the connected FM and AM antennas for the best reception. Automatic tuning Manual tuning Automatic tuning is effective when station signals are strong and there is no interference. If the signal received from the station you want to select is weak - Yamaha RX V661 | MCXSP10 Manual - Page 55
input source. 2 Press 3FM/AM to select "FM" as the reception band. "FM" appears in the front panel display. 3 number. • If the number of received stations does not reach 40 (E8), 5 preset station groups) manually. 1 Tune into a station. See page 50 for tuning instructions. 2 Press 6MEMORY on - Yamaha RX V661 | MCXSP10 Manual - Page 56
which it was stored. y When performing this operation with the remote control, set the operation mode selector to KSOURCE and then press MEMORY indicator flash in the front panel display. See "Selecting preset stations" on the left column. Flashes MEMORY A5:FM 88.9 MHz Flashes 4 Press 2EDIT again. - Yamaha RX V661 | MCXSP10 Manual - Page 57
sound content of the XM Satellite Radio broadcasts in multi-channels, resulting in a full surround sound experience. Note The XM Satellite Radio service to the sky. You can mount it indoors or outdoors. • Use the "XM ANTENNA" parameter in "OPTION MENU" (see page 83) to display the XM Satellite Radio - Yamaha RX V661 | MCXSP10 Manual - Page 58
installed the antenna, you are ready to subscribe and begin receiving XM programming the operation mode selector on the remote control to KSOURCE. 1 Rotate the sound content of the XM Satellite Radio broadcasts in multi-channels (see page 67). • You can set the XM Satellite Radio preset channels (see - Yamaha RX V661 | MCXSP10 Manual - Page 59
k / n on the remote control). ■ Preset Search mode Prior to selecting a preset channel in the Preset Search mode, you must preset XM Satellite Radio channels. For details, see "Setting the XM Satellite Radio preset channels" on page 56. y The initial factory setting of all preset channels (A1 to E8 - Yamaha RX V661 | MCXSP10 Manual - Page 60
Press 6MEMORY (or EXM MEMORY) to set the selected XM Satellite Radio channel as a preset channel while the MEMORY indicator is flashing. A colon (:) appears next to the preset channel number for confirmation, and the MEMORY indicator turns off in the front panel display. C5:[043] XMU MEMORY Colon - Yamaha RX V661 | MCXSP10 Manual - Page 61
CAT :Rock NAME :Coldplay TITLE :Speed of sound .( Coldplay/Spe) [ ]/[ ]:CHANNEL [ ]/[[]:CATEGORY y • To turn off the OSD, press 7DISPLAY (or ODISPLAY) again parameter in "OPTION MENU" (see page 81). • To hold the XM Satellite Radio information screen, press DENTER on the remote control while it is - Yamaha RX V661 | MCXSP10 Manual - Page 62
iPod using the supplied remote control. You can also use the Compressed Music Enhancer mode of this unit to improve the sound quality of the compression artifacts (such as the MP3 format) stored on your iPod (see page 46). Notes • Only iPod (Click and Wheel), iPod nano, and iPod mini are supported - Yamaha RX V661 | MCXSP10 Manual - Page 63
selector to KSOURCE and then press ODISPLAY on the remote control. The following display appears in the OSD. iPod Top Playlists > Artists > Albums > Songs > Genres > Composers > Settings > 2 Press Dk / n / l / h to navigate the iPod menu and then press DENTER to begin playback of - Yamaha RX V661 | MCXSP10 Manual - Page 64
output from the player. Notes • When this unit is set to the standby mode, you cannot record between other components connected to this unit. • TONE CONTROL (see page 48) and VOLUME settings, the speaker level (see page 74) and the sound field programs (see output on the same OUT (REC) channel Turn - Yamaha RX V661 | MCXSP10 Manual - Page 65
GUARD" in "OPTION MENU" is set to "ON" (see page 82). If you want to change the sound field parameter values, set "MEMORY GUARD" to "OFF". 1 Turn on the video monitor connected to this unit. 2 Set the operation mode selector to KAMP and then press ODISPLAY on the remote control. The following status - Yamaha RX V661 | MCXSP10 Manual - Page 66
sound effect is excessive. Control range: -6 dB to +3 dB Move up to the ideal dialogue position. Choices: 0, 1, 2, 3, 4, 5 "0" (initial setting) is the lowest position, and "5" is the highest position. Notes • "DIALG.LIFT" is only available only "EXTRA SP ASSIGN" is set to "PRESENCE" (see - Yamaha RX V661 | MCXSP10 Manual - Page 67
field parameters for the advanced configurations Use the following sound field parameters to customize sound field programs in detail. y To change sound field parameter settings, see page 61 for details. Advanced sound configurations Sound field parameter INIT.DLY P.INIT.DLY S.INIT.DLY SB INI - Yamaha RX V661 | MCXSP10 Manual - Page 68
is repeatedly reflected around a room, the larger the hall is, the longer the time between the original reflected sound and the subsequent reflections. By controlling the time between the reflected sounds, you can change the apparent size of the virtual venue. Changing this parameter from one to two - Yamaha RX V661 | MCXSP10 Manual - Page 69
environments, and a shorter time for "live" sources and listening room environments. Control range: 1.0 to 5.0 s Reverberation 60 dB Source sound Reverberation Early reflections 60 dB 60 dB REV.TIME Sound source Short reverberation REV.TIME REV.TIME Long reverberation ADVANCED OPERATION - Yamaha RX V661 | MCXSP10 Manual - Page 70
DSP processors of this unit for pure hi-fi stereo sound when playing 2-channel analog sources. Choices: AUTO, OFF y • Select "AUTO" to bypass the decoders, the DSP processors and the tone control circuitry only when "BASS" and "TREBLE" are set to 0 dB (see page 48). • Select "OFF" not to bypass the - Yamaha RX V661 | MCXSP10 Manual - Page 71
Advanced sound configurations Remote control button is not available when "SB L/R SP" is set to "NONE" (see page 73). PANORAMA DIMENSION CENTER WIDTH SUR.DECODE 9 SURROUND DECODE PLIIx Game PL are decoded straight into the appropriate channels without any additional effect processing and - Yamaha RX V661 | MCXSP10 Manual - Page 72
front left and right speakers. A larger value moves the center channel output towards the front left and right speakers. Control range: 0 (center channel sound is output only from the center speaker) to 7 (center channel sound is output only from the front left and right speakers) Initial setting - Yamaha RX V661 | MCXSP10 Manual - Page 73
adjust speaker and system parameters (see page 28). ■ Manual setup MANUAL SETUP Use this feature to manually adjust speaker and system parameters. Sound menu 1 SOUND MENU Use this menu to manually adjust any speaker settings, alter the quality and tone of the sound output by the system or compensate - Yamaha RX V661 | MCXSP10 Manual - Page 74
Features Adjusts the brightness of the display and converts video signals. Locks sound field program parameters and other "SET MENU" settings. Designates the default audio input jack select setting for the input sources when you turn on the power of this unit. Initializes the parameters of a group - Yamaha RX V661 | MCXSP10 Manual - Page 75
OPERATION p p p Customizing this unit (MANUAL SETUP) p p p p Using SET MENU Use the remote control to access and adjust each parameter. y • You can change the "SET MENU" parameters while this unit is reproducing sound. • Press ERETURN to return to the previous menu level. 1 Set the operation - Yamaha RX V661 | MCXSP10 Manual - Page 76
• Select "ZONE B" if the FRONT B speakers are set in another room. If FRONT A is turned off and FRONT B is turned on, all the speakers including the subwoofer in the main room are muted and this unit outputs sound at the FRONT B terminals only. Notes • If you connect headphones to the PHONES jack of - Yamaha RX V661 | MCXSP10 Manual - Page 77
mode (see page 46), and "SUR. B L/R SP" is automatically set to "NONE". Surround back left/right speakers SUR. B L/R SP Choices: NONE, SMLx1, SMLx2, LRGx1, LRGx2 SOUND MENU SUR " (none). The surround back channel signals are directed to the surround left and right speakers. ADVANCED OPERATION English - Yamaha RX V661 | MCXSP10 Manual - Page 78
" to reverse the phase of your subwoofer. ■ Speaker level B)SPEAKER LEVEL Use this feature to manually adjust the output level of each speaker. Control range: -10.0 to +10.0 dB Control step: 0.5 dB Initial setting: 0.0 dB SOUND MENU B)SPEAKER LEVEL 1/2 . FL;;;;;;;;;; FR;;;;;;;;;; C;;;;;;;;;; SWFR - Yamaha RX V661 | MCXSP10 Manual - Page 79
Center speaker Subwoofer Surround see page 28), "AUTO PEQ" is automatically selected as the default setting. Test tone TEST SOUND MENU output the currently selected source component. • Select "ON" to output test tones from the center and front left speakers. Notes • The available speaker channels - Yamaha RX V661 | MCXSP10 Manual - Page 80
the capacity of your subwoofer or headphones. The LFE channel carries low-frequency special effects which are only added to certain scenes. This setting is effective only when this unit decodes Dolby Digital or DTS signals. Control range: -20 to 0 dB Control step: 1 dB p p SOUND MENU E)LFE LEVEL - Yamaha RX V661 | MCXSP10 Manual - Page 81
" to set the initial volume level in Zone 2 (see page 83). ■ HDMI setting H)HDMI SET Use this feature to select the component to play back HDMI audio signals. SOUND MENU H)HDMI SET SUPPORT AUDIO: RX-V661 [p]/[[]:Select [ENTER]:Return Support audio SUPPORT AUDIO Use this feature to select whether to - Yamaha RX V661 | MCXSP10 Manual - Page 82
stereo playback, Compressed Music Enhancer (see page 46) or Pure Direct (see page 48) mode. - when "BI-AMP" is set to "ON" (see page 95). • When this unit is turned off, this setting will be reset to "AUTO". p p 2 INPUT MENU Use this menu to reassign the input/output jacks, select the input mode - Yamaha RX V661 | MCXSP10 Manual - Page 83
CBL, V-AUX, DVR, VCR INPUT MENU HDMI IN . [IN1];;; DVD ( DVD output assignment for digital jacks and component video input jacks. • You can only rename DOCK when iPod is stationed in the Yamaha Universal Dock connected to this unit. 1 Press one of the input selector buttons (A) on the remote control - Yamaha RX V661 | MCXSP10 Manual - Page 84
the multi channel input. INPUT MENU E)MULTI CH SET . BGV;;;;; LAST INPUT CH;;;;;6CH [ ]/[ ]:Up/Down [ ]/[[]:Select [ [ [ [ p p INPUT MENU C)VOLUME TRIM MY DVD DVD -> 0.0dB [ ]/[[]:Adjust [RETURN]:Exit y • You can adjust the value for DOCK only when iPod is stationed to the Yamaha Universal Dock - Yamaha RX V661 | MCXSP10 Manual - Page 85
you perform a certain operation. • Select "30s" to turn off the OSD 30 seconds after you perform a certain operation. Amplifier function OSD display time OSD-AMP Use this feature to set the amount of time to display the status and sound field parameters information screen after you perform a certain - Yamaha RX V661 | MCXSP10 Manual - Page 86
when you turn on the power of this unit. Choices: AUTO, LAST OPTION MENU C)AUDIO factory settings. Press the corresponding sound field program selector buttons on the remote control to select the sound turn on the power of this unit next time. • The "MAX VOL." setting does not affect the output level - Yamaha RX V661 | MCXSP10 Manual - Page 87
of this unit is turned on. Choices: Off, -80.0 dB to +16.5 dB Control step: 0.5 dB Notes output level at the "ZONE 2 OUT" jacks. ■ XM Radio setting F)XM RADIO SET OPTION MENU F)XM RADIO SET XM ANTENNA;;;95% [ Customizing this unit (MANUAL SETUP) ■ iPod universal dock setting G)DOCK SET OPTION MENU - Yamaha RX V661 | MCXSP10 Manual - Page 88
the remote control can also operate other audiovisual components made by Yamaha and other manufacturers. To control your TV or other components, you must set up the appropriate remote control code for each input source (see page 87). Using the remote control for the SCENE feature ■ Controlling the - Yamaha RX V661 | MCXSP10 Manual - Page 89
of the operation mode selector position. Remote control Digital TV/Cable TV TV POWER Turns the power on or off. TV VOL +/- Increases or decreases the volume level. TV CH +/- Changes the channel number. TV MUTE Mutes the audio output. TV INPUT Changes the input source. *2 These - Yamaha RX V661 | MCXSP10 Manual - Page 90
BAND RETURN XM MEMORY PRESET/CH SET MENU MENU SRCH MODE ENTER A-E/CAT. DISPLAY REC SCENE 1 2 3 4 7 8 9 Remote control DVD player/ recorder VCR Digital TV/ Cable TV LD player CD player MD/CD recorder Tuner iPod 1 AV POWER Power *1 Power *1 Power *2 Power *1 Power *1 Power - Yamaha RX V661 | MCXSP10 Manual - Page 91
manual. Remote control code default settings Input source Component category Manufacturer Default code CD CD YAMAHA 62000 MD/CD-R CD-R YAMAHA 71292 DVD DVD YAMAHA 42000 DTV/CBL - - - TUNER TUNER YAMAHA 82005 XM TUNER YAMAHA 82006 V-AUX DVR OTHER AUDIO ACCESSORIES (iPod - Yamaha RX V661 | MCXSP10 Manual - Page 92
control codes Use this feature to clear all the remote control codes previously set and reset all of them to the initial factory settings. 1 Press UCODE SET using a ballpoint pen or a similar object. The VTRANSMIT indicator on the remote control flashes twice. CODE SET TRANSMIT POWER TV POWER AV - Yamaha RX V661 | MCXSP10 Manual - Page 93
Yamaha component Yamaha component ■ Using the external amplifier Connect the amplifier/receiver in the second zone and other components to this unit as follows. From the ZONE 2 OUT jacks Main zone DVD player This unit Infrared signal emitter Amplifier Second zone (Zone 2) Remote control - Yamaha RX V661 | MCXSP10 Manual - Page 94
amplifier damage. See this owner's manual for correct usage. Compliance with minimum speaker impedance information for all channels must be maintained at all times. This information is found on the back panel of your Receiver on the remote control to turn on the main zone and Zone 2 - Yamaha RX V661 | MCXSP10 Manual - Page 95
features in Zone 2. For details about the iPod operations, see "Using iPod™" on page 58. Set Zone 2 to the standby mode Press and hold HPOWER or GSTANDBY and then press A to set the remote control to the Zone 2 mode. • Press HPOWER when the main zone is turned on. • Press GSTANDBY when the main - Yamaha RX V661 | MCXSP10 Manual - Page 96
next time you press BMASTER ON/OFF inward to the ON position to turn on this unit (see page 25). • Only BMASTER ON/OFF, CTONE CONTROL and the DPROGRAM selector are effective while you are using the advanced setup menu. • No other operations can be made while you are using the advanced setup - Yamaha RX V661 | MCXSP10 Manual - Page 97
code. Remote control AMP ID *2 ID1 (initial setting) ID2 *1 The remote control setting *2 The setting of this unit Notes • This setting completely resets all the parameters of this unit including the "SET MENU" parameters. • The initial factory settings are activated next time you turn - Yamaha RX V661 | MCXSP10 Manual - Page 98
See page 92 for the operation of the advanced setup. ■ Remote control TUNER ID REMOTE TUN Use this feature to set the TUNER ID of this unit for remote control recognition. Choices: ID1, ID2 • Select "ID1" when the remote control TUNER ID code is set to "82005". • Select "ID2" when the remote control - Yamaha RX V661 | MCXSP10 Manual - Page 99
"OFF" when the component connected to the REMOTE OUT jack is not the Yamaha component and does not have the capability of the SCENE control signals. Note If noises are output when you operate the SCENE function, set "SCENE IR" to "OFF". ■ Bi-amplifier setting BI-AMP Use this feature to activate - Yamaha RX V661 | MCXSP10 Manual - Page 100
the HDCP copy protection standards. Connect HDMI components that support the HDCP copy protection standards. "SUPPORT AUDIO" is set to "OTHER" and "HDMI" audio signals are not being played back on this unit. Set "SUPPORT AUDIO" to "RX-V661" in "MANUAL SETUP". The output and input for the picture - Yamaha RX V661 | MCXSP10 Manual - Page 101
. Press ESTRAIGHT to turn them on. You are using a source or program combination that does not output sound from all channels. Try another sound field program. "EXTRA SP ASSIGN" is set to a setting Set "EXTRA SP ASSIGN" to "PRESENCE". other than "PRESENCE". "SUR. L/R SP" in "SET MENU" is set to - Yamaha RX V661 | MCXSP10 Manual - Page 102
Troubleshooting Problem Cause Remedy No sound is heard from the subwoofer. "LFE/BASS OUT" in "SET MENU" is set to "FRONT" when a Dolby Digital or DTS signal is being played. Set "LFE/BASS OUT" to "SWFR" or "BOTH". "LFE/BASS OUT" in "SET MENU" is set to "SWFR" or "FRONT" when a 2channel source - Yamaha RX V661 | MCXSP10 Manual - Page 103
1 hour for this unit to cool down and then turn it back on. ■ Tuner See page 13 - - Problem Cause Remedy FM stereo reception is noisy. There is distortion, and clear reception cannot FM be obtained even with a good FM antenna. The desired station cannot be tuned into with the automatic - Yamaha RX V661 | MCXSP10 Manual - Page 104
of the same manufacturer using "List of remote control codes" at the end of this manual. The ID code of the remote control and the remote control ID of this unit do not match. Match the remote control ID of this unit with the corresponding remote control ID code. See page 27 - - - 87 87 93 100 - Yamaha RX V661 | MCXSP10 Manual - Page 105
problem with the signal path from your iPod to this unit. Turn off this unit and reconnect the Yamaha iPod universal dock to the DOCK terminal of this unit. Try resetting your iPod. Unknown iPod The iPod being used is not supported by this unit. Only iPod (Click and Wheel), iPod nano, and iPod - Yamaha RX V661 | MCXSP10 Manual - Page 106
the problem, then run "AUTO SETUP" again. • If a warning message "W-1" appears, corrections are made, but they may not be optimal. • If a warning message "W-2" or "W-3" appears, no corrections are made. • If an error message "E-10" occurs repeatedly, contact a qualified Yamaha service center. See - Yamaha RX V661 | MCXSP10 Manual - Page 107
unit to the initial factory settings. Notes • This procedure completely resets all the parameters of this unit including the "SET MENU" parameters. However, the advanced setup menu parameters will not be initialized. • The initial factory settings are activated next time you turn on this unit. y To - Yamaha RX V661 | MCXSP10 Manual - Page 108
excitement and realism. With this unit, any sound environment from monaural up to a 5.1-channel configuration can be freely selected for your enjoyment. ■ Dolby Digital EX Dolby Digital EX creates 6 full-bandwidth output channels from 5.1-channel sources. This is done using a matrix decoder - Yamaha RX V661 | MCXSP10 Manual - Page 109
a set-top box or AV receiver) and an audio/video monitor (such as a digital television), HDMI supports standard, enhanced or high-definition video as well as multi-channel digital audio using a single cable. HDMI transmits all ATSC HDTV standards and supports 8channel digital audio, with bandwidth - Yamaha RX V661 | MCXSP10 Manual - Page 110
and so on, can differ so widely, it is inevitable that there are differences in the sound heard. Based on a wealth of actually measured data, Yamaha CINEMA DSP uses Yamaha original sound field technology to combine Dolby Pro Logic, Dolby Digital and DTS systems to provide the audiovisual experience - Yamaha RX V661 | MCXSP10 Manual - Page 111
employs Yamaha Parametric Room Acoustic Optimizer (YPAO) technology, together with the Parametric EQ settings (see page this unit's parametric equalizer. This unit has 7 equalizer bands for each channel. The use of multiple equalizer bands enables more precise adjustments of frequency characteristics - Yamaha RX V661 | MCXSP10 Manual - Page 112
L/R 150 µV or less • Channel Separation (1 kHz/10 kHz) PHONO Control MUTE/-80 dB to 16.5 dB • Tone Control Subwoofer 24 dB/oct. VIDEO SECTION • Video Format (Gray Back) [U.S.A., Canada, General and Korea models NTSC [U.K., Europe, Australia - 3 dB FM SECTION • Tuning Range 0.5% • Antenna Input ( - Yamaha RX V661 | MCXSP10 Manual - Page 113
[China model AC 220 V, 50 Hz [Korea model AC 220 V, 60 Hz [Australia model AC 240 V, 50 Hz [U.K. and Europe models AC 230 V, 50 Hz 100 W maximum) [Asia, General and Europe models] ...... 2 (Total 50 W maximum) [Australia and U.K. models 1 (Total 100 W maximum) • Dimensions (W x H x D 435 x - Yamaha RX V661 | MCXSP10 Manual - Page 114
0 VOLUME SPEAKERS EDIT SEARCH MODE PRESET/TUNING FM/AM CATEGORY A/B/C/D/E l PRESET/TUNING/CH h MEMORY DISPLAY TUNING AUTO/MAN'L ZONE 2 ON/OFF ZONE CONTROL MAIN ZONE ON/OFF MASTER PHONES ON OFF SILENT CINEMA TONE CONTROL SCENE 1 2 3 4 PROGRAM STRAIGHT PURE DIRECT AUDIO SELECT - Yamaha RX V661 | MCXSP10 Manual - Page 115
■ Remote control U VW A CODE SET TRANSMIT POWER TV POWER AV STANDBY POWER CD DVD MD CD-R 7 8 SUR. DECODE 9 NIGHT 0 SLEEP 10 ENT LEVEL TITLE BAND RETURN XM MEMORY PRESET/CH ENTER SET MENU MENU SRCH MODE A-E/CAT. DISPLAY G H I J K L M N O P CLASSICAL LIVE/CLUB ENTERTAIN 1 2 - Yamaha RX V661 | MCXSP10 Manual - Page 116
44 Advanced setup 92 Advanced sound configurations 61 Adventure, Sound field program ......... 45 ALL CH SEARCH, XM tuning 55 All Channel Search mode, XM tuning 55 All remote control codes resetting ....... 88 AM antenna connection 24 AM tuning 50 Amplifier function OSD display time, Display - Yamaha RX V661 | MCXSP10 Manual - Page 117
RANGE, Sound menu 76 F)XM RADIO SET, Option menu ....... 83 FL SCROLL, Display settings 81 FM antenna 24 FM antenna connection 24 FM tuning 50 FRONT B speaker setting, Speaker settings 72 FRONT B speakers setting 72 FRONT B, Speaker settings 72 Front input, Multi channel input settings - Yamaha RX V661 | MCXSP10 Manual - Page 118
ID, Advanced setup 94 Remote control XM ID, Advanced setup 94 REMOTE IN/OUT jacks 23 REMOTE TUN, Advanced setup ........ 94 REMOTE XM, Advanced setup .......... 94 Rename, SCENE template 36 Repeat 59 Repeat, iPod playback 59 Resetting the system 103 REV.DELAY, Sound field parameter 65 REV - Yamaha RX V661 | MCXSP10 Manual - Page 119
Roxy Theatre, Sound field program 43 Tonal quality adjustment 48 TRANSMIT indicator 27 Troubleshooting 96 TU, Advanced setup 95 Tuner frequency step, Advanced setup 95 Tuner indicators 26 Turning off 25 Turning on 25 Turntable connection 21 TV Controlling, remote control 85 TV monitor - Yamaha RX V661 | MCXSP10 Manual - Page 120
of remote control codes CABLE TV RECEIVER 3M 10033 A-MARK 10008, 10144 ABC 10237, 10003, 10008, 10033 ACCUPHASE 10003 ACORN 10237 ACTION 10237 ACTIVE 10237 AMERICAST 10899 ARCHER 10237 BCC 10276 BELL SOUTH 10899 BRITISH TELECOM 10003 CENTURY 10008 DIRECTOR 10476 DX ANTENNA - Yamaha RX V661 | MCXSP10 Manual - Page 121
CARVER 20054, 20170 CCE 20037 CELEBRITY 20000 CELERA 20765 CHANGHONG 20156, 20765, 20767, 20783 CINERAL 20092, 20451 CITEK 20047 CITIZEN 20000, 20030, 20054, 20060, 20092, 20171, 20180, 20186, 20451, 20463 CLARION 20180 CLASSIC 20030, 20092 COLORTYME 20017, 20030, 20047, 20054, - Yamaha RX V661 | MCXSP10 Manual - Page 122
20178 WESTINGHOUSE 20000, 20451, 20885, 20889 WHITE WESTINGHOUSE 20179, 20236, 20451, 20463, 20623, 20889 WORLD 20180, 20236, 20451, 20463 XR-1000 YAMAHA YORX ZENITH 20154, 20171, 20179, 20180 20030, 20650, 20769, 21405, 21406, 21407, 21522 20030 20000, 20017, 20030, 20037, 20047, 20092 - Yamaha RX V661 | MCXSP10 Manual - Page 123
VCR A-MARK 30037, 30240, 30000 ABS 31972 ADMIRAL 30060, 30048, 30039, 30047, 30104, 30209 ADVENTURA 30037, 30240, 30000 AIWA 30037, 30000, 30307, 30348, 31284, 31291, 31332, 31336 AKAI 30041 ALBA 30209 ALIENWARE 31972 ALLEGRO 30039 AMERICAN HIGH 30035, 30081 AMSTRAD 30000 - Yamaha RX V661 | MCXSP10 Manual - Page 124
30047, 30081, 30033, 30240, 30045, 30000, 30042, 30043, 30041, 30038 WHITE WESTINGHOUSE 30000, 30209 WORLD 30209 XR-1000 30035, 30240, 30000 YAMAHA 30041, 30038 ZENITH 30037, 30039, 30033, 30000, 30209, 30041, 30034, 31479 ZT GROUP 31972 DVD PLAYER 3D LAB 40503, 40539 ACCURIAN - Yamaha RX V661 | MCXSP10 Manual - Page 125
40241 QUASAR 40204 REALISTIC 40203 SEGA 40023 SHARP 40001 SONY 40193, 40201 TECHNICS 40204 TOSHIBA 40059 VICTOR 40245 WARDS 40059 YAMAHA 40217 DVD RECORDER ACCURIAN 51416 APEX DIGITAL 51056 ASPIRE DIGITAL 51168 COBY 51086 CYBERHOME 51129 DENON 50490 EMERSON 50675 FUNAI - Yamaha RX V661 | MCXSP10 Manual - Page 126
YAMAHA 70888, 71292 MD RECORDER DENON KENWOOD ONKYO OPTIMUS PANASONIC PIONEER SHARP SHERWOOD SONY YAMAHA 70229 TECHWOOD 70365 VICTOR 70273 WARDS 70027 YAMAHA 70097, 70205, 70524 TUNER ADC AIWA 80158, 80014, 80080 XM 81406, 81414, 81846 YAMAHA 81023, 80176, 80186, 80376, 81176, 81276, - Yamaha RX V661 | MCXSP10 Manual - Page 127
-BEAUBOURG 77312 MARNE-LA-VALLEE CEDEX02, FRANCE YAMAHA ELECTRONICS (UK) LTD. YAMAHA HOUSE, 200 RICKMANSWORTH ROAD WATFORD, HERTS WD18 7GQ, ENGLAND YAMAHA SCANDINAVIA A.B. J A WETTERGRENS GATA 1, BOX 30053, 400 43 VÄSTRA FRÖLUNDA, SWEDEN YAMAHA MUSIC AUSTRALIA PTY, LTD. 17-33 MARKET ST., SOUTH - Yamaha RX V661 | MCXSP10 Manual - Page 128
■ Front panel U RX-V861/RX-V661 1 234 5 6 7 89 0 VOLUME SPEAKERS EDIT SEARCH MODE PRESET/TUNING FM/AM CATEGORY A/B/C/D/E l PRESET/TUNING/CH h MEMORY DISPLAY TUNING AUTO/MAN'L ZONE 2 ON/OFF ZONE CONTROL MAIN ZONE ON/OFF MASTER PHONES ON OFF SILENT CINEMA TONE CONTROL SCENE 1 - Yamaha RX V661 | MCXSP10 Manual - Page 129
■ Remote control U VW A CODE SET TRANSMIT POWER TV POWER AV STANDBY POWER MD MULTI CH IN 7 8 SUR. DECODE 9 NIGHT 0 SLEEP 10 ENT LEVEL TITLE BAND RETURN XM MEMORY PRESET/CH ENTER SET MENU MENU SRCH MODE A-E/CAT. DISPLAY G H I J K L M N O P CLASSICAL LIVE/CLUB ENTERTAIN 1 2 - Yamaha RX V661 | MCXSP10 Manual - Page 130
U RX-V661 Page 35 (footnote *2) Incorrect *2 You can select "V-AUX" as the input source even if your iPod is stationed in the Yamaha Universal Dock connected to this unit. When the SCENE mode is deactivated and your iPod is stationed in the Yamaha Universal Dock, this unit selects "DOCK" as the
-
 1
1 -
 2
2 -
 3
3 -
 4
4 -
 5
5 -
 6
6 -
 7
7 -
8
-
9
-
10
-
11
-
12
-
13
-
14
-
15
-
16
-
17
-
18
-
19
-
20
-
21
-
22
-
23
-
24
-
25
-
26
-
27
-
28
-
29
-
30
-
31
-
32
-
33
-
34
-
35
-
36
-
37
-
38
-
39
-
40
-
41
-
42
-
43
-
44
-
45
-
46
-
47
-
48
-
49
-
50
-
51
-
52
-
53
-
54
-
55
-
56
-
57
-
58
-
59
-
60
-
61
-
62
-
63
-
64
-
65
-
66
-
67
-
68
-
69
-
70
-
71
-
72
-
73
-
74
-
75
-
76
-
77
-
78
-
79
-
80
-
81
-
82
-
83
-
84
-
85
-
86
-
87
-
88
-
89
-
90
-
91
-
92
-
93
-
94
-
95
-
96
-
97
-
98
-
99
-
100
-
101
-
102
-
103
-
104
-
105
-
106
-
107
-
108
-
109
-
110
-
111
-
112
-
113
-
114
-
115
-
116
-
117
-
118
-
119
-
120
-
121
-
122
-
123
-
124
-
125
-
126
-
127
-
128
-
129
-
130
 |
 |

RX-V661
AV Receiver
OWNER’S MANUAL
U