Yamaha SGV Owner's Manual - Page 5
Truss Rod Adjustment Procedure - guitar
 |
View all Yamaha SGV manuals
Add to My Manuals
Save this manual to your list of manuals |
Page 5 highlights
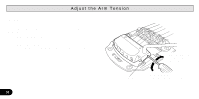
Truss Rod Adjustment Procedure Make sure guitar is tuned to pitch before making adjustments to the truss rod. The curvature of the neck should be slightly concave. The practice of sighting down the neck to see whether there is a bow or bend is unreliable, and even experienced bass technicians can be misted by optical illusions. A better method to check for proper curvature is as follows: Step 1: Tune strings to proper pitch, and depress the strings by placing a capo directly behind the first fret. The capo should be just tight enough to effectively create the tone of F when plucking the E string. Step 2: Depress the E string directly behind the 16th fret with your left hand index finger. The E string depressed at opposite ends of the fingerboard acts as a straightedge, allowing measurement of the space between the fret tops and the E string. Step 3: Measure the mentioned space at the 7th fret by inserting the appropriate feeler gauge blade (right hand). If the mentioned space is less than 0.15mm, or greater than 0.40mm insert the hexagonal truss rod wrench into the truss rod nut and turn in increments of a 1/4 turn or less towards the appropriate direction as shown in the drawing. NOTE Unless you have experience with truss rods, we suggest that you entrust this adjustment to your dealer. concave convex Increases mentioned space Truss rod Decreases mentioned space 5
-
 1
1 -
 2
2 -
 3
3 -
 4
4 -
 5
5 -
 6
6 -
 7
7 -
 8
8 -
 9
9 -
 10
10 -
 11
11 -
12
 |
 |
