Yamaha SPM-K1 Installation Manual - Page 5
Installation Procedure - mounting bracket
 |
UPC - 027108922522
View all Yamaha SPM-K1 manuals
Add to My Manuals
Save this manual to your list of manuals |
Page 5 highlights
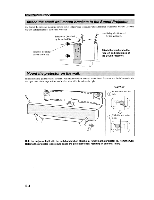
INSTALLATION PROCEDURE Make sure to leave adequate ventilation space around the unit and follow the instructions below. In order to secure the unit to the wall, you will need to attach the bracket to the wall first in a manner befitting the structure and quality of the wall. . Choose a location where the wall can bear the weight of the whole unit. Before installing the bracket, make sure of the size (see "DIMENSIONS" on the fITst page of this manual). Installation example 5....6mm Tapping Screw (commercially available) / In order to secure the unit to the wall, attach four (or more) tapping / r... r. screws using the outside of the holes in the wall mount bracket. ~% 0 c:::'.) c::> c;::)
-
 1
1 -
 2
2 -
 3
3 -
 4
4 -
 5
5 -
 6
6 -
 7
7 -
 8
8
 |
 |

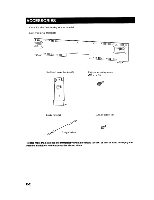
Make sure to leave adequate ventilation space around the unit and follow the instructions below.
..--
-o_~_
Installing directly
into a wall, etc
..
25mmormore
Installing into a dry
wall.
25mmormore
5
....
6mm Tapping Screw (commercially available)
/
In
order
to
secure the unit
to
the wall, attach four (or more) tapping
/
r...
r.
screws using the outside
of
the holes in the wall mount bracket.
~%
0
c:::'.)
c::>
<:::)c:::>
c;::)
<:::)
0
[J=='
Washer
(commercially
available)
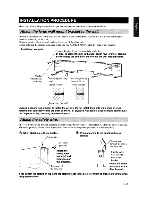
INSTALLATION PROCEDURE
In order to secure the unit to the wall, you will need to attach the bracket to the wall first in a manner befitting the
structure and quality
of
the wall.
.
Choose a location where the wall can bear the weight
of
the whole unit.
Before installing the bracket, make sure
of
the size (see "DIMENSIONS" on the
fITst
page
of
this manual).
Installation example
// I
--~
~
~y
Beam, etc. Dry wall
Choose a secure wall or beam to fasten the screws. Do not install them into walls mafe of weak
material that can easily come off, such as mortar
or
plywood wall panels. Loose screws could cause
the projector to fall, resulting in personal injury.
Choose a method (A or B) when attaching the safety wire. When you choose the method A, attach the safety wire using
M4 screws provided. (Some
of
the projectors have no screw hole depending on the date
of
manufacture.)
"
When attaching to the projector.
/Safet
y
wire
/
M4screw
provided
t
.\-----0
Attach the
\
II
safety wires
I
to the left and
II
right
sides
of
the projector.
Rear panel
of
the projector
When attaching to the small wall mount
bracket.
/
Sli
P
one end
through the loop at
the other end
-
Slip the safety
wire through a
hole in the
bracket
Repeat the same
procedure for the
other bracket.
If
you
tighten the screws
on
the slant, the screw threads
in
the projector might be broken.
Be
careful when
using electric tools.
E-3
Make sure to leave adequate ventilation space around the unit and follow the instructions below.
..--
-o_~_
Installing directly
into a wall, etc
..
25mmormore
Installing into a dry
wall.
25mmormore
5
....
6mm Tapping Screw (commercially available)
/
In
order
to
secure the unit
to
the wall, attach four (or more) tapping
/
r...
r.
screws using the outside
of
the holes in the wall mount bracket.
~%
0
c:::'.)
c::>
<:::)c:::>
c;::)
<:::)
0
[J=='
Washer
(commercially
available)
INSTALLATION PROCEDURE
In order to secure the unit to the wall, you will need to attach the bracket to the wall first in a manner befitting the
structure and quality
of
the wall.
.
Choose a location where the wall can bear the weight
of
the whole unit.
Before installing the bracket, make sure
of
the size (see "DIMENSIONS" on the
fITst
page
of
this manual).
Installation example
// I
--~
~
~y
Beam, etc. Dry wall
Choose a secure wall or beam to fasten the screws. Do not install them into walls mafe of weak
material that can easily come off, such as mortar
or
plywood wall panels. Loose screws could cause
the projector to fall, resulting in personal injury.
Choose a method (A or B) when attaching the safety wire. When you choose the method A, attach the safety wire using
M4 screws provided. (Some
of
the projectors have no screw hole depending on the date
of
manufacture.)
"
When attaching to the projector.
/Safet
y
wire
/
M4screw
provided
t
.\-----0
Attach the
\
II
safety wires
I
to the left and
II
right
sides
of
the projector.
Rear panel
of
the projector
When attaching to the small wall mount
bracket.
/
Sli
P
one end
through the loop at
the other end
-
Slip the safety
wire through a
hole in the
bracket
Repeat the same
procedure for the
other bracket.
If
you
tighten the screws
on
the slant, the screw threads
in
the projector might be broken.
Be
careful when
using electric tools.
E-3