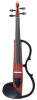
Yamaha SV130 Owner's Manual - Page 7
Setup - silent violin
 |
View all Yamaha SV130 manuals
Add to My Manuals
Save this manual to your list of manuals |
Page 7 highlights
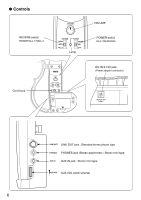
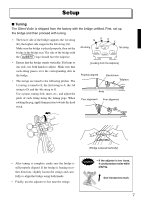
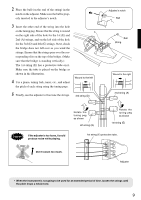
Setup ■ Tuning The Silent Violin is shipped from the factory with the bridge unfitted. First, set up the bridge and then proceed with tuning. • The lower side of the bridge supports the 1st string (E), the higher side supports the 4th string (G). G D A E Make sure the bridge is placed properly, then set the 4th string Slit 1st string bridge in the bridge seat. The side of the bridge with the AUBERT logo should face the tailpiece. • Ensure that the bridge stands vertically. If it leans to one side, use both hands to adjust. Make sure that each string passes over the corresponding slits in the bridge. • The strings are tuned to the following pitches. The 1st string is tuned to E, the 2nd string to A, the 3rd string to D, and the 4th string to G. Use a piano, tuning fork, tuner, etc., and adjust the pitch of each string using the tuning pegs. When rotating the peg, apply firm pressure towards the head stock. [Looking from the tailpiece] Properly aligned Escutcheon Tailpiece Body Poor alignment Poor alignment [Bridge is placed vertically] • After tuning is complete, make sure the bridge is still properly aligned. If the bridge is leaning in either direction, slightly loosen the strings and carefully re-align the bridge using both hands. • Finally, use the adjuster to fine tune the strings. Caution • If the adjuster is too loose, it could produce noise while playing. Don't loosen too much. 7
-
 1
1 -
 2
2 -
 3
3 -
 4
4 -
 5
5 -
 6
6 -
 7
7 -
 8
8 -
 9
9 -
 10
10 -
 11
11 -
 12
12 -
13
-
14
 |
 |
