Yamaha THR30IIA THR30IIA Wireless Quick Guide - Page 2
Quick Guide - manual
 |
View all Yamaha THR30IIA manuals
Add to My Manuals
Save this manual to your list of manuals |
Page 2 highlights
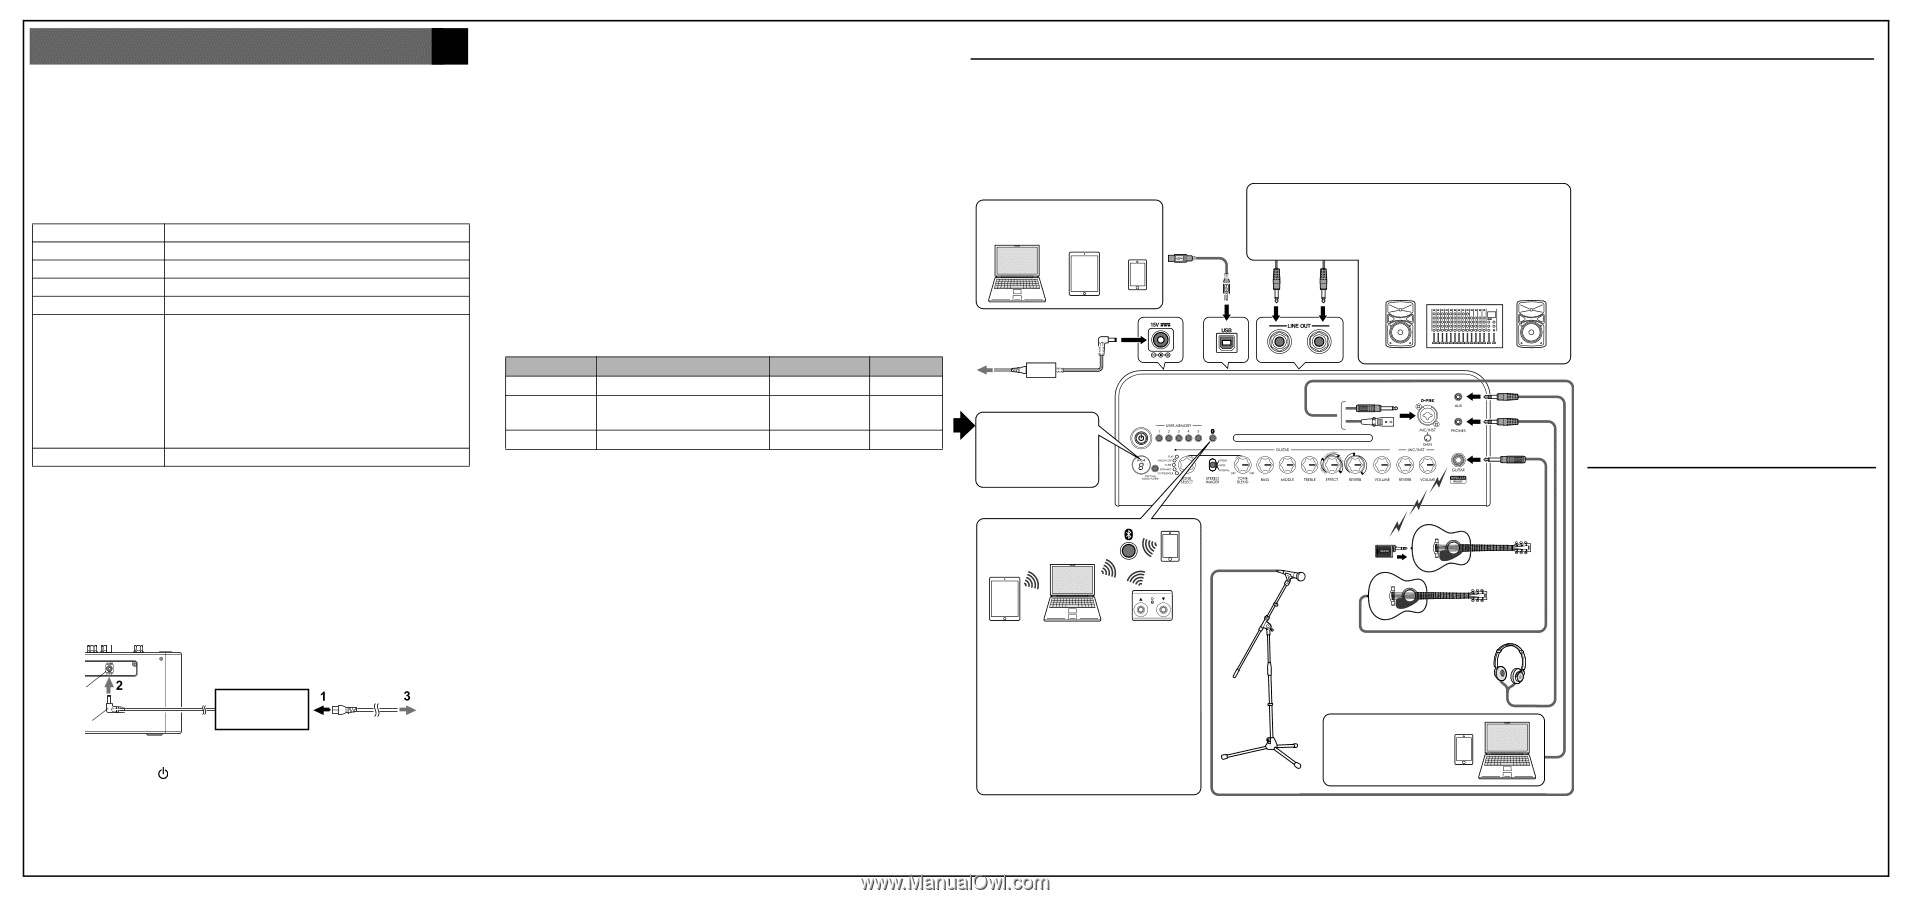
Quick Guide EN Main Features • Sophisticated guitar amplifier with modeling made possible by Yamaha's original VCM technology • THR30IIA Wireless is compatible with the Line 6 Relay G10T wireless transmitter. (sold separately) • Bluetooth® capability enables playing music from a smart device • Built‐in rechargeable battery enables use without AC adaptor Specifications Dimensions (W x H x D) Weight Power Consumption 420 x 195 x 155 mm 4.4 kg 22 W Rated Output Power Source Accessories 30 W (15 W + 15 W) AC adaptor or built‐in rechargeable battery • AC adaptor (YNT345-1530) • Quick Guide (this sheet) • Safety Instructions Sheet: Includes PRECAUTIONS and NOTICE. Please read carefully before proceeding. • Service offices list • Cubase AI Download Information: Includes an access code for downloading Steinberg's DAW software Cubase AI. For instructions on downloading, installing and setting up, refer to the reference manual. Charging temperature 5 - 35 °C * For further details on the product, download the THR30IIA Wireless reference manual from the website: https://download.yamaha.com/ Power THR30IIA Wireless can operate on either DC power (via the AC adaptor) or with the built‐in rechargeable battery. When using the AC adaptor Connect the supplied AC adaptor to the DC IN jack located on the rear side of the THR30IIA Wireless. Connect the AC plug to a power outlet. * Follow the Safety Instructions before making connections. DC IN Jack DC Plug AC adaptor (supplied) Power Outlet Turning the power on and off Press the power button [ ] on the top of THR30IIA Wireless for one second to turn the power on. The LED of the power button lights when turning the power button on. The LED of the THR30IIA Wireless lights in green while charging. Otherwise, it lights in red. Charging the built‐in rechargeable battery Connect the supplied AC adaptor to the DC IN jack located on the rear side of the THR30IIA Wireless. The LED of the power button lights in green while charging. Connection You can connect with a standard instrument cable or the Line 6 Relay G10T. Connecting to guitar by wireless The THR30IIA Wireless can connect with the Relay G10T by wireless. The optimal channel is set automatically by connecting the Relay G10T to the INPUT jack located on the top of the THR30IIA Wireless for at least 10 seconds. For details on wireless connection, refer to the reference manual. Connecting to microphone and electronic musical instrument THR30IIA Wireless Wireless can connect with a microphone and an electronic musical instrument by wire. For details, refer to the reference manual. Charging the Relay G10T Connect the Relay G10T to the INPUT jack located on the top of the THR30IIA Wireless. The built‐in rechargeable battery starts charging automatically. Connecting to a smart device via Bluetooth Press the Bluetooth button located on the top of the THR30IIA Wireless and operate the smart device as indicated the following table. LED Unlit Flashes in green Lights in green Operation Press for three seconds Configure Bluetooth on the smart device within three minutes Play music on the smart device LED after operation Status Flashes in green Pairing mode Lights in green Connected Lights in green Connected * For details on Bluetooth configuration, refer to the manual of the smart device. Turning the tuner on and off Press the TUNER TAP button for one second to turn on. Press the TUNER TAP button again to turn off. For details, refer to the reference manual. Storing user settings The settings for the knobs on the top of the THR30IIA Wireless (excepting the [VOLUME] and [MIC/INST VOLUME] knobs) are stored in user memory. Press one of the [USER MEMORY] buttons for 2 seconds to save your settings to that preset location. For details on the user memory, refer to the reference manual. Application software You can also edit the tone and settings of the THR30IIA Wireless with the THR Remote app. The THR Remote can be used (in addition to the top panel controls) to edit settings such as compressor. For Windows and Mac, download and install THR Remote from the website: https://download.yamaha.com/ For Android and iOS, install THR Remote through the appropriate app store. For details on the using THR30IIA Wireless with a computer, refer to the reference manual. Connection Example • Make sure that all devices to be connected to the unit by cable are turned off. • When connecting the unit to an external device, use an appropriate cable that matches with the jack's specifications and connect it securely. Precautions for using the USB jack Make sure to follow the points at right when connecting a computer to the THR30IIA Wireless USB jack to avoid loss of data by the computer or the THR30IIA Wireless freezing or shutting down. Computer, Tablets and Smartphones USB Cable • Order for turning the power on THR30IIA Wireless Mixer Amp (or powered speaker) • Order for turning the power off Amp (or powered speaker) Mixer THR30IIA Wireless External Audio Devices AC adaptor Power Outlet LED display When connecting Bluetooth, check LED lighting in this area. Bluetooth L R LONG ORT SH Dynamic Microphone Wireless Connection • Playing music/audio • Wireless tone editing with the iOS/ Android app (THR Remote). NOTE Make sure to adjust the device's level appropriately to avoid distortion. • Wireless control with a third-party Bluetooth footswitch. NOTE If a cable is connected to the INPUT jack, the wireless guitar receiver cannot be used. Audio output from an audio player or computer * The illustrations and LCD screens as shown in this manual are for instructional purposes only, and may appear somewhat different from those on your instrument. Notice • Use an AB type USB cable of less than 3 meters. USB 3.0 cables cannot be used. • Be sure to wake the computer from suspended/ sleep/standby mode before connecting a computer to the USB jack. • Always quit all applications that are running on the computer before connecting or disconnecting the USB cable and set the volume output on the computer to its minimum level. • When connecting or disconnecting the USB cable, be sure to set the OUTPUT controls ([VOLUME] and [MIC/INST VOLUME]) on the THR30IIA Wireless to their minimum levels. • Wait at least 6 seconds between connecting or disconnecting the USB cable. Troubleshooting No power: • Is the AC adaptor properly connected? • If the AC adaptor is disconnected, has the THR30IIA Wireless been properly charged? Cannot connect to the smart device by Bluetooth: • Is the LED display turned off or flashes in green? Refer to the reference manual. • Is the Bluetooth setting correct on the smart device? Refer to the user guide of your smart device. No sound is output by wireless connection with a guitar: • Are you using the Relay G10T? THR30IIA Wireless can- not connect to any guitar wireless transmitter except for the Relay G10T. • Did you connect the Relay G10T to the INPUT jack located on the top of the THR30IIA Wireless for at least 10 seconds? The appropriate channel is set automatically. • Is the volume control on the instrument turned up? • Is the Tuner function switched OFF? When the tuner function is set ON, the guitar sound is muted. Press the TUNER TAP button (less than one second) to turn OFF the tuner function.
-
 1
1 -
 2
2
 |
 |