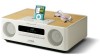
Yamaha TSX-120WH Owner's Manual - Page 8
Turning on/off the system, Adjusting the clock, Connect the power cable to the wall, outlet.
 |
View all Yamaha TSX-120WH manuals
Add to My Manuals
Save this manual to your list of manuals |
Page 8 highlights
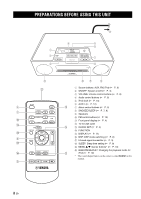
PREPARATIONS BEFORE USING THIS UNIT Turning on/off the system 1 Connect the power cable to the wall outlet. Adjusting the clock The clock is not set at the factory. 2 Press ON/OFF to turn on the system. When the system is on: "Hello" appears, then clock and other information are displayed. Example: iPod playback mode display When the system is off: "Good-bye" appears, then only date and time are displayed. 1 Press CLOCK SET. y • This unit has an auto off function, which will automatically switch the system to off if the system is left turned on for 1 hour without playback or any other operation being performed. This function is only available when the source is set to iPod. • Press and hold ON/OFF on the top of the unit for more than 3 seconds to set the system to standby mode. All the information on the front panel display is not displayed in standby mode. This can reduce the power consumption. To cancel standby mode, press ON/OFF. • Even in system off/standby mode, the alarm function is available. • The memory back-up circuit prevents stored data such as the time setting from being lost even in system off/standby mode. 2 Select each setting with MENU S/T and confirm with Center. You can set YEAR → MONTH → DAY → TIME. Notes • This operation can be performed only with the remote control. • Time appears in 12-hour notation (AM/PM), depending on the model. For example, "4:00PM". • You can switch 12-hour/24-hour notation by pressing FUNCTION → MENU S/T → Center to select TIME FORMAT, then pressing MENU S/T → Center to select 12H/24H. • The time settings are lost after one week when the power cable is disconnected from the wall outlet. 4 En
-
 1
1 -
2
-
 3
3 -
 4
4 -
 5
5 -
 6
6 -
 7
7 -
 8
8 -
 9
9 -
 10
10 -
 11
11 -
 12
12 -
 13
13 -
14
-
15
-
16
-
17
-
18
-
19
-
20
-
21
-
22
 |
 |
