Yamaha UB-DXR10 Owner's Manual - Page 2
Package Contents, Installation Instructions - speakers
 |
View all Yamaha UB-DXR10 manuals
Add to My Manuals
Save this manual to your list of manuals |
Page 2 highlights
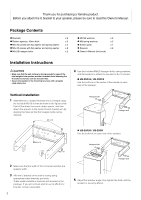
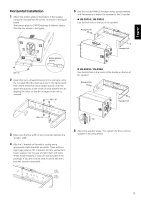
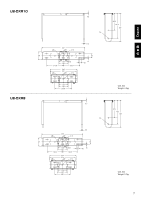
Thank you for purchasing a Yamaha product. Before you attach the U bracket to your speaker, please be sure to read this Owner's Manual. Package Contents * Brackets x 2 * Rubber spacers, 10mm thick x 2 * M5×10 screws with flat washer and spring washer x 4 * M5×16 screws with flat washer and spring washer x 2 * M8×25 hexagon bolts x 2 * M8 flat washers x 2 * M8 spring washers x 2 * Bottom plate x 1 * Spacers x 2 * Owner's Manual (this book) Installation Instructions CAUTION • Make sure that the wall surface is strong enough to support the total weight of the speaker and the U bracket. Avoid attaching the U bracket to drywall, such as acoustic tiles. • Secure the speaker to the mounting structure with a properly rated safety wire. 4 Use the included M8x25 hexagon bolts, spring washers, and flat washers to attach the speaker to the U bracket. UB-DXR15 / UB-DXR12 Use the bolt hole in the center of the handle on each side of the speaker. Vertical installation 1 Assemble two L-shaped brackets into a U-shape using the included M5x10 screws as shown in the figure below. Peel off the sheet from each rubber spacer, and then attach the spacers to the inside of each bracket arm by aligning the holes so that the hexagon bolts can be inserted. M5 x 10 Hexagon bolt Hexagon bolt M5 x 10 M5 x 10 2 Make sure that the width of the U bracket matches the speaker width. 3 Affix the U bracket on the wall or ceiling using appropriate metal brackets and bolts. These metal brackets or bolts are not included in the package. If you are not sure what to use to affix the U bracket, consult a specialist. 2 UB-DXR10 / UB-DXR8 Use the bolt hole on each side of the speaker. Hexagon bolt Hexagon bolt 5 Adjust the speaker angle, then tighten the bolts until the speaker is securely affixed.
-
 1
1 -
 2
2 -
 3
3 -
 4
4 -
 5
5 -
 6
6
 |
 |
