Yamaha V1.10 MOTIF XS6/MOTIF XS7/MOTIF XS8 New Functions in MOTIF XS V1.50/V1. - Page 2
Playing an audio file, NO] and [INC/YES] buttons.
 |
View all Yamaha V1.10 manuals
Add to My Manuals
Save this manual to your list of manuals |
Page 2 highlights
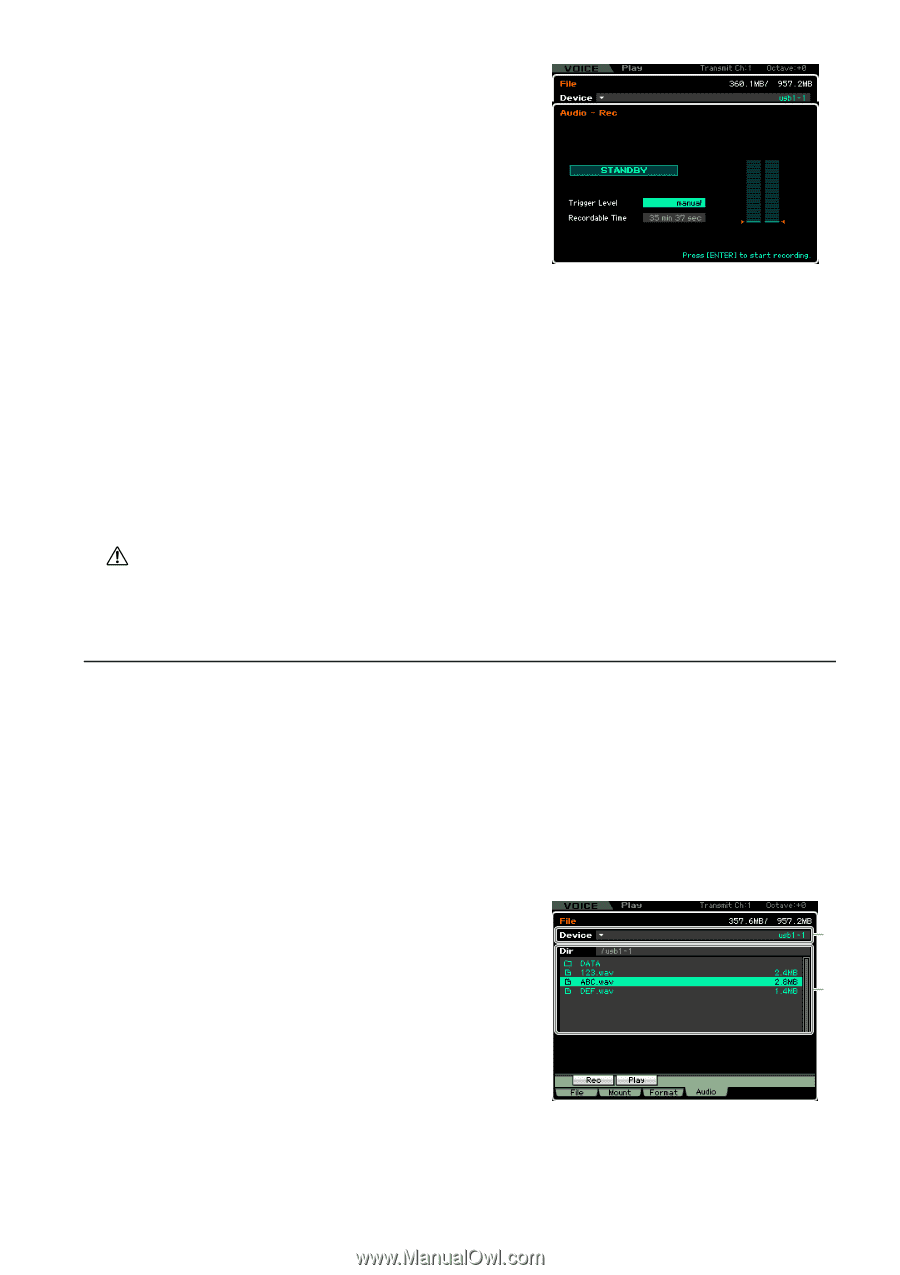
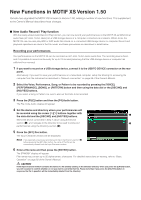
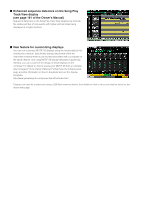
7 Set the required trigger level. If you set the trigger level to "manual", recording will begin whenever you press the [ENTER] button. Alternatively, if you set a value between 1 and 127, recording will begin automatically whenever the playback volume exceeds that level. The level set here will be indicated by red triangles in the level meter. For best results, set this parameter as low as possible to capture the entire signal, but not so low as to record unwanted noise. 8 Press the [ENTER] button. If you have set the trigger level to "manual", recording will begin immediately and the displayed status will change from "STANDBY" to "RECORDING". If you have set a value between 1 and 127 as the trigger level, the displayed status will change from "STANDBY" to "WAITING". 9 Play the keyboard. If you set the trigger level to a value between 1 and 127, recording will begin automatically whenever the playback volume exceeds that level; furthermore, the displayed status will change from "WAITING" to "RECORDING" at that time. If you want to include the currently-selected Song or Pattern in your recording, press the SEQ TRANSPORT [F] (Play) button at any time to start playback. You can also press one of the Number buttons [1] - [16] while recording to change parts. 10 When you have finished playing, press the [ENTER] button once again. Recording will end and the recorded audio file will be saved on the selected device. CAUTION The MOTIF XS or the selected storage device should never be turned off during recording or while the recorded audio file is being saved. Turning off either device at this time may make it impossible to subsequently access the storage device. Playing an audio file Using the MOTIF XS, you can now playback WAV and AIFF audio files stored on a USB storage device or a networked computer 1 If you want to play an audio file on a USB storage device, connect it to the USB TO DEVICE connector on the rear panel. Alternatively, if you want to play an audio file on a networked computer, setup File Sharing for accessing the computer from the instrument as described in "Network connection" on page 86 of the Owner's Manual. 2 Press the [FILE] button and then the [F4] Audio button. The File mode Audio display will appear. 3 Select the device and the file to be played using the cursor [L][M] buttons together with the data dial and the [DEC/ 1 NO] and [INC/YES] buttons. Select the device connected in Step 1 above using the Device section (1), and set the audio file for playback using the Directory 2 section (2). 4 Press the [SF2] Play button. The audio file will begin playing. 5 If necessary, you can adjust the playback volume using the data dial or the [DEC/NO] and [INC/YES] buttons. 6 To stop playback, press the [SF2] Stop button, the [ENTER] button, or the [EXIT] button. Operation will return to the File mode Audio display.
-
 1
1 -
 2
2 -
 3
3 -
 4
4 -
 5
5 -
 6
6
 |
 |