Yamaha YHT-685 Quick Connect Guide - Page 2
DSS/Cable/HDTV
 |
View all Yamaha YHT-685 manuals
Add to My Manuals
Save this manual to your list of manuals |
Page 2 highlights
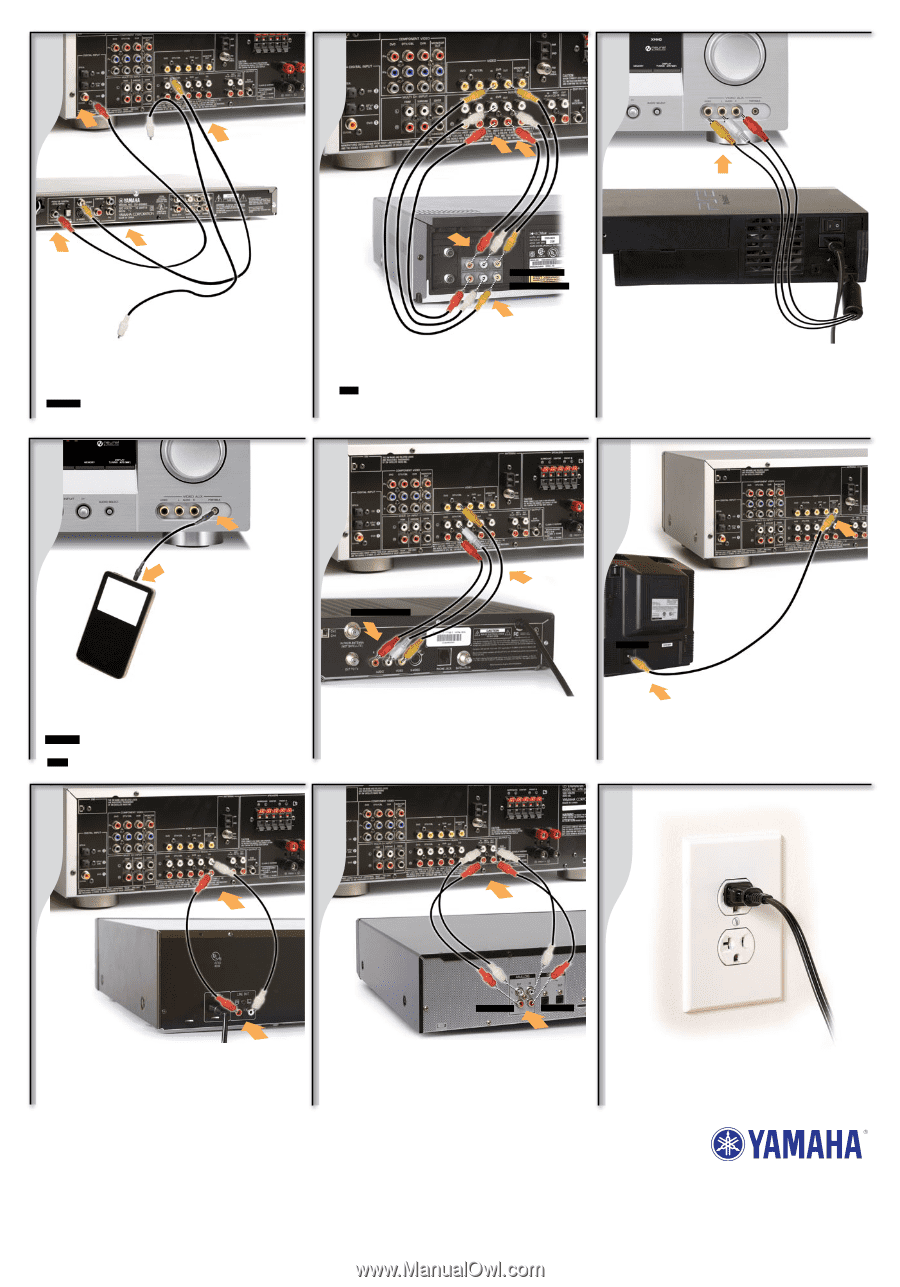
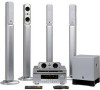
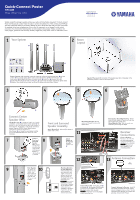
14 HTR-6030 Receiver 15 HTR-6030 Receiver 16 HTR-6030 Receiver DV-S5860SL DVD Player DVD Player Connection Connect DVD Player Top: Connect RCA audio/video cables I to receiver: Yellow to "DVD," Red to "Digital Input DVD Coaxial" as shown, and leave White unplugged. Bottom: Connect audio/video cables to DVD player from receiver: Yellow to "Video", Red to "Coaxial", and leave White unplugged. WARNING Components must not be plugged in while connecting them. Wait until all connections are made before plugging in your components. AUDIO/VIDEO IN AUDIO/VIDEO OUT VCR VCR Connection Connect VCR (optional) Connect audio/video cables (not included) as shown. NOTE VCR shown is for illustration purposes only. When using a hi-fistereo VCR, set the Tuner/Line switch on the VCR to "Line" position to record from another source connected to the HTR-6030 receiver. Video Game Console Audio/Video OUT Video Game Console Connection Connect Game Console or Video Camera (optional) Connect RCA audio/video cables (not included) as shown. 17 18 19 HTR-6030 Receiver MP3 Player MP3 Player Connection Connect MP3 Player (optional) Connect a 3.5 mm stereo mini cable (not included) from line out or headphone jack of the MP3 player to the portable input on the receiver as shown. WARNING MP3 player volume must be turned down to half before connecting. Consult the MP3 player's Owner's Manual for further instructions. NOTE The PORTABLE mini jack input takes priority over the AUDIO L/R jacks. HTR-6030 Receiver AUDIO/VIDEO OUT DSS/Cable/HDTV Tuner Box DSS/Cable/HDTV Tuner Connection Connect DSS/Cable/HDTV Tuner Box (optional) Connect RCA audio/video cables (not included) and optional optical cable (not pictured) to "DTV/CBL" terminals on receiver to A/V OUT connections on Box as shown. HTR-6030 Receiver VIDEO IN Video Monitor Video Monitor Connection Connect a Video Monitor (optional) Connect an RCA video cable (not included) to receiver Monitor OUT from your video monitor as shown. 20 21 22 HTR-6030 Receiver HTR-6030 Receiver CD Player Connection CD Player Connect CD Player (optional) Connect RCA audio cables (not included) to "CD" terminals on receiver as shown. If your CD Player has digital output terminal, connect digital cable (not included) to HTR-6030 Receiver Digital Input terminal. See your HTR-6030 Owner's Manual for more information. AUDIO OUT AUDIO IN MD/CD-R Player Connection MD/CD-R Recorder Connect MD/CD-R Recorder (optional) Connect RCA audio cables (not included) to "MD/CD-R" terminals on receiver as shown. Plug In receiver and other components. Power on the receiver first, and the other components next. Adjust volume on the receiver. Please see each of your respective Owner's Manuals for recommended guidelines and settings. Part No. 685QCP 03/07 Enjoy the Yamaha Home Theater Experience Be sure to put batteries in your remotes (see Owner's Manuals for instructions). Refer to your Owner's Manuals for each component in your system for more information. Now, relax and enjoy the unparalleled sound of your Yamaha Home Theater system. YAMAHA ELECTRONICS CORPORATION, USA 6660 Orangethorpe Avenue Buena Park, CA 90620 http://www.yamaha.com Phone: 1-800-292-2982 ©2007 Yamaha Electronics Corporation Printed in USA
-
 1
1 -
 2
2
 |
 |