Yamaha YM-4900A Owner's Manual - Page 11
Insert the rails 1 and 4 into the end frames of the legs.
 |
View all Yamaha YM-4900A manuals
Add to My Manuals
Save this manual to your list of manuals |
Page 11 highlights
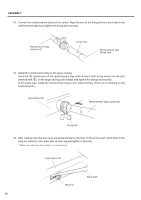
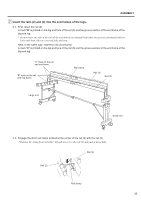
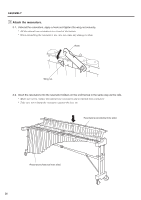
ASSEMBLY v Insert the rails (1) and (4) into the end frames of the legs. 4-1. Insert the outer rails (1) and (4) in the same way as the inner rails (2) and (3). A mark "A" is printed on the big end face of the rail (1) and the groove section of the end frame of the big end leg, and a mark "D" for the rail (4). "D" mark on the rail and end frame. "A" mark on the rail and end frame. Rail (4) Rail (1) Large end Small end 4-2. Engage the rail clamps on rail (2) and rail (3) with rail (1) and rail (4) respectively. Rail clamp YM-5100A Only 4-3. Secure the resonators by fitting their hooks to the rail clamps engaged in Step 4-2. * Hooks are provided at 2 locations both on the natural tone side and the accidental tone side. * Make sure that each hook is securely fitted. Rail (1) Hook Rail (2) 27
-
 1
1 -
2
-
3
-
4
-
5
-
 6
6 -
 7
7 -
 8
8 -
 9
9 -
 10
10 -
 11
11 -
 12
12 -
 13
13 -
 14
14
 |
 |
