Yamaha YSP-3050 Owner's Manual - Page 118
Carry out the AUTO SETUP IntelliBeam, Enjoying surround sound, About the IntelliBeam microphone
 |
UPC - 027108930282
View all Yamaha YSP-3050 manuals
Add to My Manuals
Save this manual to your list of manuals |
Page 118 highlights
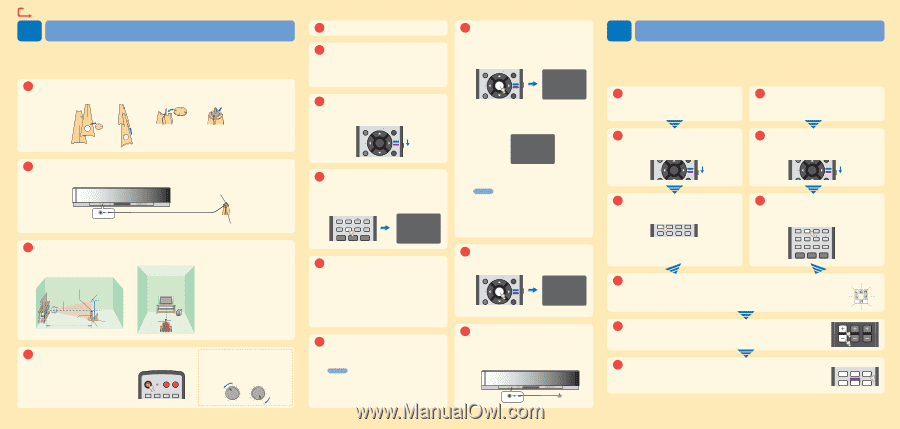
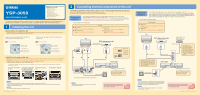
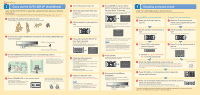
Continued from the front 3 Carry out the AUTO SETUP (IntelliBeam) Carry out the AUTO SETUP to adjust the settings that best match your listening environment. The IntelliBeam technology allows you to achieve sound adjustments that best match your listening environment. It is normal for loud test tones to be output during the AUTO SETUP procedure. Make sure that there are no children around in the listening room while the AUTO SETUP procedure is in progress. 1 Assemble the cardboard microphone stand. Place the IntelliBeam microphone on top of cardboard microphone stand as shown below. 1 2 3 4 2 Connect the supplied IntelliBeam microphone to the INTELLIBEAM MIC jack on the front panel. IntelliBeam microphone (supplied) INTELLIBEAM MIC Cardboard microphone stand (supplied) 3 Set the IntelliBeam microphone at your normal listening position. Use the supplied cardboard microphone stand or a tripod to place the IntelliBeam microphone at the same height as your ears would be when you are seated. IntelliBeam microphone Center height of this unit Upper bound position of the microphone Place the IntelliBeam microphone on the extended center line of this unit and 1.8 m (6.0 ft) or more away from it. Also, make sure place the IntelliBeam microphone within 1 m (3.3 ft) upper or lower from the center height of this unit. Within 1 m (3.3 ft) Cardboard microphone stand More than 1.8 m (6.0 ft) Within 1 m (3.3 ft) Listening position Lower bound position of the microphone Center line Cardboard microphone stand IntelliBeam microphone 4 Press STANDBY/ON on the remote control. The power of this unit turns on. Before operations, insert batteries into the remote control (see page 24 in the Owner's Manual). If necessary, adjust the volume level of this unit. STANDBY/ON POWER POWER TV AV DVD AUX1 DOCK AUX2 AUX3 INPUT1 TV MACRO If you have connected the subwoofer, set the volume and crossover/high cut frequency. Refer to the "Notes" on page 30 in the Owner's Manual. Subwoofer VOLUME CROSSOVER/ HIGH CUT MIN MAX MIN MAX 5 Turn on the power of your TV. 6 Select the appropriate video input on your TV. If the OSD video pin cable is connected to the video input 1 on the TV as shown in the connection example 1, switch the video input to "1". 7 Set the operation mode selector to YSP. This unit switches to the YSP operation mode. ENHANCER ENTRY MENU CAT/ A-E DISPLAY ENTER TV/AV YSP RETURN 8 Press and hold AUTO SETUP for more than 2 seconds. The menu screen appears on the TV. If the menu screen does not appear, check the OSD video pin cable (see the connection example on the front page). PRESET/TUNE SEARCH MEMORY FM/XM CAT AUTO VOL MODE SETUP INPUTMODE SLEEP 5BEAM 1 ST+3BEAM 2 3BEAM 3 AUTO SETUP PREPARATION & CHECK Please connect the MIC. Please place the MIC at least 1.8m/6ft away from the YSP unit. The MIC should be set at ear level when seated. Measurement takes about 3min. After [ENTER] is pressed, please leave the room. [ENTER]:Start [RETURN]:Cancel 9 Check the following points. About the IntelliBeam microphone • Is the microphone placed on an imaginary center line drawn from this unit? • Is the microphone placed within 1 m (3.3 ft) upper or lower from the center height of this unit? • Is the microphone placed more than 1.8 m (6.0 ft) from the front of this unit? About the room environment • Is your listening room kept as quiet as possible? 10 Prepare to leave the room. The best setting may not be done if you are in the room. Prepare to leave the room in 10 seconds after pressing ENTER in step 11. y Hint • When leaving the room, bring this guide with you. • Wait outside the room during the AUTO SETUP procedure. • The AUTO SETUP procedure takes about 3 minutes. • To cancel the AUTO SETUP procedure after it is started, press RETURN. 11 Press ENTER to start the AUTO SETUP procedure, and then leave the room within 10 seconds. The following screen appears on the TV. Leave the room within 10 seconds before the AUTO SETUP procedure starts. ENHANCER ENTRY MENU CAT/ A-E DISPLAY ENTER TV/AV YSP RETURN AUTO SETUP START Will begin in 20sec Please leave the room **-------[RETURN]:Cancel The setup screen automatically changes during the AUTO SETUP procedure. When the AUTO SETUP procedure is completed, the following screen appears on the TV. SHOW RESULT MEASUREMENT COMPLETE BEAM MODE :5 BEAM SUBWOOFER :NOT APPLICABLE [ENTER]:Save set-up [RETURN]:Do not save set-up If "ENVIRONMENT CHECK (FAILED) is displayed, see page 34 in the Owner's Manual and then run the procedure again. y Hint • The result may differ depending on the environment. • If any error occurs, the corresponding error message appears on the screen. In this case, see "Error messages for AUTO SETUP" on page 35 in the Owner's Manual and then follow the instructions. To start the AUTO SETUP procedure once again, press RETURN. 12 Press ENTER. The following screen appears on the TV for 2 seconds and then the menu screen disappears from the TV. ENHANCER ENTRY MENU CAT/ A-E DISPLAY ENTER TV/AV YSP RETURN AUTO SETUP COMPLETE Please remove the MIC from the YSP and the listening position. 13 Disconnect the IntelliBeam microphone. The AUTO SETUP has completed. Keep the IntelliBeam microphone in a safe place. The settings are automatically saved in the system memory. INTELLIBEAM MIC 4 Enjoying surround sound Enjoy TV or DVD digital audio in surround sound. For instructions on how to operate or set your TV or DVD player/recorder, refer to the owner's manual supplied with each component. Enjoying DVDs in surround sound 1 Select the DVD video input on your TV. Enjoying TV in surround sound 1 Select the TV channel using the remote control supplied with your TV. Mute the volume on the TV. 2 Set the operation mode selector to YSP. This unit switches to the YSP operation mode. CAT/ A-E DISPLAY ENTER TV/AV YSP RETURN 2 Set the operation mode selector to YSP. This unit switches to the YSP operation mode. CAT/ A-E DISPLAY ENTER TV/AV YSP RETURN 3 1) Press DVD on the remote control of this unit. This unit switches to the DVD playback mode. DVD STB AUX1 AUX2 AUX3 TV INPUT1 MACRO TV PRESET/TUNE SEARCH MEMORY 2) Play back the supplied demonstration DVD on the DVD player/recorder. 3 Press TV on the remote control of this unit. This unit switches to the TV playback mode. TV INPUT1 MACRO STB TV PRESET/TUNE SEARCH MEMORY FM/XM CAT AUTO VOL MODE SETUP INPUTMODE SLEEP 5BEAM 1 ST+3BEAM 2 3BEAM 3 4 Check the digital signal being output at this unit. The input channel indicators (see page 8 in the Owner's Manual) are lit in the front panel display, and they switch according to the channel composition of the corresponding input source. If the sound is output from your TV speakers, mute the volume on your TV. For details about digital audio input signals, see page 58 in the Owner's Manual. Input channel indicators 5 Press VOLUME +/- on the remote control to adjust the volume level of this unit. VOLUME CH TV VOL MUTE TV INPUT TV MUTE 6 Press one of the beam mode buttons on the remote control to select the desired beam mode. Select one of the six beam modes that best matches the current input source of this unit. For further information on the beam modes, see pages 56, 57, 62, 63 and 64 in the Owner's Manual. 5BEAM 1 ST+3BEAM 2 3BEAM 3 STEREO 4 MY BEAM 5 MY SUR. 6 To fine-tune the listening environment parameters manually or make advanced settings for speaker positions, sound beams, etc., see "MANUAL SETUP" on page 74 in the Owner's Manual.
-
 1
1 -
2
-
3
-
4
-
5
-
6
-
7
-
8
-
9
-
10
-
11
-
12
-
13
-
14
-
15
-
16
-
17
-
18
-
19
-
20
-
21
-
22
-
23
-
24
-
25
-
26
-
27
-
28
-
29
-
30
-
31
-
32
-
33
-
34
-
35
-
36
-
37
-
38
-
39
-
40
-
41
-
42
-
43
-
44
-
45
-
46
-
47
-
48
-
49
-
50
-
51
-
52
-
53
-
54
-
55
-
56
-
57
-
58
-
59
-
60
-
61
-
62
-
63
-
64
-
65
-
66
-
67
-
68
-
69
-
70
-
71
-
72
-
73
-
74
-
75
-
76
-
77
-
78
-
79
-
80
-
81
-
82
-
83
-
84
-
85
-
86
-
87
-
88
-
89
-
90
-
91
-
92
-
93
-
94
-
95
-
96
-
97
-
98
-
99
-
100
-
101
-
102
-
103
-
104
-
105
-
106
-
107
-
108
-
109
-
110
-
111
-
112
-
 113
113 -
 114
114 -
 115
115 -
 116
116 -
 117
117 -
 118
118
 |
 |