Yamaha YST-M40 Owner's Manual - Page 6
Controls & Connectors, OUTPUT ADJ. VOL - speaker
 |
View all Yamaha YST-M40 manuals
Add to My Manuals
Save this manual to your list of manuals |
Page 6 highlights
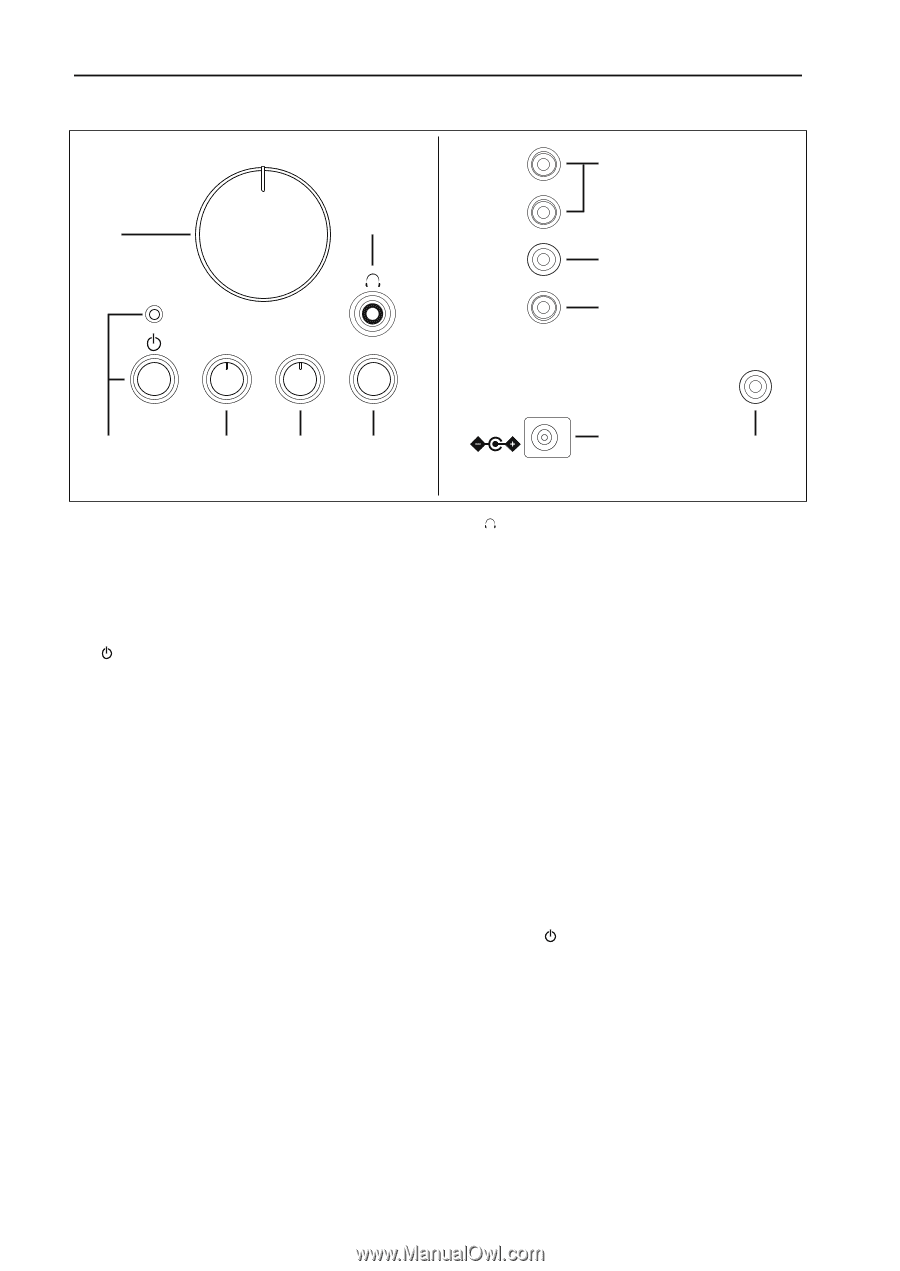
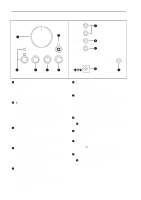
Controls & Connectors Front INPUT 1 7 Rear 1 6 VOLUME BASS TREBLE 3D SURROUND 2 3 4 5 (Right speaker) 1 VOLUME control Allows you to adjust the volume level of the entire speaker system. Rotating the control clockwise will increase the volume level, and rotating the control counterclockwise will decrease the level. 2 (standby/on) button/indicator Press this button to turn on the power to the speaker system. Its indicator lights up. Press the button again to set the speaker system to standby mode. Before pressing this button, make sure that the VOLUME control setting is lowered. A small electrical current flows through the speaker system even if the standby/on button is turned off. 3 BASS control Allows you to adjust the volume level of the low range. Rotating the control clockwise will increase the volume level, and rotating the control counterclockwise will decrease the level. 4 TREBLE control Allows you to adjust the volume level of the high range. Rotating the control clockwise will increase the volume level, and rotating the control counterclockwise will decrease the level. 5 3D SURROUND switch Turn this switch on to add 3D surround sound to the stereo source sound. Press the switch to turn on the surround effect. Press it again to turn off the effect. This setting does not simulate the surround effect through the headphones. E-3 INPUT 2 TO LEFT SPEAKER OUTPUT (ADJ.VOL) 8 9 TO RIGHT SPEAKER DC 15V 0 A (Right speaker) (Left speaker) 6 Headphone jack Connect a pair of stereo headphones here to monitor the sound. When you connect the headphones, the speakers will not output sound. 7 INPUT 1/2 You can input two audio sources to the speaker system from these input jacks simultaneously. For example, you can connect the output of a CD player and a personal computer here. The two audio sources are mixed together by the speaker system. 8 TO LEFT SPEAKER (on the right speaker) Use the RCA plug cable to connect this jack to the ATO RIGHT SPEAKER jack on the right speaker to this connector. 9 OUTPUT (ADJ. VOL) Use a 3.5mm stereo mini plug cable to connect this jack to a subwoofer to reinforce the low range. 0 DC connector Connect the included AC adaptor to this connector. Press the (standby/on) button on the right speaker to turn the power on or standby. A TO RIGHT SPEAKER (on the left speaker) Use the RCA plug cable to connect this jack to the 8TO LEFT SPEAKER jack on the right speaker to this connector.
-
 1
1 -
 2
2 -
 3
3 -
 4
4 -
 5
5 -
 6
6 -
 7
7 -
 8
8 -
 9
9
 |
 |