Yamaha YVS-100 Venova YVS-100 Owners Manual - Page 8
After Playing, Instrument Maintenance after, Playing, Putting the Instrument in
 |
View all Yamaha YVS-100 manuals
Add to My Manuals
Save this manual to your list of manuals |
Page 8 highlights
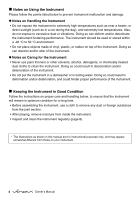
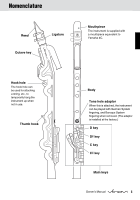
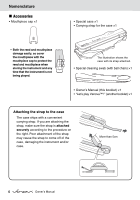
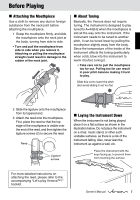
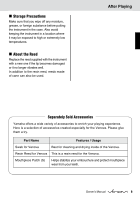
After Playing Instrument Maintenance after Playing After playing, always loosen the ligature and remove the reed from the mouthpiece then wipe dry with gauze. Remove the ligature from the mouthpiece as well. • Take care not to damage the end of the mouthpiece. Remove the mouthpiece from the instrument and clean the inside of the mouthpiece with a soft cloth. Clean the inside of the instrument with the supplied cleaning swab. • Turn and pull the mouthpiece from side to side when you remove it. Attaching or pulling the mouthpiece straight could result in damage to the rubber of the neck joint. Using the Cleaning Swab 1 Insert the end of ball chain of the swab into the body from the neck joint of the instrument. 2 Gently shake the instrument so that the ball chain comes out of the opposite end. 3 Pull on the ball chain gently so that the cleaning swab can remove moisture and dirt from the inside of the body. • Pulling the cleaning swab too fast can result in the swab becoming stuck in the body. Use a soft cloth to wipe the instrument's surface. Take care to avoid applying excessive force on the keys. Both the mouthpiece and body are washable. After washing, please use a cleaning swab or a soft cloth to thoroughly remove moisture. Putting the Instrument in the Case When placing the instrument in the case, refer to page 7 and make sure that the mouthpiece is attached straight onto the body. Make sure that the mouthpiece is properly attached to avoid the possibility of damage to the instrument. A A Make sure that the mouthpiece is attached straight onto the body. The slide locks on the case lid (A) slightly protrude from the case. Take care that your clothing or the cleaning swab do not get caught hooked on one of the locks and cause the case or instrument to fall. • Always keep the cleaning swab clean and dry. 8 Owner's Manual
-
 1
1 -
2
-
 3
3 -
 4
4 -
 5
5 -
 6
6 -
 7
7 -
 8
8 -
 9
9 -
 10
10
 |
 |