Yamaha YWA-10 YWA-10 Wireless Network Adapter Owners Manual - Page 1
Yamaha YWA-10 Manual
 |
View all Yamaha YWA-10 manuals
Add to My Manuals
Save this manual to your list of manuals |
Page 1 highlights
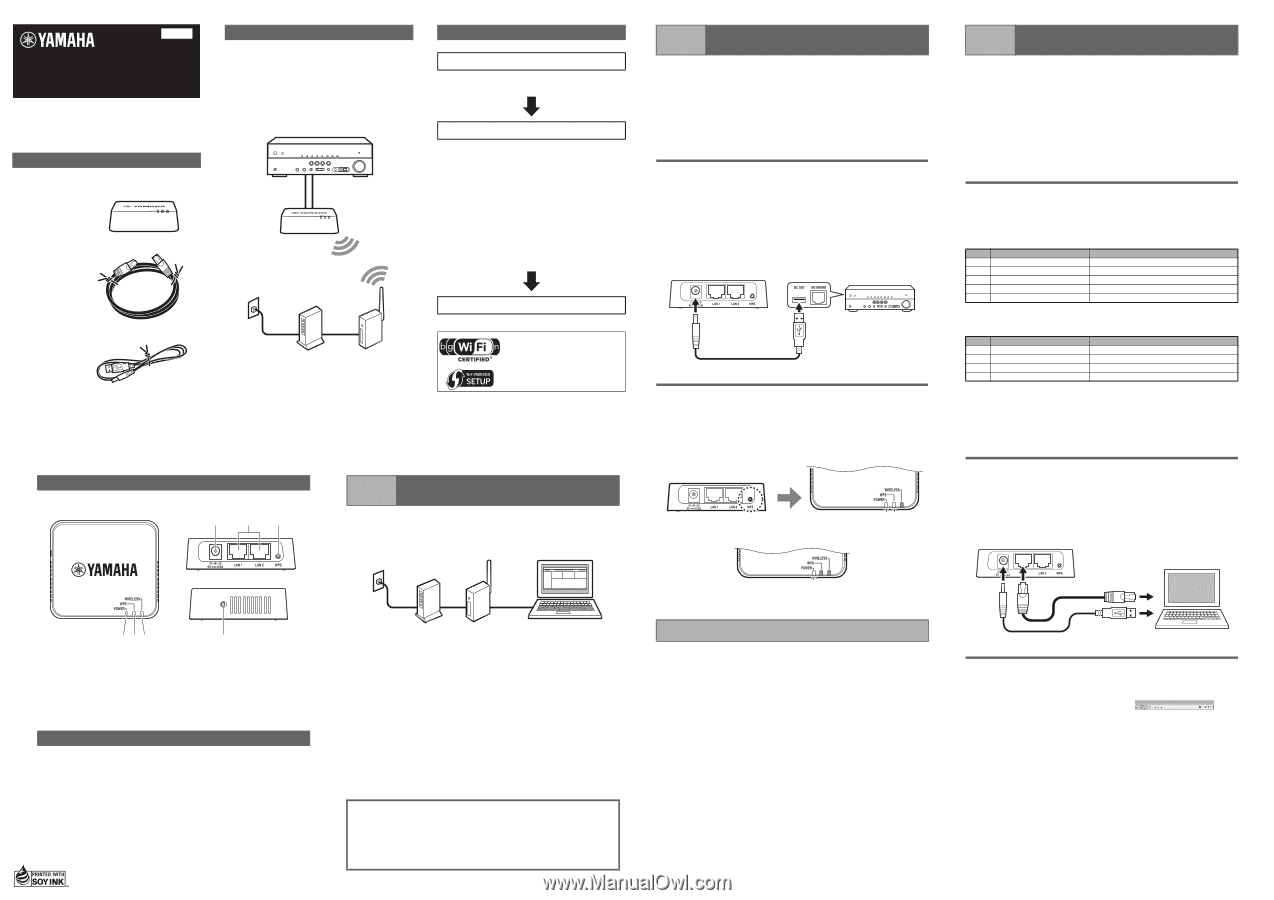
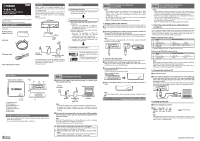
YWA-10/EN-1 English YWA-10 Wireless Network Adapter Owner's Manual © 2012 Yamaha Corporation Printed in China To assure the finest performance, please read this manual carefully. Keep it in a safe place for future reference. Package contents Check that the following accessories are supplied with the product. Wireless Network Adapter (this unit) Features Allows Yamaha AV products equipped with a NETWORK port and a DC OUT jack to be connected with a wireless LAN. Compatible devices can connect to the YWA-10 through a USB connector instead of a DC OUT jack. Refer to the website below for a list of compatible devices. http://yamaha.com/ AV Receiver YWA-10 LAN cable Setup procedure Checking the base unit • Check that the Wireless LAN router (base unit) can connect to the Internet. Connecting to the base unit • When the Wireless LAN router (base unit) has a WPS button ^ Carry out the procedures in "Step 2-A Connecting to the base unit (using WPS)" to connect to the base unit. • When the Wireless LAN router (base unit) does not have a WPS button ^ Carry out the procedures in "Step 2-B Connecting to the base unit (manual configuration)" to connect to the base unit. ✻ If connecting using "(using WPS)" does not succeed, refer to "(manual configuration)" and configure the connection. USB power cable Owner's Manual (this manual) Modem Internet connection Wireless LAN router (base unit) The firmware of this unit may be updated at times for improvement. Please refer to the following website for information on firmware updates. http://yamaha.com/ Connecting to an AV product The Wi-Fi CERTIFIED Logo is a certification mark of the Wi-Fi Alliance. The Wi-Fi Protected Setup Mark is a mark of the Wi-Fi Alliance. Part names Upper surface of product Rear d ef Side Step 1 Checking the base unit a Check that the wireless LAN router (base unit) can connect to the Internet without difficulty. Internet connection Internet connectivity abc g a POWER indicator b WPS indicator c WIRELESS indicator d Power connector e LAN1 port, LAN2 port f WPS button g Reset button Things to check before setup • If you do not already have an Internet connection, please apply for one before setting up this unit. • Do not connect the USB power cable to a USB hub. Modem Wireless LAN router (base unit) Computer Notes • If you do not currently have an Internet subscription, please obtain one. • A wireless LAN router is required to set up a connection using this procedure. Please obtain a wireless LAN router if you do not have one available. b Check whether the wireless LAN router (base unit) is WPS compatible. Check the owner's manual and other documentation supplied with the wireless LAN router. Note WPS (Wi-Fi Protected Setup) is a function that uses a button to configure connections and security on wireless LAN devices. *Some Wi-Fi devices have "WPS" written on them. W When the wireless LAN router (base unit) has a WPS button Carry out "Step 2-A Connecting to the base unit (using WPS)", and then "Step 3 Connecting to an AV product", in that order. W When the wireless LAN router (base unit) does not have a WPS button Carry out "Step 2-B Connecting to the base unit (manual configuration)", and then "Step 3 Connecting to an AV product", in that order. Step 2-A Connecting to the base unit (using WPS) Notes • This explanation details the procedure for connecting using the WPS function. When using a base unit that is not equipped with a WPS function, refer to "Step 2-B Connecting to the base unit (manual configuration)" at right. • You will need to change the IP address of this unit if you are using more than one YWA-10 at the same time. Refer to "Troubleshooting" on the reverse page for more details. 1. Supply power to the YWA-10 a Turn on the power of the AV product that you wish to connect this unit to. b Use the supplied USB power cable to connect the power connector on this unit to the DC OUT jack on the AV product. The indicator on the front panel of this unit lights. Wait for approximately one minute after the indicator lights and then carry out the following procedure. Note If the AV product is not equipped with a DC OUT jack, connect to the USB connector on the front panel. Rear Panel AV Receiver 2. Connect the base unit a Press the WPS button on the wireless LAN router (base unit). Refer to the owner's manual of the wireless LAN router (base unit) for information on how to use the WPS button. b Press and hold the WPS button on the rear of this unit for more than 5 seconds and release it. The WPS indicator on the front panel lights. Press and hold for more than 5 seconds. c Wait until the WPS indicator turns off (this will take two minutes at most). Note If the WPS indicator blinks, carry out procedure 2 again, starting at number a. This completes connection with the base unit. Proceed to "Step 3 Connecting to an AV product". Step 2-B Connecting to the base unit (manual configuration) Notes • When making a manual connection to the base unit, or when you are unable to connect using the procedure described in "Step 2-A Connecting to the base unit (using WPS)" at left, refer to the explanation below. • If the PC you are using to configure this unit is connected to the wireless LAN, turn the PC's wireless LAN function off. • You will need to change the IP address of this unit if you are using more than one YWA-10 at the same time. Refer to "Troubleshooting" on the reverse page for more details. 1. Check the network that you are attempting to connect to. You will need the setting information from the wireless LAN router (base unit) when connecting or setting up this unit. Have the following table ready for use. * Refer to the owner's manual of the wireless LAN router (base unit) for information on how to check its wireless LAN settings. ■ When using WEP security settings Name (1) SSID (2) Security mode (3) Security key type (4) Default key (5) Password Wireless LAN setting ❑ Open ❑ Shared ❑ Hexadecimal*1 ❑ ASCII*2 ❑ Key 1 ❑ Key 2 ❑ Key 3 ❑ Key 4 *1: 16-digit number (0-9, A-F), *2: ASCII (0-9, A-Z, a-z) ■ When using WPA/WPA2 security settings Name (1) SSID (2) Security mode (3) Encryption type (4) Password Wireless LAN setting ❑ WPA-PSK ❑ TKIP ❑ WPA2-PSK ❑ AES Note Use only alpha-numeric characters (0-9, A-Z, a-z) for an SSID or password. Otherwise, Yamaha cannot guarantee normal operation. Refer to the owner's manual of the wireless LAN router (base unit) for information on how to change the SSID or password. 2. Connect this unit to a PC a Turn the PC power on. b Use the supplied LAN cable to connect the LAN1 port (or the LAN2 port) on this unit to the LAN port on the PC. Then, use the supplied USB power cable to connect the power connector on this unit to the USB connector on the PC. The indicator on the front panel of this unit lights. Wait for approximately one minute after the indicator lights and then carry out the following procedure. 3. Setting up this unit a Start the web browser on the PC. b Enter "ywa.setup" in the address field in the Web browser, and press the Enter key. Note If the login screen does not appear even after you enter "ywa.setup", enter "192.168.1.249" and press the Enter key. If the login screen still does not appear, refer to "Troubleshooting". Continues to the back side.
-
 1
1 -
 2
2
 |
 |