Zanussi ZBM26542BA Product Manaul - Page 25
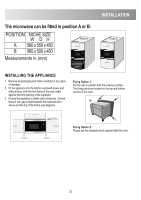
The microwave can be fitted in position A or B
 |
View all Zanussi ZBM26542BA manuals
Add to My Manuals
Save this manual to your list of manuals |
Page 25 highlights
INSTALLATION The microwave can be fitted in position A or B: POSITION NICHE SIZE W DH A 560 x 550 x 450 B 560 x 500 x 450 Measurements in (mm) Position A Conventional oven Position B D INSTALLING THE APPLIANCE 1. Remove all packaging and check carefully for any signs of damage. 2. Fit the appliance into the kitchen cupboard slowly, and without force, until the front frame of the oven seals against the front opening of the cupboard. 3. Ensure the appliance is stable and not leaning. Ensure that a 4 mm gap is kept between the cupboard door above and the top of the frame (see diagram). Fixing Option 1: Fix the oven in position with the screws provided. The fixing points are located on the top and bottom corners of the oven. 4 mm 4 mm 4 mm Fixing Option 2: Please see the template sheet supplied with this oven. 25
-
 1
1 -
2
-
3
-
4
-
5
-
6
-
7
-
8
-
9
-
10
-
11
-
12
-
13
-
14
-
15
-
16
-
17
-
18
-
19
-
 20
20 -
 21
21 -
 22
22 -
 23
23 -
 24
24 -
 25
25 -
 26
26 -
 27
27 -
 28
28 -
 29
29 -
 30
30 -
31
-
32
 |
 |
