ZyXEL ES1100-16P User Guide - Page 18
Rack Mounting, Rack-mounted Installation Requirements, Precautions
 |
View all ZyXEL ES1100-16P manuals
Add to My Manuals
Save this manual to your list of manuals |
Page 18 highlights
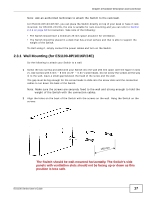
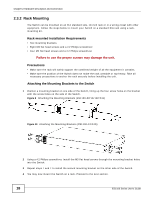
Chapter 2 Hardware Description and Connection 2.3.2 Rack Mounting The Switch can be mounted on an EIA standard size, 19-inch rack or in a wiring closet with other equipment. Follow the steps below to mount your Switch on a standard EIA rack using a rackmounting kit. Rack-mounted Installation Requirements • Two mounting brackets. • Eight M3 flat head screws and a #2 Philips screwdriver. • Four M5 flat head screws and a #2 Philips screwdriver. Failure to use the proper screws may damage the unit. Precautions • Make sure the rack will safely support the combined weight of all the equipment it contains. • Make sure the position of the Switch does not make the rack unstable or top-heavy. Take all necessary precautions to anchor the rack securely before installing the unit. Attaching the Mounting Brackets to the Switch 1 Position a mounting bracket on one side of the Switch, lining up the four screw holes on the bracket with the screw holes on the side of the Switch. Figure 9 Attaching the Mounting Brackets (ES1100-8P/16/16P/24E) Figure 10 Attaching the Mounting Brackets (ES1100-24/24G) 2 Using a #2 Philips screwdriver, install the M3 flat head screws through the mounting bracket holes into the Switch. 3 Repeat steps 1 and 2 to install the second mounting bracket on the other side of the Switch. 4 You may now mount the Switch on a rack. Proceed to the next section. 18 ES1100 Series User's Guide
-
 1
1 -
2
-
3
-
4
-
5
-
6
-
7
-
8
-
9
-
10
-
11
-
12
-
 13
13 -
 14
14 -
 15
15 -
 16
16 -
 17
17 -
 18
18 -
 19
19 -
 20
20 -
 21
21 -
 22
22 -
 23
23 -
24
-
25
-
26
-
27
-
28
-
29
-
30
 |
 |
