ZyXEL GS1100-24E User Guide - Page 11
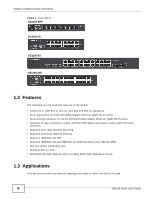
Transceiver Removal, - switch
 |
View all ZyXEL GS1100-24E manuals
Add to My Manuals
Save this manual to your list of manuals |
Page 11 highlights
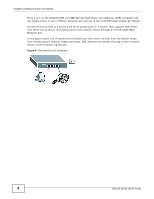
Chapter 2 Hardware Description and Connection 2 Press the transceiver firmly until it clicks into place. 3 The Switch automatically detects the installed transceiver. Check the LEDs to verify that it is functioning properly. 4 Close the transceiver's latch (latch styles vary). 5 Connect the fiber optic cables to the transceiver. Figure 6 Transceiver Installation Example Figure 7 Connecting the Fiber Optic Cables 2.2.3.2 Transceiver Removal Use the following steps to remove a SFP module. 1 Remove the fiber optic cables from the transceiver. 2 Open the transceiver's latch (latch styles vary). 3 Pull the transceiver out of the slot. Figure 8 Removing the Fiber Optic Cables Figure 9 Opening the Transceiver's Latch Example GS1100 Series User's Guide 11
-
 1
1 -
2
-
3
-
4
-
5
-
 6
6 -
 7
7 -
 8
8 -
 9
9 -
 10
10 -
 11
11 -
 12
12 -
 13
13 -
 14
14 -
 15
15 -
 16
16 -
17
-
18
-
19
-
20
-
21
-
22
-
23
-
24
 |
 |
