ZyXEL NAS326 User Guide - Page 127
Table 52, Label, Description
 |
View all ZyXEL NAS326 manuals
Add to My Manuals
Save this manual to your list of manuals |
Page 127 highlights
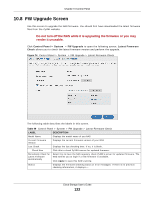
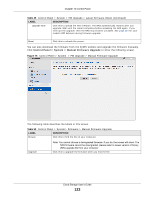
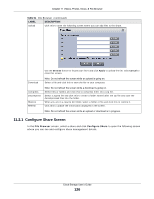
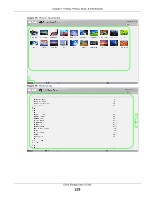
Chapter 11 Videos, Photos, Music, & File Browser Figure 77 File Browser > Configure Share The following table describes the labels in the this screen. Table 52 File Browser > Configure Share LABEL DESCRIPTION Share Name Configure a name to identify this share. Type a share name from 1 to 239 single-byte (no Chinese characters allowed for example) ASCII characters. The name cannot be the same as another existing local share. See Section 11.2.2 on page 128 for more information on share names. This is not configurable for the NAS's default admin, music, photo, public, and video shares. Volume This shows the volume the share is on. It is read-only. Make this share owned by Select the administrator or user account that is to own (manage) this share. The share owner controls access rights to the share. This is not configurable for the NAS's default admin and public shares. Enable This Share Select this option to allow users to access this share. When this option is not selected, you cannot see and access this share. Enable Recycle Bin Select this option to keep deleted items in a recycle bin. When you delete an item, a recycle folder is created within the share, and the deleted item is stored in the recycle bin. Later if you want to retrieve a deleted item, you can select the item from the recycle folder and move/copy the item to another share. Publish this share Select this option to make the share's files available to media clients. When you publish a to Media Server share, you can also select whether or not to publish music tracks, photos, and videos. Publish this share Select this option to let people use a web browser to access this share's files without to Web logging into the Web Configurator screens. Share Access Select who can access the files in the share and how much access they are to be given. If you publish the share to the media server or the web, all users will have at least readonly access to the share, regardless of what you configure here. Select Keep it private to owner to allow only the share owner to read files in the share, delete files in the share and save files to the share. Select Make it public to allow anyone (with or without a user account on the NAS) to read files in the share, delete files in the share and save files to the share. Apply Cancel Select Advanced to select which individual users can read the share's files, which users can delete the share's files, and which users are blocked from doing either. Click this to save your changes. Click this to return to the previous screen without saving. Cloud Storage User's Guide 127
-
 1
1 -
2
-
3
-
4
-
5
-
6
-
7
-
8
-
9
-
10
-
11
-
12
-
13
-
14
-
15
-
16
-
17
-
18
-
19
-
20
-
21
-
22
-
23
-
24
-
25
-
26
-
27
-
28
-
29
-
30
-
31
-
32
-
33
-
34
-
35
-
36
-
37
-
38
-
39
-
40
-
41
-
42
-
43
-
44
-
45
-
46
-
47
-
48
-
49
-
50
-
51
-
52
-
53
-
54
-
55
-
56
-
57
-
58
-
59
-
60
-
61
-
62
-
63
-
64
-
65
-
66
-
67
-
68
-
69
-
70
-
71
-
72
-
73
-
74
-
75
-
76
-
77
-
78
-
79
-
80
-
81
-
82
-
83
-
84
-
85
-
86
-
87
-
88
-
89
-
90
-
91
-
92
-
93
-
94
-
95
-
96
-
97
-
98
-
99
-
100
-
101
-
102
-
103
-
104
-
105
-
106
-
107
-
108
-
109
-
110
-
111
-
112
-
113
-
114
-
115
-
116
-
117
-
118
-
119
-
120
-
121
-
 122
122 -
 123
123 -
 124
124 -
 125
125 -
 126
126 -
 127
127 -
 128
128 -
 129
129 -
 130
130 -
 131
131 -
 132
132 -
133
-
134
-
135
-
136
-
137
-
138
-
139
-
140
-
141
-
142
-
143
-
144
-
145
-
146
-
147
-
148
-
149
-
150
-
151
-
152
-
153
-
154
-
155
-
156
-
157
-
158
-
159
-
160
-
161
-
162
-
163
-
164
-
165
-
166
-
167
-
168
-
169
-
170
-
171
-
172
-
173
-
174
-
175
-
176
-
177
-
178
-
179
-
180
-
181
-
182
-
183
-
184
-
185
-
186
-
187
-
188
-
189
-
190
-
191
-
192
-
193
-
194
-
195
-
196
-
197
-
198
-
199
-
200
-
201
-
202
-
203
-
204
-
205
-
206
-
207
-
208
-
209
-
210
-
211
-
212
-
213
-
214
-
215
-
216
-
217
-
218
-
219
-
220
-
221
-
222
-
223
-
224
-
225
-
226
-
227
-
228
-
229
-
230
-
231
-
232
-
233
-
234
-
235
-
236
-
237
-
238
-
239
-
240
-
241
-
242
-
243
-
244
-
245
-
246
-
247
-
248
-
249
-
250
-
251
-
252
-
253
-
254
-
255
-
256
-
257
-
258
-
259
-
260
-
261
-
262
-
263
-
264
-
265
-
266
-
267
-
268
-
269
-
270
-
271
-
272
-
273
-
274
-
275
-
276
-
277
-
278
-
279
-
280
-
281
-
282
-
283
-
284
-
285
-
286
-
287
-
288
-
289
-
290
-
291
-
292
-
293
-
294
-
295
-
296
-
297
-
298
-
299
-
300
-
301
-
302
-
303
-
304
-
305
-
306
-
307
-
308
-
309
-
310
-
311
-
312
-
313
-
314
-
315
-
316
-
317
-
318
-
319
-
320
-
321
-
322
-
323
-
324
-
325
-
326
-
327
-
328
-
329
-
330
-
331
-
332
-
333
-
334
-
335
-
336
-
337
-
338
-
339
-
340
-
341
-
342
-
343
-
344
-
345
-
346
-
347
-
348
-
349
-
350
-
351
-
352
-
353
-
354
-
355
-
356
-
357
-
358
-
359
-
360
-
361
-
362
-
363
-
364
-
365
-
366
-
367
-
368
-
369
-
370
-
371
-
372
 |
 |
