ZyXEL SFP-LX-10 User Guide - Page 1
ZyXEL SFP-LX-10 Manual
 |
View all ZyXEL SFP-LX-10 manuals
Add to My Manuals
Save this manual to your list of manuals |
Page 1 highlights
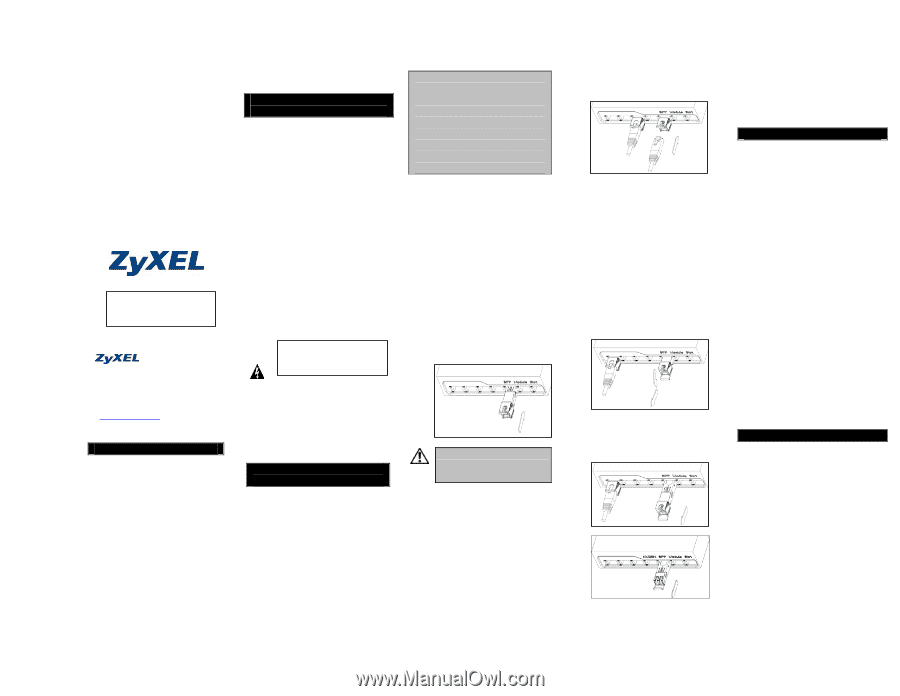
Copper SFP Transceivers User's Guide Version 1.0 Edition 2 11/2007 Only trained and qualified personnel should be allowed to install or replace these modules. Corporate Headquarters ZyXEL Communications Corp. Tel: +886-3-578-3942 Fax: +886-3-578-2439 Email:[email protected] http://www.zyxel.com http://www.zyxel.com.tw Introduction This user's guide provides information for Copper SFP transceiver modules, as well as instructions for installing, connecting and removing these transceivers. Copper SFP transceiver modules are hot-pluggable - you can insert them into SFP module slots and remove them without interrupting the host system. Copper SFP Transceiver Modules: The SFP modules uses 3.3V power input and RJ-45 connectors. Handling, Safety, and Environmental Guidelines Read the following guidelines before installing and using Copper SFP transceiver modules. Handling Warning Copper SFP are static sensitive. To prevent damage from electrostatic discharge (ESD), it is recommended to attach an ESD preventative wrist strap to your wrist and to a bare metal surface when you install or remove a Copper SFP module. Safety Warning Copper SFP modules: Read the following safety and warning instructions carefully. Only trained and qualified personnel should be allowed to install or replace these modules. Warning Environmental Warnings: Dispose of your Copper SFP module according to all national laws and regulations. Installing and Removing Copper SFP Modules The Copper SFP module installation and removal procedures are described in this section. Note: Disconnect all UTP (Unshielded Twisted Pair) cables before removing or installing a Copper SFP module. Do NOT remove and insert Copper SFP modules more often than is absolutely necessary. Doing so may shorten the useful life of SFP modules. Installing a Copper SFP module: Follow the steps below to install a Copper SFP module. 1. Attach an ESD preventive wrist strap to your wrist and to a bare metal surface. 2. Remove the Copper SFP module from its protective packaging. 3. Find the Copper SFP markings on the SFP module. 4. Align the Copper SFP module in front of the slot opening. 5. Insert the Copper SFP module into the slot until you feel the Copper SFP module snaps into place. If SFP module resists as you push it in, do NOT force it; turn it over and reinsert it. Connecting UTP Cables Follow the steps below to connect UTP cables to the Copper SFP module. 1. Insert UTP cable into the RJ-45 connector of Copper SFP module. 2. Make sure to push UTP cable into the Copper SFP module with RJ-45 already latched. 4. Place the removed SFP module in the protective packaging or antistatic bag. Removing a Copper SFP module Follow the steps below to remove an SFP module. 1. Attach an ESD preventive wrist strap to your wrist and to a bare metal surface 2. Disconnect the UTP cable from the SFP module. 3. Unlock and remove the Copper SFP module, as shown in the figures below. Pull out the latch and down to unlock the SFP module. Using your thumb and index finger, grasp the tabs on both sides of the module and carefully slide it out of the slot. Copyright Copyright 2007 by ZyXEL Corporation The contents of this publication may not be reproduced in any part or as a whole, transcribed, stored in a retrieval system, translated into any language, or transmitted in any form or by any means, electronic, mechanical, magnetic, optical, chemical, photocopying, manual, or otherwise, without the prior written permission of ZyXEL Corporation. Published by ZyXEL Corporation. All rights reserved. Disclaimer ZyXEL does not assume any liability arising out of the application or use of any products, or software described herein. Neither does it convey any license under its patent rights nor the patent rights of others. ZyXEL further reserves the right to make changes in any products described herein without notice. This publication is subject to change without notice. ZyXEL Limited Warranty ZyXEL warrants to the original end user (purchaser) that this product is free from any defects in materials or workmanship for a period of up to two (2) years from the date of purchase. During the warranty period, and upon proof of purchase, should the product have indications of failure due to faulty workmanship and/or materials, ZyXEL will, at its discretion, repair or replace the defective products or components without charge for either parts or labor, and to whatever extent it shall deem necessary to restore the product or components to proper operating condition. Any replacement will consist of a new or re-manufactured
-
 1
1 -
 2
2
 |
 |