eMachines E15T3 User Guide - Page 4
Hardware Installation - power supply
 |
View all eMachines E15T3 manuals
Add to My Manuals
Save this manual to your list of manuals |
Page 4 highlights
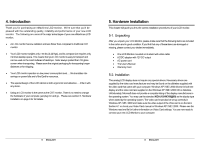
5. Hardware Installation Follow these simple steps to setup your LCD monitor 1. Turn power off to both Computer and Display before making any connection. 2. Disconnect any existing monitor you may have from your Computer. Please refer to your existing monitor's User's Guide. 3. Install the Display on a solid horizontal surface such as a table or a desk. 4. Connect the power cable and the AC/DC adapter and then connect the AC Adapter to the DC jack that is located at the end of the signal cable. IBM PC's & Compatibles 5a. Connect one end of the signal cable to the matching 15-pin connector on the rear of the computer. Apple / Macintosh Computers 5b. Connect a MAC adapter (not supplied) to the video connector on the rear of the Apple / Macintosh computer. Then plug the other end of the signal cable into the MAC adapter. (Contact your local Apple dealer for information on purchasing the correct conversion connector.) 6. Tighten the screws of the Display cable until the connectors are fastened securely. 7. Switch on power to the computer, then to the Display. 15 pin D-SUB DC Jack Power Cord AC/DC Adapter Figure 5.1 LCD Monitor Hardware Setup 7 ENGLISH 5. Hardware Installation 5-3. Video Input Pin Assignment This section describes the pin assignment of the LCD's video connector. It is called a 15-Pin Mini D-sub Connector. Pin No. 1 2 3 4 5 6 7 8 9 10 11 12 13 14 15 Signal Connector Red Video Signal Green Video Signal Blue Video Signal N.C. Ground Ground for red video signal Ground for green video signal Ground for blue video signal +5V Ground N.C. DDC data Horizontal sync signal Vertical sync signal DDC clock 8 ENGLISH
-
 1
1 -
 2
2 -
 3
3 -
 4
4 -
 5
5 -
 6
6 -
 7
7 -
 8
8 -
 9
9 -
 10
10 -
11
 |
 |
