eMachines H5237 8512167 - eMachines Canada Desktop Computer User Guide - Page 74
Changing screen settings
 |
View all eMachines H5237 manuals
Add to My Manuals
Save this manual to your list of manuals |
Page 74 highlights
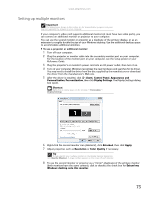
Chapter 7: Customizing Windows Changing screen settings Adjusting the color depth and screen area are two of the most basic display settings you may need to change. You can also adjust settings such as the screen background and screen saver. Changing color depth and screen resolution Color depth and screen resolution are two of the most basic monitor settings you may need to change to suit your needs. Color depth is the number of colors your computer uses to display images on your monitor. Most images look best displayed with the maximum number of colors available. If the color in your images seems "false" or "jumpy," especially after you have played a game or run a video-intensive program, check the color depth setting and return it to the highest color setting, if necessary. Screen resolution is the number of pixels (individual colored dots) your computer uses to display images on your monitor. The higher the resolution, the more information and screen components (such as icons and menu bars) can be displayed on the monitor. Help For more information about adjusting the screen, click Start, then click Help and Support. Type adjusting monitor settings in the Search Help box, then press ENTER. To change the color depth or screen resolution: 1 Click (Start), Control Panel, then under Appearance and Personalization, click Adjust Screen Resolution. The Display Settings dialog box opens. 2 To change the color depth, click the Colors list, then click the color depth you want. • Low (8-bit) = 256 colors • Medium (16-bit) = 65,500 colors • Highest (32-bit) = 16,700,000 colors 3 To change the screen resolution, drag the Resolution slider to the size you prefer. 4 Click Apply. If the new settings do not look right, click No. If the new settings make the screen illegible and you cannot click No, the settings return to their previous values after several seconds. 5 Click OK, then click Yes to save your changes. 68
-
 1
1 -
2
-
3
-
4
-
5
-
6
-
7
-
8
-
9
-
10
-
11
-
12
-
13
-
14
-
15
-
16
-
17
-
18
-
19
-
20
-
21
-
22
-
23
-
24
-
25
-
26
-
27
-
28
-
29
-
30
-
31
-
32
-
33
-
34
-
35
-
36
-
37
-
38
-
39
-
40
-
41
-
42
-
43
-
44
-
45
-
46
-
47
-
48
-
49
-
50
-
51
-
52
-
53
-
54
-
55
-
56
-
57
-
58
-
59
-
60
-
61
-
62
-
63
-
64
-
65
-
66
-
67
-
68
-
 69
69 -
 70
70 -
 71
71 -
 72
72 -
 73
73 -
 74
74 -
 75
75 -
 76
76 -
 77
77 -
 78
78 -
 79
79 -
80
-
81
-
82
-
83
-
84
-
85
-
86
-
87
-
88
-
89
-
90
-
91
-
92
-
93
-
94
-
95
-
96
-
97
-
98
-
99
-
100
-
101
-
102
-
103
-
104
-
105
-
106
-
107
-
108
-
109
-
110
-
111
-
112
-
113
-
114
-
115
-
116
-
117
-
118
-
119
-
120
-
121
-
122
-
123
-
124
-
125
-
126
-
127
-
128
-
129
-
130
-
131
-
132
-
133
-
134
-
135
-
136
-
137
-
138
-
139
-
140
-
141
-
142
-
143
-
144
-
145
-
146
-
147
-
148
-
149
-
150
-
151
-
152
-
153
-
154
-
155
-
156
-
157
-
158
-
159
-
160
-
161
-
162
-
163
-
164
-
165
-
166
-
167
-
168
-
169
-
170
-
171
-
172
-
173
-
174
-
175
-
176
-
177
-
178
-
179
-
180
-
181
-
182
-
183
-
184
-
185
-
186
-
187
-
188
-
189
-
190
 |
 |
