eMachines T3256 User Guide - Page 33
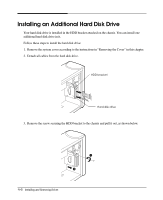
chassis using a tool such as a screwdriver.
 |
View all eMachines T3256 manuals
Add to My Manuals
Save this manual to your list of manuals |
Page 33 highlights
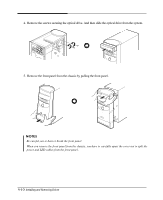
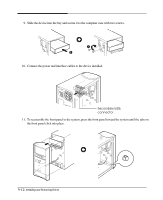
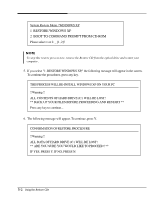
6. Remove the faceplate cover from the front panel. Push out the faceplate, pressing outward two tabs on both ends of the front panel using your finger. 7. If there is an EMI shield that covers the 5.25-inch drive bay you want to use, remove it from the chassis using a tool such as a screwdriver. EMI shield 8. Make sure the jumper of optional drive you want to install is set to CS (Cable Select). NOTES Like a hard disk drive, most optional devices have jumpers that must be set for the drive to work properly with your computer. You must set the jumper of your optional device to CS (Cable Select). If you set the jumper of new device to CS, your system recognizes the device according to location of the cable connector that connected to new device. If you are to install an optional drive to this 5.25-inch bay, you can use the secondary E-IDE drive connector. To install an additional device in the empty bay below the optical drive, you can use the spare connector of E-IDE cable marked "SLAVE." Installing and Removing Drives 4-11
-
 1
1 -
2
-
3
-
4
-
5
-
6
-
7
-
8
-
9
-
10
-
11
-
12
-
13
-
14
-
15
-
16
-
17
-
18
-
19
-
20
-
21
-
22
-
23
-
24
-
25
-
26
-
27
-
 28
28 -
 29
29 -
 30
30 -
 31
31 -
 32
32 -
 33
33 -
 34
34 -
 35
35 -
 36
36 -
 37
37 -
 38
38 -
39
-
40
-
41
-
42
-
43
-
44
-
45
-
46
-
47
-
48
-
49
-
50
 |
 |
