2001 Chevrolet Impala Owner's Manual - Page 184
2001 Chevrolet Impala Manual

Page 184 highlights
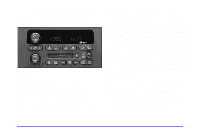
PUSHBUTTONS: The six numbered pushbuttons let you return to your favorite stations. You can set up to 18 stations (six AM, six FM1 and six FM2) by performing the following steps: 1. Turn the radio on. 2. Press AM FM to select the band. 3. Tune in the desired station. 4. Press AUTO TONE to select the equalization that best suits the type of station selected. 5. Press and hold one of the six numbered buttons. The radio will produce one beep. Whenever you press that numbered button, the station you set will return and the AUTO TONE equalization that you selected will also be automatically selected for that button. 6. Repeat the steps for each pushbutton. P SCAN: Press and hold one of the arrows for more than two seconds. The radio will produce one beep. Use P SCAN to listen to each of your favorite stations stored on your pushbuttons for a few seconds. The radio will scan through each of the stations stored on your pushbuttons, except those stations with weak reception. The AUTO TONE setting stored for that pushbutton will be automatically chosen. Press P SCAN or one of the pushbuttons again to stop scanning. SCAN will be displayed whenever the tuner is in the P SCAN mode. The channel number (P1 through P6) will appear with the frequency. In FM mode, this function will scan through the current band such as FM1 or FM2. Setting the Tone BASS: Press and release the P-TYPE LIST/AUDIO knob until BASS appears on the display. Then turn the knob clockwise to increase bass and counterclockwise to decrease bass. The display will show the bass level. When you use this control, the radio's AUTO TONE setting will switch to manual. To set bass to the middle position, select the control and press and hold the P-TYPE LIST/AUDIO knob. The radio will produce one beep and set the display level to the middle position. To set all tone and speaker controls to the middle position, press and hold the P-TYPE LIST/AUDIO knob when no tone or speaker control is active. The radio will produce one beep and display ALL with the level display in the middle position. 3-14
-
 1
1 -
2
-
3
-
4
-
5
-
6
-
7
-
8
-
9
-
10
-
11
-
12
-
13
-
14
-
15
-
16
-
17
-
18
-
19
-
20
-
21
-
22
-
23
-
24
-
25
-
26
-
27
-
28
-
29
-
30
-
31
-
32
-
33
-
34
-
35
-
36
-
37
-
38
-
39
-
40
-
41
-
42
-
43
-
44
-
45
-
46
-
47
-
48
-
49
-
50
-
51
-
52
-
53
-
54
-
55
-
56
-
57
-
58
-
59
-
60
-
61
-
62
-
63
-
64
-
65
-
66
-
67
-
68
-
69
-
70
-
71
-
72
-
73
-
74
-
75
-
76
-
77
-
78
-
79
-
80
-
81
-
82
-
83
-
84
-
85
-
86
-
87
-
88
-
89
-
90
-
91
-
92
-
93
-
94
-
95
-
96
-
97
-
98
-
99
-
100
-
101
-
102
-
103
-
104
-
105
-
106
-
107
-
108
-
109
-
110
-
111
-
112
-
113
-
114
-
115
-
116
-
117
-
118
-
119
-
120
-
121
-
122
-
123
-
124
-
125
-
126
-
127
-
128
-
129
-
130
-
131
-
132
-
133
-
134
-
135
-
136
-
137
-
138
-
139
-
140
-
141
-
142
-
143
-
144
-
145
-
146
-
147
-
148
-
149
-
150
-
151
-
152
-
153
-
154
-
155
-
156
-
157
-
158
-
159
-
160
-
161
-
162
-
163
-
164
-
165
-
166
-
167
-
168
-
169
-
170
-
171
-
172
-
173
-
174
-
175
-
176
-
177
-
178
-
 179
179 -
 180
180 -
 181
181 -
 182
182 -
 183
183 -
 184
184 -
 185
185 -
 186
186 -
 187
187 -
 188
188 -
 189
189 -
190
-
191
-
192
-
193
-
194
-
195
-
196
-
197
-
198
-
199
-
200
-
201
-
202
-
203
-
204
-
205
-
206
-
207
-
208
-
209
-
210
-
211
-
212
-
213
-
214
-
215
-
216
-
217
-
218
-
219
-
220
-
221
-
222
-
223
-
224
-
225
-
226
-
227
-
228
-
229
-
230
-
231
-
232
-
233
-
234
-
235
-
236
-
237
-
238
-
239
-
240
-
241
-
242
-
243
-
244
-
245
-
246
-
247
-
248
-
249
-
250
-
251
-
252
-
253
-
254
-
255
-
256
-
257
-
258
-
259
-
260
-
261
-
262
-
263
-
264
-
265
-
266
-
267
-
268
-
269
-
270
-
271
-
272
-
273
-
274
-
275
-
276
-
277
-
278
-
279
-
280
-
281
-
282
-
283
-
284
-
285
-
286
-
287
-
288
-
289
-
290
-
291
-
292
-
293
-
294
-
295
-
296
-
297
-
298
-
299
-
300
-
301
-
302
-
303
-
304
-
305
-
306
-
307
-
308
-
309
-
310
-
311
-
312
-
313
-
314
-
315
-
316
-
317
-
318
-
319
-
320
-
321
-
322
-
323
-
324
-
325
-
326
-
327
-
328
-
329
-
330
-
331
-
332
-
333
-
334
-
335
-
336
-
337
-
338
-
339
-
340
-
341
-
342
-
343
-
344
-
345
-
346
-
347
-
348
-
349
-
350
-
351
-
352
-
353
-
354
-
355
-
356
-
357
-
358
-
359
-
360
-
361
-
362
-
363
-
364
-
365
-
366
-
367
-
368
-
369
-
370
-
371
-
372
-
373
-
374
-
375
-
376
-
377
-
378
-
379
-
380
-
381
-
382
-
383
-
384
-
385
-
386
-
387
-
388
-
389
-
390
-
391
-
392
 |
 |
