2001 Chevrolet Malibu Owner's Manual - Page 90
2001 Chevrolet Malibu Manual

Page 90 highlights
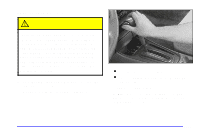
THIRD (3): This position is also used for normal driving, however, it offers more power and lower fuel economy than AUTOMATIC OVERDRIVE (D). Here are some times you might choose THIRD (3) instead of AUTOMATIC OVERDRIVE (D): D When driving on hilly, winding roads. D When towing a trailer, so there is less shifting between gears. D When going down a steep hill. SECOND (2): This position gives you more power but lower fuel economy. You can use SECOND (2) on hills. It can help control your speed as you go down steep mountain roads, but then you would also want to use your brakes off and on. FIRST (1): This position gives you even more power (but lower fuel economy) than SECOND (2). You can use it on very steep hills, or in deep snow or mud. If the selector lever is put in FIRST (1), the transaxle won't shift into first gear until the vehicle is going slowly enough. NOTICE: If your front wheels can't turn, don't try to drive. This might happen if you were stuck in very deep sand or mud or were up against a solid object. You can damage your transaxle. Also, if you stop when going uphill, don't hold your vehicle there with only the accelerator pedal. This could overheat and damage the transaxle. Use your brakes or shift into PARK (P) to hold your vehicle in position on a hill. NOTICE: Don't drive in SECOND (2) for more than 25 miles (40 km), or at speeds over 55 mph (90 km/h), or you can damage your transaxle. Use AUTOMATIC OVERDRIVE (D) or THIRD (3) as much as possible. Don't shift into SECOND (2) unless you are going slower than 65 mph (105 km/h) or you can damage your engine. 2-25
-
 1
1 -
2
-
3
-
4
-
5
-
6
-
7
-
8
-
9
-
10
-
11
-
12
-
13
-
14
-
15
-
16
-
17
-
18
-
19
-
20
-
21
-
22
-
23
-
24
-
25
-
26
-
27
-
28
-
29
-
30
-
31
-
32
-
33
-
34
-
35
-
36
-
37
-
38
-
39
-
40
-
41
-
42
-
43
-
44
-
45
-
46
-
47
-
48
-
49
-
50
-
51
-
52
-
53
-
54
-
55
-
56
-
57
-
58
-
59
-
60
-
61
-
62
-
63
-
64
-
65
-
66
-
67
-
68
-
69
-
70
-
71
-
72
-
73
-
74
-
75
-
76
-
77
-
78
-
79
-
80
-
81
-
82
-
83
-
84
-
 85
85 -
 86
86 -
 87
87 -
 88
88 -
 89
89 -
 90
90 -
 91
91 -
 92
92 -
 93
93 -
 94
94 -
 95
95 -
96
-
97
-
98
-
99
-
100
-
101
-
102
-
103
-
104
-
105
-
106
-
107
-
108
-
109
-
110
-
111
-
112
-
113
-
114
-
115
-
116
-
117
-
118
-
119
-
120
-
121
-
122
-
123
-
124
-
125
-
126
-
127
-
128
-
129
-
130
-
131
-
132
-
133
-
134
-
135
-
136
-
137
-
138
-
139
-
140
-
141
-
142
-
143
-
144
-
145
-
146
-
147
-
148
-
149
-
150
-
151
-
152
-
153
-
154
-
155
-
156
-
157
-
158
-
159
-
160
-
161
-
162
-
163
-
164
-
165
-
166
-
167
-
168
-
169
-
170
-
171
-
172
-
173
-
174
-
175
-
176
-
177
-
178
-
179
-
180
-
181
-
182
-
183
-
184
-
185
-
186
-
187
-
188
-
189
-
190
-
191
-
192
-
193
-
194
-
195
-
196
-
197
-
198
-
199
-
200
-
201
-
202
-
203
-
204
-
205
-
206
-
207
-
208
-
209
-
210
-
211
-
212
-
213
-
214
-
215
-
216
-
217
-
218
-
219
-
220
-
221
-
222
-
223
-
224
-
225
-
226
-
227
-
228
-
229
-
230
-
231
-
232
-
233
-
234
-
235
-
236
-
237
-
238
-
239
-
240
-
241
-
242
-
243
-
244
-
245
-
246
-
247
-
248
-
249
-
250
-
251
-
252
-
253
-
254
-
255
-
256
-
257
-
258
-
259
-
260
-
261
-
262
-
263
-
264
-
265
-
266
-
267
-
268
-
269
-
270
-
271
-
272
-
273
-
274
-
275
-
276
-
277
-
278
-
279
-
280
-
281
-
282
-
283
-
284
-
285
-
286
-
287
-
288
-
289
-
290
-
291
-
292
-
293
-
294
-
295
-
296
-
297
-
298
-
299
-
300
-
301
-
302
-
303
-
304
-
305
-
306
-
307
-
308
-
309
-
310
-
311
-
312
-
313
-
314
-
315
-
316
-
317
-
318
-
319
-
320
-
321
-
322
-
323
-
324
-
325
-
326
-
327
-
328
-
329
-
330
-
331
-
332
-
333
-
334
-
335
-
336
-
337
-
338
-
339
-
340
-
341
-
342
-
343
-
344
-
345
-
346
-
347
-
348
-
349
-
350
-
351
 |
 |