2013 Chevrolet Express 1500 Passenger Owner Manual - Page 108
2013 Chevrolet Express 1500 Passenger Manual

Page 108 highlights
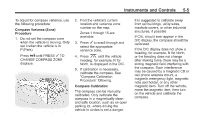
5-6 Instruments and Controls CALIBRATION COMPLETE for a few seconds when the calibration is complete. The DIC display will then return to PRESS V TO CALIBRATE COMPASS. counterclockwise to increase or decrease the time. While the 12HR or 24HR time format is flashing, turn the f knob clockwise or counterclockwise to select the default time settings. 3. Press H again until the clock display stops flashing to set the currently displayed time; otherwise, the flashing stops after five seconds and the current time displayed is automatically set. To calibrate the compass, use the following procedure: Compass Calibration Procedure 1. Before calibrating the compass, make sure the compass zone is set to the variance zone in which the vehicle is located. See "Compass Variance (Zone) Procedure" earlier in this section. Do not operate any switches such as window, climate controls, seats, etc. during the calibration procedure. 2. Press T until PRESS V TO CALIBRATE COMPASS displays. 3. Press V to start the compass calibration. 4. The DIC will display CALIBRATING: DRIVE IN CIRCLES. Drive the vehicle in tight circles at less than 8 km/h (5 mph) to complete the calibration. The DIC will display Clock The clock can be set with either the radio turned on or off. AM/FM Radio To set the time: 1. Press H until the hour begins flashing on the display. Press this button a second time and the minutes begin flashing on display. Press H a third time and the 12HR or 24HR time format begins flashing. 2. While either the hour or the minutes are flashing, turn the f knob, on the upper right side of the radio, clockwise or Radio with a CD Player To set the time and date: 1. Press H and the HR, MIN, MM, DD, YYYY (hour, minute, month, day, and year) displays. 2. Press the softkey under any one of the tabs to be changed. Every time the softkey is pressed again, the time or the date if selected, increases by one.
-
 1
1 -
2
-
3
-
4
-
5
-
6
-
7
-
8
-
9
-
10
-
11
-
12
-
13
-
14
-
15
-
16
-
17
-
18
-
19
-
20
-
21
-
22
-
23
-
24
-
25
-
26
-
27
-
28
-
29
-
30
-
31
-
32
-
33
-
34
-
35
-
36
-
37
-
38
-
39
-
40
-
41
-
42
-
43
-
44
-
45
-
46
-
47
-
48
-
49
-
50
-
51
-
52
-
53
-
54
-
55
-
56
-
57
-
58
-
59
-
60
-
61
-
62
-
63
-
64
-
65
-
66
-
67
-
68
-
69
-
70
-
71
-
72
-
73
-
74
-
75
-
76
-
77
-
78
-
79
-
80
-
81
-
82
-
83
-
84
-
85
-
86
-
87
-
88
-
89
-
90
-
91
-
92
-
93
-
94
-
95
-
96
-
97
-
98
-
99
-
100
-
101
-
102
-
 103
103 -
 104
104 -
 105
105 -
 106
106 -
 107
107 -
 108
108 -
 109
109 -
 110
110 -
 111
111 -
 112
112 -
 113
113 -
114
-
115
-
116
-
117
-
118
-
119
-
120
-
121
-
122
-
123
-
124
-
125
-
126
-
127
-
128
-
129
-
130
-
131
-
132
-
133
-
134
-
135
-
136
-
137
-
138
-
139
-
140
-
141
-
142
-
143
-
144
-
145
-
146
-
147
-
148
-
149
-
150
-
151
-
152
-
153
-
154
-
155
-
156
-
157
-
158
-
159
-
160
-
161
-
162
-
163
-
164
-
165
-
166
-
167
-
168
-
169
-
170
-
171
-
172
-
173
-
174
-
175
-
176
-
177
-
178
-
179
-
180
-
181
-
182
-
183
-
184
-
185
-
186
-
187
-
188
-
189
-
190
-
191
-
192
-
193
-
194
-
195
-
196
-
197
-
198
-
199
-
200
-
201
-
202
-
203
-
204
-
205
-
206
-
207
-
208
-
209
-
210
-
211
-
212
-
213
-
214
-
215
-
216
-
217
-
218
-
219
-
220
-
221
-
222
-
223
-
224
-
225
-
226
-
227
-
228
-
229
-
230
-
231
-
232
-
233
-
234
-
235
-
236
-
237
-
238
-
239
-
240
-
241
-
242
-
243
-
244
-
245
-
246
-
247
-
248
-
249
-
250
-
251
-
252
-
253
-
254
-
255
-
256
-
257
-
258
-
259
-
260
-
261
-
262
-
263
-
264
-
265
-
266
-
267
-
268
-
269
-
270
-
271
-
272
-
273
-
274
-
275
-
276
-
277
-
278
-
279
-
280
-
281
-
282
-
283
-
284
-
285
-
286
-
287
-
288
-
289
-
290
-
291
-
292
-
293
-
294
-
295
-
296
-
297
-
298
-
299
-
300
-
301
-
302
-
303
-
304
-
305
-
306
-
307
-
308
-
309
-
310
-
311
-
312
-
313
-
314
-
315
-
316
-
317
-
318
-
319
-
320
-
321
-
322
-
323
-
324
-
325
-
326
-
327
-
328
-
329
-
330
-
331
-
332
-
333
-
334
-
335
-
336
-
337
-
338
-
339
-
340
-
341
-
342
-
343
-
344
-
345
-
346
-
347
-
348
-
349
-
350
-
351
-
352
-
353
-
354
-
355
-
356
-
357
-
358
-
359
-
360
-
361
-
362
-
363
-
364
-
365
-
366
-
367
-
368
-
369
-
370
-
371
-
372
-
373
-
374
-
375
-
376
-
377
-
378
-
379
-
380
-
381
-
382
-
383
-
384
-
385
-
386
-
387
-
388
-
389
-
390
-
391
-
392
-
393
-
394
-
395
-
396
-
397
-
398
-
399
-
400
-
401
-
402
 |
 |