1999 Ford F150 Owner Guide 1st Printing
1999 Ford F150 Manual
1999 Ford F150 manual content summary:
- 1999 Ford F150 | Owner Guide 1st Printing - Page 1
and features Seating and safety restraints Starting and driving Starting Driving Roadside emergencies Servicing Maintenance and or by any information storage and retrieval system or translation in whole or part is not permitted without written authorization from Ford Motor Company. Copyright - 1999 Ford F150 | Owner Guide 1st Printing - Page 2
Seating and safety restraints for more information. Indicates that this Owner Guide contains information on this subject. Please refer to the Index to locate parts a chance to break in. INFORMATION ABOUT THIS GUIDE The information found in this guide was in effect at the time of printing. Ford - 1999 Ford F150 | Owner Guide 1st Printing - Page 3
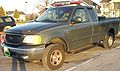
your vehicle as an ambulance Do not use this vehicle as an ambulance. Your vehicle is not equipped with the Ford Ambulance Preparation package. Notice to owners of utility type vehicles Before you drive your vehicle, please read this Owner's Guide carefully. Your vehicle is not a passenger car - 1999 Ford F150 | Owner Guide 1st Printing - Page 4
* (pg. 62) THEFT H 40 60 80 00 20 40 60 km/h H L H SELECT RESET L F E 20 0 MPH FUEL RESET BRAKE C P RN D 2 ON RES SET ACCEL P OFF COAST Headlamp control (pg. 16) Turn signal and wiper/washer control (pg. 67) Instrument panel dimmer switch (pg. 17) Driver side air bag (pg. 95 - 1999 Ford F150 | Owner Guide 1st Printing - Page 5
EJ DOLBY 8 NR TAPE CD FF 2 SIDE 1-2 3 4 COMP 5 SHUFFLE 6 LO FLOOR PANEL HI OFF PANEL & FLOOR FLR& DEF DEF PASSENGER AIRBAG ON OFF OFF COOL WARM Climate control systems (pg. 56) Auxiliary power point (pg. 18) 4WD Control* (pg. 130) Passenger air bag deactivate switch (pg. 99) 5 - 1999 Ford F150 | Owner Guide 1st Printing - Page 6
40 60 km/h RPMX1000 H L H BRAKE FUEL RESET 4X4 LOW RANGE L LOW FUEL SERVICE ENGINE SOON 20 0 F E FUEL DOOR MPH SELECT/RESET CK SUSP D 2 P RN D C Low fuel Illuminates as an early reminder of a low fuel condition indicated on the fuel gauge. The light comes on when there is approximately - 1999 Ford F150 | Owner Guide 1st Printing - Page 7
II system also assists the service technician in properly servicing your vehicle. The Service Engine Soon indicator light illuminates when the ignition is first turned to the ON position to check the bulb. If it comes on after the engine is started, one of the engine's emission control systems may - 1999 Ford F150 | Owner Guide 1st Printing - Page 8
. Under engine misfire conditions, excessive exhaust temperatures could damage the catalytic converter, the fuel system, interior floor coverings or other vehicle components, possibly causing a fire. Air bag readiness Momentarily illuminates when the ignition is turned ON. If the light fails to - 1999 Ford F150 | Owner Guide 1st Printing - Page 9
Instrumentation Anti-lock brake system (ABS) Momentarily illuminates when the ignition is turned to the ON position ABS and the engine is off. If the light remains on, continues to flash or fails to illuminate, have the system serviced immediately. With the ABS light on, the anti-lock brake system - 1999 Ford F150 | Owner Guide 1st Printing - Page 10
. If this condition persists, damage to the transmission could occur. Four wheel drive low (if equipped) This light momentarily illuminates when the ignition is turned to ON. Illuminates when four-wheel drive low is engaged. If the light continues to flash have the system serviced. Four wheel - 1999 Ford F150 | Owner Guide 1st Printing - Page 11
when the ignition is turned to the ON position and the engine is OFF. The light also illuminates when the air suspension system requires servicing. For information, refer to Air suspension system in the Driving chapter. CK SUSP Door ajar Illuminates when the ignition is in the ON or START position - 1999 Ford F150 | Owner Guide 1st Printing - Page 12
RESET 4X4 LOW RANGE L LOW FUEL SERVICE ENGINE SOON 20 0 F E FUEL DOOR MPH SELECT/RESET CK SUSP D 2 P RN D C Fuel gauge Displays approximately how much fuel is in the fuel tank (when the key is in the ON position). The fuel gauge may vary slightly when the vehicle is in motion. The ignition - 1999 Ford F150 | Owner Guide 1st Printing - Page 13
engine immediately and let the engine cool. Refer to Engine coolant in the Maintenance and care chapter. H C Never remove the coolant reservoir cap while the engine enters the red section, the oil pressure/engine coolant and Check Engine/Service Engine Soon indicators illuminate, refer to What you - 1999 Ford F150 | Owner Guide 1st Printing - Page 14
scale may damage the engine. D 2 P RN D RPMX1000 Battery voltage gauge This gauge shows the battery voltage when the ignition is in the ON position. If the pointer moves and stays outside the normal operating range (as indicated), have the vehicle's electrical system checked as soon as possible - 1999 Ford F150 | Owner Guide 1st Printing - Page 15
This shows the engine oil pressure in the system. Sufficient pressure exists as long as the needle remains H in the normal range (the area between the "L" and "H"). If the gauge indicates low pressure, stop the vehicle as soon as safely L possible and switch off the engine immediately. Check the - 1999 Ford F150 | Owner Guide 1st Printing - Page 16
or Parking lamps position. Always remember to turn on your headlamps at dusk or during inclement weather. The Daytime Running Light (DRL) System does not activate your tail lamps and generally may not provide adequate lighting during these conditions. Failure to activate your headlamps under these - 1999 Ford F150 | Owner Guide 1st Printing - Page 17
EQUIPPED) The autolamp system provides light sensitive automatic on-off control of the exterior lights normally controlled by the headlamp control. The autolamp system also keeps the lights on for a preselected period of time after the ignition switch is turned to OFF. • To turn autolamps on, rotate - 1999 Ford F150 | Owner Guide 1st Printing - Page 18
EQUIPPED) This control operates the 4WD. Refer to the Driving chapter for more information. 4H 2H 4L AUXILIARY POWER POINT The auxiliary power point is located on the instrument panel. Do not plug optional electrical accessories into the cigarette lighter. Use the power point. 18 - 1999 Ford F150 | Owner Guide 1st Printing - Page 19
PUSH ON TONE CLK TONE VOL ST DX FM 12 SEEK TUNE AM / FM STEREO 1 2 3 4 AM/FM Your vehicle is equipped with a delayed accessory feature. This feature enables the audio playing media to continue playing up to 10 minutes after the ignition has been turned off, or until a door is opened. 19 - 1999 Ford F150 | Owner Guide 1st Printing - Page 20
the control to turn the audio system on or off. VOL PUSH ON Turn the control to raise or lower volume. VOL PUSH ON If the volume is set above a certain level and the ignition is turned off, the volume will come back on at a "nominal" listening level when the ignition switch is turned back on. AM - 1999 Ford F150 | Owner Guide 1st Printing - Page 21
frequency up the band (whether or not a listenable station is located there). Hold for quick movement. Seek function The seek function increase or decrease the audio system's bass output. With the electronic AM/FM stereo, press the TONE control once, then use the volume knob to adjust the level. TONE - 1999 Ford F150 | Owner Guide 1st Printing - Page 22
Treble adjust The treble adjust control allows you to increase or decrease the audio system's treble output. With the electronic AM/FM stereo, press the TONE control twice, then use the volume knob to adjust the level. Speaker balance adjust Speaker sound distribution can be adjusted between - 1999 Ford F150 | Owner Guide 1st Printing - Page 23
information, etc.) and clock display mode (time). When in clock mode, the media information will display for ten seconds, when the radio is turned on, and then revert to clock information. Anytime that the media is changed, (new radio station, etc.), the media information will again display for - 1999 Ford F150 | Owner Guide 1st Printing - Page 24
feature enables the audio playing media to continue playing up to 10 minutes after the ignition has been turned off, or until a door is opened. Volume/power control Press the control to turn the audio system on or off. VOL - PUSH ON Turn the control to raise or lower volume. VOL - PUSH ON 24 - 1999 Ford F150 | Owner Guide 1st Printing - Page 25
level and the ignition is turned off, the volume will come back on at a "nominal" listening level when the ignition switch is turned back on. AM/ frequency down the band (whether or not a listenable TUNE station is located there). Hold the DISCS control to move through the frequencies quickly. to - 1999 Ford F150 | Owner Guide 1st Printing - Page 26
seek forward to the next track of the current disc. After the last track has been completed, the first track of the current disc will automatically replay. Scan function The scan function works in radio or CD changer mode (if equipped). SCAN 26 - 1999 Ford F150 | Owner Guide 1st Printing - Page 27
selections on the CD. (The CD scans in a forward direction, wrapping back to the first track at the end of the CD.) To stop on equipped with six station memory preset controls. These controls can be used to select up to six preset AM stations and twelve FM the audio system's bass output. BASS 27 - 1999 Ford F150 | Owner Guide 1st Printing - Page 28
Controls and features Treble adjust The treble adjust control allows you to increase or decrease the audio system's treble output. TREB Speaker balance adjust Speaker sound distribution can be adjusted between the right and left speakers. BAL Speaker fade adjust Speaker sound can - 1999 Ford F150 | Owner Guide 1st Printing - Page 29
Controls and features Automatic Music Search The Automatic Music Search feature allows you to quickly locate the CLK beginning of the tape selection being played or to skip to the next selection. TAPE AMS To activate the feature, momentarily depress the - 1999 Ford F150 | Owner Guide 1st Printing - Page 30
tape mode, press SIDE 1 - 2 the 1-2/FF control. Tape direction will automatically REW FF reverse when the end of the tape is reached. Press the SIDE/ next disc after all tracks are played. Press the SHUFFLE control to start this feature. Random order play will continue until the SHUFFLE control is - 1999 Ford F150 | Owner Guide 1st Printing - Page 31
amount of hiss and static during tape playback. control to activate (and deactivate) Dolby noise reduction. Press the The noise reduction system is manufactured under license from Dolby Laboratories Licensing Corporation. Setting the clock Press CLK to toggle between listening frequencies and clock - 1999 Ford F150 | Owner Guide 1st Printing - Page 32
information, etc.) and clock display mode (time). When in clock mode, the media information will display for ten seconds, when the radio is turned on, and then revert to clock information. Anytime that the media is changed, (new radio station, etc.), the media information will again display for - 1999 Ford F150 | Owner Guide 1st Printing - Page 33
system is equipped with selective lighting, a unique lighting strategy. This lighting turned off. Your vehicle is equipped with a delayed accessory feature. This feature enables the audio playing media to continue playing up to 10 minutes after the ignition has been turned off, or until a door - 1999 Ford F150 | Owner Guide 1st Printing - Page 34
set above a certain level and the ignition is turned off, the volume will come back on at a "nominal" listening level when the ignition switch is turned back on. Speed sensitive volume (if equipped) With this feature, radio volume changes automatically and slightly with vehicle speed to compensate - 1999 Ford F150 | Owner Guide 1st Printing - Page 35
mode (if equipped). Tune adjust in radio mode • Press to move to the next TUNE frequency down the band (whether or not a listenable station is located there). Hold the control to move through the frequencies quickly. • Press to move to the next frequency up the band (whether or not a listenable - 1999 Ford F150 | Owner Guide 1st Printing - Page 36
seek forward to the next track of the current disc. After the last track has been completed, the first track of the current disc will automatically replay. 36 - 1999 Ford F150 | Owner Guide 1st Printing - Page 37
At the end of the tape's first side, direction automatically reverses to the opposite side of the tape.) To stop . (The CD scans in a forward direction, wrapping back to the first track at the end of the CD memory preset controls. These controls can be used to select up to six preset AM stations - 1999 Ford F150 | Owner Guide 1st Printing - Page 38
you to set strong radio stations without losing your original manually set preset stations. This feature is helpful on trips when you travel between cities with different radio stations. Starting autoset memory preset 1. Select a frequency using the AM/FM select controls. 2. Press the AUTO control - 1999 Ford F150 | Owner Guide 1st Printing - Page 39
can be adjusted between the front and rear speakers. Press the FADE control. Use the SEL control to adjust the sound between the front and rear speakers. BAL /CD select • To begin tape play (with a tape loaded into the audio system) CD TAPE while in the radio or CD mode, press the TAPE control. - 1999 Ford F150 | Owner Guide 1st Printing - Page 40
if equipped). 2 • In the tape mode, tape direction will automatically reverse when the end of the tape is reached. • In CD action. Tape direction select Press SIDE 1-2 to play the alternate side of a tape. SIDE 1-2 3 Eject function system is manufactured under license from Dolby Laboratories Licensing - 1999 Ford F150 | Owner Guide 1st Printing - Page 41
start this feature. Random order play will continue until the SHUFFLE control is pressed again. Radio data system (RDS) feature This feature allows your audio system to use RDS technology to transmit station ID and program type as desired. Press and hold the control for five seconds to turn the - 1999 Ford F150 | Owner Guide 1st Printing - Page 42
broadcasting RDS data). SEL Program type • Press the RDS control until the FIND program type is displayed. • Use the SEL control to select the program type. With the feature on, use the SEEK or SCAN control to find the desired program type from the following selections: • Classic • Country • Info - 1999 Ford F150 | Owner Guide 1st Printing - Page 43
again to return to the playing media. MUTE Setting the clock with radio data system (RDS) feature Press the RDS control until CLOCK HOUR or CLOCK MINUTE is RDS displayed. Use the SEL control to manually set the time. to increase • Press hours/minutes. • Press to decrease hours/minutes. SEL - 1999 Ford F150 | Owner Guide 1st Printing - Page 44
Your vehicle is equipped with a delayed accessory feature. This feature enables the audio playing media to continue playing up to 10 minutes after the ignition has been turned off, or until a door is opened. Volume/power control Press the control to turn the audio system on or off. VOL PUSH ON 44 - 1999 Ford F150 | Owner Guide 1st Printing - Page 45
set above a certain level and the ignition is turned off, the volume will come back on at a "nominal" listening level when the ignition switch is turned back on. Speed sensitive volume (if equipped) With this feature, radio volume changes automatically and slightly with vehicle speed to compensate - 1999 Ford F150 | Owner Guide 1st Printing - Page 46
CD changer mode. Tune adjust in radio mode • Press to move to the next TUNE frequency down the band (whether or not a listenable station is located there). Hold the control to move through the frequencies quickly. • Press to move to the next frequency up the band (whether or not a listenable station - 1999 Ford F150 | Owner Guide 1st Printing - Page 47
, the first track of the current disc will automatically replay. Scan function The scan function works in CD (The CD scans in a forward direction, wrapping back to the first track at the end of the CD.). station memory preset controls. These controls can be used to select up to six preset AM stations - 1999 Ford F150 | Owner Guide 1st Printing - Page 48
you to set strong radio stations without losing your original manually set preset stations. This feature is helpful on trips when you travel between cities with different radio stations. Starting autoset memory preset 1. Select a frequency using the AM/FM select controls. 2. Press the AUTO control - 1999 Ford F150 | Owner Guide 1st Printing - Page 49
Controls and features Speaker balance adjust Speaker sound distribution can be adjusted between the right and left speakers. BAL SEL FADE Speaker fade adjust Speaker sound can be adjusted between the front and rear speakers. BAL SEL FADE CD select To begin CD play (if CD[s] are loaded), press - 1999 Ford F150 | Owner Guide 1st Printing - Page 50
start this feature. Random order play will continue until the SHUFFLE control is pressed again. Radio data system (RDS) feature This feature allows your audio system to use RDS technology to transmit station ID and program type as desired. Press and hold the control for five seconds to turn the - 1999 Ford F150 | Owner Guide 1st Printing - Page 51
is broadcasting RDS data). SEL Program type • Press the RDS control until FIND program type is displayed. • Use the SEL control to select the program type. With the feature on, use the SEEK or SCAN control to find the desired program type from the following selections: • Classic • Country • Info - 1999 Ford F150 | Owner Guide 1st Printing - Page 52
to mute the playing media. Press the control again to return to the playing media. MUTE CD changer (if equipped) The CD changer is either located behind the driver's seat or in the center console of your vehicle. Slide the door to access the CD changer magazine. 52 - 1999 Ford F150 | Owner Guide 1st Printing - Page 53
in each slot. Each disc must be inserted with the label surface upward. Depending on your system, you may insert up to six or ten CDs. COMPACT DIGITAL AUDIO 6 5 4 power must be turned on to play the CDs in the changer. The magazine may be stored in the glove compartment when not being used. The CD - 1999 Ford F150 | Owner Guide 1st Printing - Page 54
Controls and features Troubleshooting the CD changer (if equipped) The laser beam used in the compact disc player is of the CD changer magazine. Cleaning cassette player (if equipped) Clean the tape player head with a cassette cleaning cartridge after ten to twelve hours of play in order to maintain - 1999 Ford F150 | Owner Guide 1st Printing - Page 55
can cause FM reception problems. Static can be caused on AM stations by power lines, electric fences, traffic lights and thunderstorms. Moving away play while the weak station frequency is displayed. The audio system automatically switches to single channel reception if it will improve the reception - 1999 Ford F150 | Owner Guide 1st Printing - Page 56
"Warranty Guide" for audio system warranty information. If service is necessary, see your dealer or a qualified technician. CLIMATE CONTROL SYSTEM Heater only system (if equipped) LO PANEL OFF PANEL & FLOOR FLOOR FLR & DEF DEF HI COOL WARM Fan speed control Controls the volume of air circulated - 1999 Ford F150 | Owner Guide 1st Printing - Page 57
. • DEF -Distributes outside air through the windshield defroster ducts. It can be used to clear ice or fog system in the OFF position. • Don't put objects under the front seat that will interfere with the airflow to the back seats (if equipped). • Remove any snow, ice or leaves from the air intake - 1999 Ford F150 | Owner Guide 1st Printing - Page 58
Controls and features Manual heating and air conditioning system (if equipped) LO OFF PANEL & FLOOR FLOOR FLR & DEF DEF PANEL A/C MAX A/C HI COOL WARM Fan speed control Controls the volume of air circulated in the vehicle. LO HI Temperature control knob Controls the temperature of the airflow - 1999 Ford F150 | Owner Guide 1st Printing - Page 59
defroster ducts. If the temperature is about 10°C (50°F) or higher, the air conditioner will automatically dehumidify the air to prevent fogging. -Distributes outside air through the windshield defroster • DEF ducts. It can be used to clear ice or fog from the windshield. If the temperature is about - 1999 Ford F150 | Owner Guide 1st Printing - Page 60
will interfere with the airflow to the back seats (if equipped). • Remove any snow, ice or leaves from the air intake area (at the bottom of the windshield under the hood). • If your vehicle has been parked with the windows closed during hot weather, the air conditioner will do a much faster job of - 1999 Ford F150 | Owner Guide 1st Printing - Page 61
air bag ON/OFF switch in the Seating and safety restraints chapter. PASSENGER AIRBAG OFF OFF ON POSITIONS OF THE IGNITION 1. ACCESSORY, allows the electrical 4 accessories such as the radio to 3 operate while the engine is not 5 running. 2. LOCK, locks the steering wheel, 2 automatic transmission - 1999 Ford F150 | Owner Guide 1st Printing - Page 62
• Push down to activate the left turn signal. • Push up to activate the right turn signal. SPEED CONTROL (IF EQUIPPED) To turn speed control on • Press ON. Vehicle speed cannot be controlled until the vehicle is traveling at or above 48 km/h (30 mph). ON OFF Do not use the speed control in heavy - 1999 Ford F150 | Owner Guide 1st Printing - Page 63
features To turn speed control off • Press OFF or • Turn off the vehicle ignition. ON OFF may want to shift to the next lower gear or apply the brakes to reduce your vehicle speed. If your vehicle slows down more than . Do not use the speed control in heavy traffic or on roads that are winding, - 1999 Ford F150 | Owner Guide 1st Printing - Page 64
is reached or • Press and release CST/COAST. Each press will decrease the set speed by 1.6 km/h (1 mph) or RES SET ACCEL COAST • Depress the brake pedal. When the desired vehicle speed is reached, press SET/SET ACC/ SET ACCEL. RES SET ACCEL COAST 64 - 1999 Ford F150 | Owner Guide 1st Printing - Page 65
Controls and features To disengage speed control • Depress the brake pedal or • Depress the clutch pedal (if equipped) Disengaging the speed control will not erase the previously programmed set speed. Pressing OFF will erase the previously programmed set speed. ON OFF 65 - 1999 Ford F150 | Owner Guide 1st Printing - Page 66
you to move the steering wheel up or down. Hold the control while adjusting the wheel to the desired position, then release the control to lock the steering wheel in position. Never adjust the steering wheel when the vehicle is moving. 66 - 1999 Ford F150 | Owner Guide 1st Printing - Page 67
, low or high speed position. automatically adjust as the vehicle's speed increases. To activate or deactivate this feature do the following: 1. Both front doors must be securely closed. 2. Turn the ignition key to the ON position and then back to the OFF position. 3. Remove the key from the ignition - 1999 Ford F150 | Owner Guide 1st Printing - Page 68
the best fuel economy. The overdrive function allows automatic upshifts to second, third and fourth gear. Deactivating overdrive Press the Transmission Control Switch (TCS) located on the end of the gearshift lever. The Transmission Control Indicator Light (TCIL) (the word OFF) will illuminate on - 1999 Ford F150 | Owner Guide 1st Printing - Page 69
word OFF) will no longer be illuminated. When you shut off and re-start your vehicle, the transmission will (Overdrive) mode. automatically return to normal INTERIOR LAMPS Map lamps (if equipped) The map lamps and controls are located on the dome lamp. Press the controls on either side of each map - 1999 Ford F150 | Owner Guide 1st Printing - Page 70
window operation. AUTO Accessory delay (if equipped) With accessory delay, the window switches may be used for up to ten minutes after the ignition switch is turned to the OFF position or until any door is opened. POWER DOOR LOCKS (IF EQUIPPED) Press U to unlock all doors and L to lock all doors - 1999 Ford F150 | Owner Guide 1st Printing - Page 71
ignition lock mirrors in located at the top of the right and left side view mirrors. When the turn signal is activated, the appropriate mirror will show a blinking red arrow. The arrow provides an additional warning to other drivers that your vehicle is about to turn. Driver and passengers seated - 1999 Ford F150 | Owner Guide 1st Printing - Page 72
carefully when driving through a narrow space, like an automatic car wash. TAILGATE LOCK (IF EQUIPPED) Your vehicle is equipped with a tailgate lock designed to prevent theft of the tailgate. • Insert ignition key and turn to the right to engage lock. • Turn ignition key to the left to unlock. 72 - 1999 Ford F150 | Owner Guide 1st Printing - Page 73
Use a screwdriver to pry the spring clip (on each connector) past the head of the support screw. Disconnect cable. 3. Disconnect the other cable. 4. Lift tailgate to a 45 degree angle. 5. Lift right side off of its hinge. 6. Lift noted. To remove or stow the cover: 1. Styleside only: In cold weather lower - 1999 Ford F150 | Owner Guide 1st Printing - Page 74
the side rail working from the rear to the front. 4. Starting from the opposite side of the vehicle, pull cover away from the side rail and roll the cover from rear to front. 5. Secure the cover behind the cab with two straps. The cover may be removed from the vehicle by sliding it sideways out - 1999 Ford F150 | Owner Guide 1st Printing - Page 75
Controls and features Flareside only: • Remove two cross bars from pickup box by pushing towards either side to release tension. • Lower tailgate, depress the levers on each side of the rear rail and remove rear rail from pickup box. 75 - 1999 Ford F150 | Owner Guide 1st Printing - Page 76
in the side rails and the rear rails are locked in position prior to cover installation. SECURILOCKி PASSIVE ANTI-THEFT SYSTEM Your vehicle is equipped with a coded-key anti-theft system. Only the correct key will be able to start your vehicle. If your keys are lost or stolen, you must take your - 1999 Ford F150 | Owner Guide 1st Printing - Page 77
When the ignition is turned to ON or START, the theft indicator will light for 3 seconds and then go out. If the theft indicator stays on for an extended period of time or flashes rapidly, have the system serviced by your dealership or a qualified technician. Programming spare SecuriLockி keys Spare - 1999 Ford F150 | Owner Guide 1st Printing - Page 78
your new SecuriLock key. 6. To program additional SecuriLock key(s), repeat this procedure from step 1. If the programming procedure was successful, the new SecuriLock key(s) will start the vehicle's engine. The theft indicator (located on the instrument panel) will light for three seconds and - 1999 Ford F150 | Owner Guide 1st Printing - Page 79
key(s) will not operate the vehicle's engine. The theft system which allows you to: • unlock the vehicle doors without a key. • lock all the vehicle doors without a key • activate the personal alarm. The remote entry features only operate with the ignition in the OFF position. Unlocking the doors - 1999 Ford F150 | Owner Guide 1st Printing - Page 80
will also arm your anti-theft system (if equipped). For more information on arming the anti-theft system, refer to Anti-theft system in this chapter. Sounding a panic alarm Press this control to activate the alarm. To deactivate the alarm, press the control again or turn the ignition to ACC or RUN - 1999 Ford F150 | Owner Guide 1st Printing - Page 81
the ignition key to RUN. 2. Press the power door unlock control three times. 3. Turn the ignition key from RUN to OFF. 4. Press the power door unlock control three times. 5. Turn the ignition back to RUN. The horn will chirp. 6. Press the unlock control, then press the lock control. The horn will - 1999 Ford F150 | Owner Guide 1st Printing - Page 82
of the transmitter near the key ring. DO NOT TAKE THE FRONT PART OF THE TRANSMITTER APART. 2. Place the positive (+) side of new battery in the same orientation. Refer to the diagram inside the transmitter unit. 3. Snap the two halves back together. Replacement of the battery will not cause the - 1999 Ford F150 | Owner Guide 1st Printing - Page 83
turn off the interior lights if the ignition switch is turned to the RUN position, or if the remote transmitter lock control is pressed, or after 25 seconds of illumination. The inside lights will not turn off if: • they have been turned on with the dimmer control or • any door is open. The battery - 1999 Ford F150 | Owner Guide 1st Printing - Page 84
the front manual seat Never adjust the driver's seat or seatback when the vehicle is moving. Do not pile cargo higher than the seatbacks to avoid injuring people in a collision or sudden stop. Always drive and ride with your seatback upright and the lap belt snug and low across the hips. Lift handle - 1999 Ford F150 | Owner Guide 1st Printing - Page 85
seatback forward. 60/40 split bench seat (if equipped) • Lift the release bar to move the seat forward or backward. Ensure the seat is relatched into place. • Pull the seatback handle up to recline the seat. • Push down the release lever located on the back of the seat to quickly fold the seatback - 1999 Ford F150 | Owner Guide 1st Printing - Page 86
and safety restraints Captain's chair (if equipped) • Lift the release bar to move the seat forward or rearward. Make sure that the seat is relatched into place. • Pull the seatback handle up to recline the seat. • Push the release lever down to quickly fold the seatback forward. Adjusting the - 1999 Ford F150 | Owner Guide 1st Printing - Page 87
or lower the rear portion of the seat cushion. Press the control to move the seat forward, backward, up or down. Using the manual lumbar support Turn the lumbar support control toward the front of vehicle to increase firmness. Turn the lumbar support control toward the rear of vehicle to increase - 1999 Ford F150 | Owner Guide 1st Printing - Page 88
load floor before folding the seat up. • Make sure the seat cushion is latched into place. • Remove the center safety belt from its stowed position. Check to assure that 60/40 Split rear seat cushion is latched by pulling up and forward on lap belt buckles. Using the armrest (if equipped) Push the - 1999 Ford F150 | Owner Guide 1st Printing - Page 89
the driver, should always properly wear their safety belts, even when an air bag SRS is provided. It is extremely dangerous to ride in a cargo not equipped with seats and safety belts. Be sure everyone in your vehicle is in a seat and using a safety belt properly. Each seating position in your - 1999 Ford F150 | Owner Guide 1st Printing - Page 90
, if the driver brakes suddenly or turns a corner sharply, or the vehicle receives an impact of 8 km/h (5 mph) or more, the combination safety belts will lock to help reduce forward movement of the driver and passengers. The front seat belt system can also be made to lock manually by quickly pulling - 1999 Ford F150 | Owner Guide 1st Printing - Page 91
mode is not available on the driver safety belt. When to use the automatic locking mode • When a tight lap/shoulder fit is desired. • Anytime a child safety seat is installed in a passenger front or outboard rear seating position (if equipped). Refer to Safety Restraints for Children or Safety - 1999 Ford F150 | Owner Guide 1st Printing - Page 92
Seating and safety restraints • Allow the belt to retract. As the belt retracts, you will hear a clicking sound. This indicates the safety belt is now in the automatic locking mode. How to disengage the automatic locking mode Disconnect the combination lap/shoulder belt and allow it to retract - 1999 Ford F150 | Owner Guide 1st Printing - Page 93
is located at the end of the webbing on the label. Also, use the safety belt extension only if the safety belt is too short for you when fully extended. Do not use extensions to change the fit of the shoulder belt across the torso. Safety belt warning light and indicator chime The seat belt - 1999 Ford F150 | Owner Guide 1st Printing - Page 94
Seating and safety restraints Conditions of operation If...The driver's safety belt is not buckled before the ignition switch is turned to the ON position...Then...The safety belt warning light illuminates for one to two minutes and the warning chime sounds for four to eight seconds. The safety belt - 1999 Ford F150 | Owner Guide 1st Printing - Page 95
greatest close to the trim covering the air bag module. All occupants of the vehicle including the driver should always properly wear their safety belts even when air bag SRS is provided. Always transport children 12 years old and under in the back seat and always use appropriate child restraints - 1999 Ford F150 | Owner Guide 1st Printing - Page 96
follow these instructions may increase the risk of injury in a collision. An infant in a rear-facing seat faces a high risk of serious or fatal injuries from a deploying passenger air bag. Rear facing infant seats should NEVER be placed in the front seats, unless the passenger air bag is turned off - 1999 Ford F150 | Owner Guide 1st Printing - Page 97
immediately. If the air bag is not replaced, the unrepaired area will increase the risk of injury in a collision. The SRS consists of: • driver and passenger air bag modules (which include the inflators and air bags), • one or more impact and safing sensors, passenger air bag deactivation switch - 1999 Ford F150 | Owner Guide 1st Printing - Page 98
(restraints control module) monitors its own internal circuits and the supplemental air bag electrical system warning (including the passenger air bag deactivation switch, the impact sensors, the system wiring, the air bag system readiness light, the air bag back up power and the air bag ignitors - 1999 Ford F150 | Owner Guide 1st Printing - Page 99
then turns back on. This indicates that the passenger air bag is deactivated. PASSENGER AIRBAG OFF OFF ON If the light fails to illuminate when the passenger air bag switch is in the OFF position and the ignition switch is in ON, have the passenger air bag switch serviced at your Ford or Lincoln - 1999 Ford F150 | Owner Guide 1st Printing - Page 100
the passenger air bag back on The passenger air bag remains OFF until you turn it back ON. 1. Insert the ignition key and turn the switch to ON. 2. The OFF light will briefly illuminate when the ignition is turned to ON. This indicates that the passenger air bag is operational. PASSENGER AIRBAG OFF - 1999 Ford F150 | Owner Guide 1st Printing - Page 101
12 and younger in the rear seat. Always use safety belts and child restraints properly. If a child in a rear facing infant seat must be transported in front, the passenger air bag must be turned OFF. This is because the back of the infant seat is too close to the inflating air bag and the risk of - 1999 Ford F150 | Owner Guide 1st Printing - Page 102
makes it necessary for the child to ride in the front seat so that the driver can constantly monitor the child's condition. 3. Medical condition. A passenger has a medical condition which, according to his or her physician: • causes the passenger air bag to pose a special risk for the passenger; and - 1999 Ford F150 | Owner Guide 1st Printing - Page 103
use safety restraints for children. Also see Air Bag Supplemental Restraint System (SRS) in this chapter for special instructions about using air follow the instructions and warnings that come with any infant or child restraint you might use. When possible, place children in the rear seat of your - 1999 Ford F150 | Owner Guide 1st Printing - Page 104
the fit of lap and shoulder belts on children who have outgrown child safety seats, Ford recommends use of a belt-positioning booster seat that is labelled as conforming to all Federal motor vehicle safety standards. Belt-positioning booster seats raise the child and provide a shorter, firmer - 1999 Ford F150 | Owner Guide 1st Printing - Page 105
prevent accidental unbuckling. • Place seat back in upright position. • Put the safety belt in the automatic locking mode. Refer to Automatic locking mode (passenger side front and outboard rear seating positions)(if equipped). Ford recommends the use of a child safety seat having a top tether strap - 1999 Ford F150 | Owner Guide 1st Printing - Page 106
lap and shoulder belt seating positions 1. Position the child safety seat in a seat with a combination lap and shoulder belt. An air bag can kill or injure a child in a child seat. If you must use a forward-facing child seat in the front seat, move seat all the way back. Children 12 and under - 1999 Ford F150 | Owner Guide 1st Printing - Page 107
tongue through the child seat according to the child seat manufacturer's instructions. Be sure the belt coming from) for that seating position until you hear a snap and feel the latch engage. Make sure the tongue is latched securely by pulling on it. 5. To put the retractor in the automatic locking - 1999 Ford F150 | Owner Guide 1st Printing - Page 108
in the belt. 9. Before placing the child in the seat, forcibly tilt the seat forward and back to make sure the seat is securely held in place. 10. Try to pull the belt out of the retractor to make sure the retractor is in the automatic locking mode (you should not be able to pull more - 1999 Ford F150 | Owner Guide 1st Printing - Page 109
in the rear edge of the front passenger seat cushion frame. The anchor bracket must be installed using the instructions provided with the kit. Tether anchorage hardware kits (part number 613D74) including instructions, may be obtained at no charge from any Ford or Lincoln-Mercury dealer. If you have - 1999 Ford F150 | Owner Guide 1st Printing - Page 110
computer system controls the engine's idle revolutions per minute (RPM). When the engine starts, the idle RPM runs faster to warm the engine. If the engine idle speed does not slow down automatically, have the vehicle checked. Do not allow the vehicle to idle for more than ten minutes at high engine - 1999 Ford F150 | Owner Guide 1st Printing - Page 111
and vehicle accessories are off. If starting a vehicle with an automatic transmission: • Make sure the parking brake is set. HOOD BRAKE • If • • Make sure the gearshift is in P (Park). starting a vehicle with a manual transmission: Make sure the parking brake is set. Push the clutch pedal to - 1999 Ford F150 | Owner Guide 1st Printing - Page 112
3. Turn the key to 4 (ON) without turning the key to 5 (START). 4 3 5 2 1 THEFT DOOR AJAR 60 80 00 20 40 60 km/h H L 20 40 H L H SELECT RESET 4X4 LOW RANGE LOW FUEL SERVICE ENGINE SOON F E FUEL DOOR 0 MPH FUEL RESET BRAKE C CK SUSP D 2 P RN D Make sure the corresponding lights - 1999 Ford F150 | Owner Guide 1st Printing - Page 113
when the engine starts. 4. After idling for a few seconds, apply the brake and release the parking brake. Using the engine block heater (if equipped) An engine block heater warms the engine coolant, which improves starting, warms up the engine faster and allows the heater-defroster system to respond - 1999 Ford F150 | Owner Guide 1st Printing - Page 114
harm. Important ventilating information If the engine is idling while the vehicle is stopped in an open area for long periods of time, open the windows at least 2.5 cm (one inch). Adjust the heating or air conditioning (if equipped) to bring in fresh air. Improve vehicle ventilation by keeping all - 1999 Ford F150 | Owner Guide 1st Printing - Page 115
functioning of the vehicle's anti-lock brake system. The ABS performs a self-check at 17 km/h (10 mph) after you start the engine and begin to drive away. A brief mechanical noise may be heard during this test. This is normal. If a malfunction is found, the ABS warning light will come on. If the - 1999 Ford F150 | Owner Guide 1st Printing - Page 116
illuminates when the ignition is turned on and the engine is off. If the light does not illuminate momentarily at start up, remains on or continues to flash, the ABS needs to be serviced. With the ABS light on, the anti-lock brake system is disabled and normal BRAKE braking is still effective - 1999 Ford F150 | Owner Guide 1st Printing - Page 117
illuminated (when the ignition is turned ON) until the parking brake is released. BRAKE ! Always set the parking brake fully and make sure that the gearshift is securely latched in P (Park) (automatic transmission) or in 1 (First) (manual transmission). The parking brake is not recommended to - 1999 Ford F150 | Owner Guide 1st Printing - Page 118
right or the extreme left for more than a few seconds when the engine is running. • Do not operate the vehicle with a low power steering pump fluid level. If the power steering system breaks down (or if the engine is turned off), you can steer the vehicle manually, but it takes more effort. 118 - 1999 Ford F150 | Owner Guide 1st Printing - Page 119
illuminates when the air suspension switch is turned off or an air suspension system fault has been detected. If the light is displayed while driving and the air suspension system switch is not turned off, safely pull off the road at your earliest convenience. Turn the ignition switch from 4 (On - 1999 Ford F150 | Owner Guide 1st Printing - Page 120
gearshift out of P (Park) with the brake pedal depressed: 1. Apply the parking brake, turn ignition key to LOCK, then remove the key. 2. Insert the key and turn it to OFF. Apply the brake pedal and shift to N (Neutral). 3. Start the vehicle. If it is necessary to use the above procedure to move the - 1999 Ford F150 | Owner Guide 1st Printing - Page 121
and injure someone. P (Park) Always come to a complete stop before shifting into P (Park). Make sure the gearshift is securely latched in P (Park). This position locks the transmission and prevents the rear wheels from turning. Always set the parking brake fully and make sure the gearshift is - 1999 Ford F150 | Owner Guide 1st Printing - Page 122
gearshift lever. Transmission operates in gears one through three. (Drive) provides more engine braking than (Overdrive) and is useful when: started, the transmission will automatically return to normal overdrive mode. Every time the vehicle is shut off and restarted, you must press the transmission - 1999 Ford F150 | Owner Guide 1st Printing - Page 123
(IF EQUIPPED) Using the clutch Vehicles equipped with a manual transmission have a starter interlock that prevents cranking the engine unless the clutch pedal is fully depressed. When starting a vehicle with a manual transmission, you must: 1. Put gearshift in N (Neutral). 2. Hold down brake pedal - 1999 Ford F150 | Owner Guide 1st Printing - Page 124
4. Turn ignition to position 5 (START) to start the engine, let the engine idle for a few seconds, then shift into gear. 5. Release the brake pedal. 6. Release clutch slowly while pressing down slowly on the accelerator pedal. 4 3 5 2 1 • Do not drive with your foot resting on the clutch pedal - 1999 Ford F150 | Owner Guide 1st Printing - Page 125
and downshift according to the following charts for your specific engine/drivetrain combination: Upshifts when accelerating (recommended for best fuel 2-1 32 km/h (20 mph) 11 km/h (7 mph) 1 2 Use 2H or 4H for 4WD equipped vehicles. Downshift at lower speeds when driving on slippery surfaces. 125 - 1999 Ford F150 | Owner Guide 1st Printing - Page 126
Driving Parking your vehicle 1. Disengage the clutch, apply brake and shift into N (Neutral). 1 2 3 4 D R 2. Set parking brake. 3. Shift into 1 (First). 4. Turn the ignition key to position 3 (OFF). 4 3 5 2 1 126 - 1999 Ford F150 | Owner Guide 1st Printing - Page 127
Use 1 (First) gear and set the parking brake fully. Reverse Make sure that your vehicle is at a complete stop before you shift into R (Reverse). Failure to do so may damage the transmission from D (Overdrive). Removing key from ignition • Turn the ignition key to position 2. • Push the release - 1999 Ford F150 | Owner Guide 1st Printing - Page 128
decreased fuel economy. 4WD system indicator lights The 4WD system indicator lights illuminate only under the following conditions. If these lights illuminate during normal driving, have your vehicle serviced. • 4X4 -illuminates when the ignition is turned on or when 4H (4WD High) is selected. • LOW - 1999 Ford F150 | Owner Guide 1st Printing - Page 129
mph). 2H 4H N 4L Shifting from 4H (4WD high) to 4L (4WD low) 1. Bring the vehicle to a complete stop. 2. Depress the brake. 3. Place the gearshift lever in N (Neutral) (automatic transmission) or depress the clutch (manual transmission). 4. Move the transfer case shift lever 2H through N (Neutral - 1999 Ford F150 | Owner Guide 1st Printing - Page 130
in the N (Neutral) position. Always set the parking brake fully and turn off the ignition when leaving the vehicle. Using the electronic shift 4WD system (if equipped) Positions of the electronic shift system 2H (2WD High) - Power to rear axle only. 4H (4WD High) - Power delivered to front and rear - 1999 Ford F150 | Owner Guide 1st Printing - Page 131
to 2H at any forward speed. 2H 4H 4L Shifting between 4H (4WD high) and 4L (4WD low) 1. Bring the vehicle to a stop. 2. Depress the brake. 3. Place the gearshift in N (Neutral) (automatic transmission) or depress the clutch (manual transmission). 4. Move the 4WD control to the 4H 4H or 4L position - 1999 Ford F150 | Owner Guide 1st Printing - Page 132
shifting from forward and reverse gears, stopping between shifts, in a steady pattern. Press lightly on the accelerator in each gear. Do not rock the vehicle for more than a few minutes. The transmission and tires may be damaged or the engine can overheat. Do not spin the wheels at over 56 km/h (35 - 1999 Ford F150 | Owner Guide 1st Printing - Page 133
mph). Automatic transmissions may starting from a full stop. When braking, apply the brakes as you normally would. In order to allow the anti-lock brake system (ABS) to operate properly, keep steady pressure on the brake pedal. Allow more stopping distance and drive slower than usual. Consider using - 1999 Ford F150 | Owner Guide 1st Printing - Page 134
fluids, lubricants, etc. It does not include passengers or aftermarket equipment the driver's door pillar. • GAWR (Gross Axle Weight Rating) : Carrying capacity for each axle system. The GAWR subtracting the vehicle curb weight for each engine/transmission combination, any required option weight for - 1999 Ford F150 | Owner Guide 1st Printing - Page 135
vehicle and/or personal injury. Calculating the load your vehicle can carry/tow 1. Use the appropriate maximum gross combined weight rating (GCWR) chart to find the maximum GCWR for your type engine and rear axle ratio. 2. Weigh your vehicle as you customarily operate the vehicle without cargo. To - 1999 Ford F150 | Owner Guide 1st Printing - Page 136
is designated by weight, not by volume, so you cannot necessarily use all available space when loading a vehicle. Towing a trailer places an additional load on your vehicle's engine, transmission, axle, brakes, tires and suspension. Inspect these components carefully after any towing operation. 136 - 1999 Ford F150 | Owner Guide 1st Printing - Page 137
engine damage, transmission/axle damage, structural damage, loss of control, and personal injury. Trailer towing tables F-150 4x2 with automatic transmission Engine Rear axle 800) 800) 600) 200) 600) 300) 600) 600) 500) 000) 300) 000) 4.2L 4.2L 4.6L 4.6L 5.4L 5.4L 4.2L 4.2L 4.6L 4.6L 5.4L 5.4L 137 - 1999 Ford F150 | Owner Guide 1st Printing - Page 138
Maximum trailer weight-kg (lbs.) 1 1 1 1 132 630 041 587 (2 (3 (2 (3 500) 600) 300) 500) 4.2L 4.2L 4.6L 4.6L 4.2L 4.2L 4.6L 4.6L 951 (2 100) 1 540 (3 400) 907 (2 000) 1496 (3 300) F-150 4x4 automatic transmission Engine Rear axle ratio 3.55 3.55/16 3.55/17 3.55/16 3.55/17 3.55/16 3.55/17 3.55/16 - 1999 Ford F150 | Owner Guide 1st Printing - Page 139
F-150 4x4 manual transmission Trailer towing table (F-150 4x4 manual transmission) Engine Rear axle Maximum GCWRMaximum trailer ratio kg (lbs.) weight-kg (lbs.) Regular Cab F-150 4.2L 3.31 2 944 (6 500) 861 (1 900) 4.2L 3.55 3 533 (7 800) 1 451 (3 200) 4.6L 3.08 2 944 (6 500) 816 (1 800) 4.6L - 1999 Ford F150 | Owner Guide 1st Printing - Page 140
200) 1 133 (2 500) 1 406 (3 100) 4.6L 4.6L 4.6L 4.6L F-250 4x4 automatic transmission Engine Rear axle ratio 3.31 3.73 3.31 3.73 3.31 3.73 3.31 400) 400) 900) 800) 300) 4.6L 4.6L 5.4L 5.4L 4.6L 4.6L 5.4L 5.4L F-250 4x4 manual transmission Engine Rear axle ratio 3.31 3.73 3.31 3.73 Maximum GCWRkg - 1999 Ford F150 | Owner Guide 1st Printing - Page 141
vehicle on a level surface. With the ignition on and all doors closed, allow the vehicle to stand for several minutes so that it can level. 2. Turn the air suspension (if equipped) control to OFF. 3. Measure the height of a reference point on the front and rear bumpers at the center of the vehicle - 1999 Ford F150 | Owner Guide 1st Printing - Page 142
the trailer tongue and allow slack for turning corners. If you use a rental trailer, follow the instructions that the rental agency gives to you. Do not attach safety chains to the bumper. Trailer brakes Electric brakes and manual, automatic or surge-type brakes are safe if installed properly and - 1999 Ford F150 | Owner Guide 1st Printing - Page 143
check your hitch, electrical connections and trailer wheel lug nuts. • When stopped in traffic for long periods of time in hot weather, place the gearshift in P (Park) (automatic transmissions) or N (Neutral) (manual transmissions). This aids engine cooling and air conditioner efficiency. • Vehicles - 1999 Ford F150 | Owner Guide 1st Printing - Page 144
and automatic transmissions) 1. Place transmission in P (Park) (automatic transmission), or R (Reverse) (manual transmission). Engage the parking brake. 2. Shift the transfer case to N (Neutral). 3. Lockout the center disconnect by capping off one of the front axle vacuum motor lines. See your Ford - 1999 Ford F150 | Owner Guide 1st Printing - Page 145
for low speed, personal use snow removal: • F-150/F-250 4WD Regular Cab long wheelbase • 4.6L or 5.4L engine • Heavy duty service package • Super engine cooling • Heavy duty front suspension package • Automatic transmission with auxiliary automatic transmission fluid cooling • All-terrain tires - 1999 Ford F150 | Owner Guide 1st Printing - Page 146
if required). These specifications are located in the vehicle's Workshop Manual. Adherence to the toe, tire pressures and ride height specification is important for proper tire wear, ride, handling and headlight aim. Also, maintain the engine oil and transmission fluid change intervals following the - 1999 Ford F150 | Owner Guide 1st Printing - Page 147
damage to the vehicle and the snow removal equipment as well as possible air bag deployment. Do not attempt to service, repair, or modify the Air Bag Supplemental Restraint System or its fuses. See your Ford or Lincoln-Mercury dealer. Engine temperature while plowing When driving with a plow, your - 1999 Ford F150 | Owner Guide 1st Printing - Page 148
full left or full right to provide maximum airflow to the radiator. If you are driving less than 24 km (15 High) when plowing larger areas or light snow at higher speeds. Do not exceed 24 km/h (15 mph). • Do not shift the transmission from a forward gear to R (Reverse) until the engine is at idle - 1999 Ford F150 | Owner Guide 1st Printing - Page 149
• The hazard lights control is located on top of the steering column. • Depress hazard lights control to activate all hazard flashers simultaneously. • Depress control again to turn the flashers off. FUEL PUMP SHUT-OFF SWITCH After a collision, if the engine cranks but does not start, the fuel pump - 1999 Ford F150 | Owner Guide 1st Printing - Page 150
are identified by a broken wire within the fuse. Check the appropriate fuses before replacing any electrical components. 15 Always replace a fuse with one that has the specified amperage rating. Using a fuse with a higher amperage rating can cause severe wire damage and could start a fire. 150 - 1999 Ford F150 | Owner Guide 1st Printing - Page 151
Blue - - Pink Pink Green Green Red Red - Yellow - Brown - Black Passenger compartment fuse panel The fuse panel is located below and to the left of the steering wheel by the brake pedal. Remove the panel cover to access the fuses. To remove a fuse use the fuse puller tool provided on the fuse panel - 1999 Ford F150 | Owner Guide 1st Printing - Page 152
Connector Autolamp Module, Remote Entry Module, Mirrors AC Clutch Relay, Speed Control Module, Reverse Lamp, Climate Mode Switch, Daytime Running Lamp Relay Cluster, Brake Shift Interlock Solenoid, Rear Air Suspension Module, GEM Module Not Used Radio, Remote Entry Module, GEM Module Not Used 152 - 1999 Ford F150 | Owner Guide 1st Printing - Page 153
(PCM), 15A Starter Relay, Clutch Switch, Fuse 20 10A Air Bag Module, Passenger Airbag Deactivation Module 10A Trailer Tow Battery Charge Relay, Turn/Hazard Flasher, 4x4 Solenoids, 4x4 Relays 10A Climate Mode Switch (Blower Relay) 5A 4 Wheel Anti-Lock Brake System (4WABS) Module 10A Right Side Low - 1999 Ford F150 | Owner Guide 1st Printing - Page 154
current fuses that protect your vehicle's main electrical systems from overloads. Always disconnect the battery before servicing high current fuses. Always replace the cover to the Power Distribution Box before reconnecting the battery or refilling fluid reservoirs. HALF RELAY 204 D 503 MAXI FUSE - 1999 Ford F150 | Owner Guide 1st Printing - Page 155
Mass Air Flow Sensor Trailer Tow Stop and Right Turn Lamp Trailer Tow Stop and Left Turn Lamp Not Used Not Used Powertrain Control Module, HEGO Sensor, Canister Vent Powertrain C ontrol Module, Automatic Transmission, CMS Sensor Trailer Tow Battery Charge Four Wheel Antilock Brake Module/Rear Wheel - 1999 Ford F150 | Owner Guide 1st Printing - Page 156
Battery Feed 4x4 Shift Motor & Clutch Climate Control Front Blower Not Used Not Used Trailer Tow Electric Brake Air Suspension Compressor Power Windows Ignition Switch Battery Feed (Start and Run Circuits) Drivers Power Seat Ignition Switch Battery Feed (Run and Accessory Circuits) Not Used Not Used - 1999 Ford F150 | Owner Guide 1st Printing - Page 157
Location of the spare tire and tools The spare tire and tools for your vehicle are stowed in the following locations: Tool Spare tire Jack, lug nut wrench Jack handle Location Under the vehicle, just forward of the rear bumper Under the seat On top of the radiator support at the front of the engine - 1999 Ford F150 | Owner Guide 1st Printing - Page 158
bumper opening. The handle will stop moving and forward resistance to turning will be felt when properly engaged. 2. Turn the handle counterclockwise until tire is lowered to the ground, the tire can be slid rearward and the cable change a tire, be sure the parking brake is set, then block (in both - 1999 Ford F150 | Owner Guide 1st Printing - Page 159
in P (Park) (automatic transmission) or in the reverse gear (manual transmission) BRAKE and turn engine OFF. HOOD 3. Block the diagonally opposite wheel. 4. Obtain the spare tire and jack from their storage locations. 5. Use the tip of the lug wrench to remove any wheel trim. 6. Loosen each wheel - 1999 Ford F150 | Owner Guide 1st Printing - Page 160
Roadside emergencies 7. Turn OFF the air suspension switch (if equipped). 8. Position the jack according to the following guides and turn the jack handle clockwise until the wheel is completely off the ground. When one of the rear wheels is off the ground, the transmission alone will not prevent the - 1999 Ford F150 | Owner Guide 1st Printing - Page 161
put any part of your body under the vehicle while changing a tire. Do not start the engine when your vehicle is on the jack. The jack is only meant for changing the tire. • Never use the front or rear differential as a jacking point. 9. Remove the lug nuts with the lug wrench. 10. Replace the flat - 1999 Ford F150 | Owner Guide 1st Printing - Page 162
damage the vehicle's electrical system. 3. Park the booster vehicle close to the hood of the disabled vehicle making sure the two vehicles do not touch. Set the parking brake on both vehicles and stay clear of the engine cooling fan and other moving parts. 4. Check all battery terminals and remove - 1999 Ford F150 | Owner Guide 1st Printing - Page 163
in both vehicles to protect any electrical surges. Turn all other accessories off. Connecting the jumper cables 1. Connect the positive (+) booster cable to the positive (+) terminal of the discharged battery. Note: In the illustrations, lightning bolts are used to designate the assisting (boosting - 1999 Ford F150 | Owner Guide 1st Printing - Page 164
cable to an exposed metal part of the stalled vehicle's engine, away from the battery and the carburetor. The preferred locations of an exposed metal part (to ground the circuit) are the alternator mounting brackets or an engine lifting eye. Do not use fuel lines, engine rocker covers or the intake - 1999 Ford F150 | Owner Guide 1st Printing - Page 165
and run the engine at moderately increased speed. 2. Start the engine of the disabled vehicle. 3. Once the disabled vehicle has been started, run both engines for a further three minutes before disconnecting the jumper cables. Removing the jumper cables Remove the jumper cables in the reverse - 1999 Ford F150 | Owner Guide 1st Printing - Page 166
of the booster vehicle's battery. 4. Remove the jumper cable from the positive (+) terminal of the disabled vehicle's battery. After the disabled vehicle has been started and the jumper cables removed, allow it to idle for several minutes so the engine computer can relearn its idle conditions. 166 - 1999 Ford F150 | Owner Guide 1st Printing - Page 167
. It is recommended that your vehicle be towed with a wheel lift or flatbed equipment. Do not tow with a slingbelt. Ford Motor Company has not approved a slingbelt towing procedure. If equipped with air suspension, the air suspension control must be turned to the OFF position. On 4x2 vehicles, it is - 1999 Ford F150 | Owner Guide 1st Printing - Page 168
" its idle conditions before your vehicle will drive properly, as explained in the Battery section in this chapter. Working with the engine off • Automatic transmission: 1. Set the parking brake and ensure the gearshift is securely latched in P (Park). 2. Turn off the engine and remove the key - 1999 Ford F150 | Owner Guide 1st Printing - Page 169
engine on • Automatic transmission: 1. Set the parking brake and ensure the gearshift is securely latched in P (Park). 2. Block the wheels to prevent the vehicle from moving unexpectedly. Do not start your engine with the air cleaner removed and do not remove it while the engine is running. • Manual - 1999 Ford F150 | Owner Guide 1st Printing - Page 170
1. Battery 2. Engine oil filler cap 3. Engine oil dipstick 4. Clutch fluid reservoir (manual transmission) 5. Brake fluid reservoir 6. Engine coolant reservoir 7. Air filter assembly 8. Power steering fluid reservoir 9. Transmission fluid dipstick (automatic transmission) 10. Windshield washer fluid - 1999 Ford F150 | Owner Guide 1st Printing - Page 171
reservoir (manual transmission) 3. Power steering fluid reservoir 4. Brake fluid reservoir 5. Power distribution box 6. Air filter assembly 7. Engine coolant reservoir 8. Windshield washer fluid reservoir 9. Battery 10. Transmission fluid dipstick (automatic transmission) 11. Engine oil filler cap - 1999 Ford F150 | Owner Guide 1st Printing - Page 172
. 2. Turn the engine off and wait a few minutes for the oil to drain into the oil pan. 3. Set the parking brake and ensure the gearshift is securely latched in P (Park) (automatic transmission) or 1 (First) (manual transmission). 4. Open the hood. Protect yourself from engine heat. 5. Locate and - 1999 Ford F150 | Owner Guide 1st Printing - Page 173
damage. Some oil must be removed from the engine by a service technician. 7. Put the indicator back in and ensure it is fully seated. Adding engine oil 1. Check the engine oil. For instructions, refer to Checking the engine oil in this chapter. 2. If the engine oil level is not within the MIN and - 1999 Ford F150 | Owner Guide 1st Printing - Page 174
oil filter (or another brand meeting Ford specifications) for your engine application. BRAKE FLUID Checking and adding brake fluid Brake fluid should be checked and refilled as needed. Refer to the Scheduled Maintenance Guide for the service interval schedules: 1. Clean the reservoir cap before - 1999 Ford F150 | Owner Guide 1st Printing - Page 175
Scheduled Maintenance Guide for the service interval schedules. During normal operation, the fluid level in the clutch reservoir should remain constant. If the fluid level drops, maintain the fluid level at the step in the reservoir. Use only a DOT 3 brake fluid designed to meet Ford specifications - 1999 Ford F150 | Owner Guide 1st Printing - Page 176
Clean the reservoir cap before removal to prevent dirt and water from entering the reservoir. 2. Remove cap and rubber diaphragm from reservoir. 3. Add fluid until the level reaches the step in the reservoir. 4. Reinstall rubber diaphragm and cap onto reservoir. WINDSHIELD WASHER FLUID Checking and - 1999 Ford F150 | Owner Guide 1st Printing - Page 177
Maintenance and care ENGINE COOLANT Check the level of the engine coolant in the reservoir. Refer to the Scheduled Maintenance Guide for service interval schedules. Be sure to read and understand Precautions when servicing your vehicle in this chapter. COLD FILL RANGE If the engine coolant has not - 1999 Ford F150 | Owner Guide 1st Printing - Page 178
back while the pressure releases. 4. When you are sure that all the pressure has been released, use the cloth to turn it counterclockwise and remove the cap. Change your engine coolant according to the appropriate schedule listed in the Scheduled Maintenance Guide. Use Ford Premium Engine Coolant - 1999 Ford F150 | Owner Guide 1st Printing - Page 179
and care Not all coolant recycling processes produce coolant which meets Ford specification ESE-M97B44-A, and use of such coolant may harm engine and cooling system components. Always dispose of used automotive fluids in a responsible manner. Follow your community's regulations and standards for - 1999 Ford F150 | Owner Guide 1st Printing - Page 180
. • the air conditioning system will be disabled. Continued operation will increase the engine temperature: • the engine will completely shut down. • steering and braking effort will increase. Once the engine temperature cools, the engine can be re-started. Take your vehicle to a service facility as - 1999 Ford F150 | Owner Guide 1st Printing - Page 181
Maintenance and care CHECKING AND ADDING POWER STEERING FLUID Check the power steering fluid. Refer to the Scheduled Maintenance Guide for the service interval schedules. If adding fluid is necessary, use only MERCON ATF. 1. Start the engine and let it run until it reaches normal operating - 1999 Ford F150 | Owner Guide 1st Printing - Page 182
Maintenance and care TRANSMISSION FLUID Checking automatic transmission fluid Refer to your Scheduled Maintenance Guide for scheduled intervals for fluid checks and changes. Your transmission does not consume fluid. However, the fluid level should be checked if the transmission is not working - 1999 Ford F150 | Owner Guide 1st Printing - Page 183
[150°F-170°F]). DON'T ADD The transmission fluid should be in this range if at ambient temperature (10°C-35°C [50°F-95°F]). ADD COLD HOT DO NOT ADD DON'T ADD High fluid level Fluid levels above the safe range may result in transmission failure. An overfill condition of transmission fluid may - 1999 Ford F150 | Owner Guide 1st Printing - Page 184
. Use of a non-approved automatic transmission fluid may cause internal transmission component damage. If necessary, add fluid in overfill condition of transmission fluid may cause DON'T ADD shift and/or engagement concerns and/or possible damage. Checking and adding manual transmission fluid 1. - 1999 Ford F150 | Owner Guide 1st Printing - Page 185
should be at bottom of the opening. 4. Add enough fluid through the filler opening so that the fluid level is at the bottom of the opening. 5. Install and tighten the fill plug securely. Use only fluid that meets Ford specifications. Refer to the Capacities and specifications chapter. Checking and - 1999 Ford F150 | Owner Guide 1st Printing - Page 186
joints are replaced with universal joints equipped with grease fittings, lubrication will also be necessary. BATTERY Your vehicle is equipped with a Motorcraft maintenance-free battery which normally does not require additional water during its life of service. However, for severe usage or in high - 1999 Ford F150 | Owner Guide 1st Printing - Page 187
often, have the charging system checked. If your battery has a cover/shield, make sure it is reinstalled after the battery has been cleaned or replaced. For longer, trouble-free operation, keep the top of the battery clean and dry. Also, make certain the battery cables are always tightly fastened - 1999 Ford F150 | Owner Guide 1st Printing - Page 188
(manual transmission), turn off all accessories and start the engine. 3. Let the engine idle for at least one minute. 4. The relearning process will automatically complete as you drive the vehicle. • The vehicle may need to be driven 16 km (10 miles) or more to relearn the idle and fuel trim - 1999 Ford F150 | Owner Guide 1st Printing - Page 189
unmetered air to enter the engine if not properly seated. 5. Replace the two halves of the air filter housing and secure the clamp. WINDSHIELD WIPER BLADES Check the wiper blades at least twice a year or when they seem less effective. Substances such as tree sap and some hot wax treatments used by - 1999 Ford F150 | Owner Guide 1st Printing - Page 190
Maintenance and care Changing the wiper blades To replace the wiper blades: 1. Pull the wiper arm away from the windshield and lock into the service position. 2. Turn the blade at an angle from the wiper arm. Push the lock pin manually to release the blade and pull the wiper blade down toward the - 1999 Ford F150 | Owner Guide 1st Printing - Page 191
graded 150 would wear one and one-half (1 1/2) times as well on the government course as a tire graded 100. The relative performance of tires depends upon the actual conditions of their use, however, and may depart significantly from the norm due to variations in driving habits, service practices - 1999 Ford F150 | Owner Guide 1st Printing - Page 192
Use an accurate tire pressure gauge. • Check the tire pressure when tires are cold, after the vehicle has been parked for at least one hour or has been driven less than 5 km (3 miles). • Adjust tire pressure to recommended specifications found on the label located on the passenger door Guide. - 1999 Ford F150 | Owner Guide 1st Printing - Page 193
treads. When replacing full size tires, never mix radial, bias-belted, or bias-type tires. Use only the same size, speed rating, and load-carrying capacity. Use only the tire combinations recommended on the decal. If and safely. Make sure that all replacement tires are of the same size, type, - 1999 Ford F150 | Owner Guide 1st Printing - Page 194
replace your tires with "high using snow tires and chains: • Use only SAE Class S chains. • Install chains securely, verifying that the chains do not touch any wiring, brake no longer needed. Do not use tire chains on dry roads. • The suspension insulation and bumpers will help prevent vehicle damage. - 1999 Ford F150 | Owner Guide 1st Printing - Page 195
lead to fuel spray and fire. If you do not use the proper fuel cap, the pressure in the fuel tank can damage the fuel system or cause it to work improperly in a collision. The fuel system may be under pressure. If the fuel cap is venting vapor or if you hear a hissing sound, wait - 1999 Ford F150 | Owner Guide 1st Printing - Page 196
control devices and systems may be adversely affected. In New York and Massachusetts, which have adopted California's emission standards without requiring the sale of California cleaner-burning gasoline, repairs to correct the effects of using non-California fuel may not be covered by the emissions - 1999 Ford F150 | Owner Guide 1st Printing - Page 197
most driving conditions while you are using fuel with the recommended octane rating, see your dealer or a qualified service technician to prevent any engine damage. 87 Fuel quality If you are experiencing starting, rough idle or hesitation driveability problems during a cold start, try a different - 1999 Ford F150 | Owner Guide 1st Printing - Page 198
comes on and stays on when you start the engine, the fuel filler cap may not be properly installed. Turn off the engine, remove the fuel filler cap and reinstall it being careful to align the cap properly. If you must replace the fuel filler cap, replace it with a genuine Ford or Motorcraft part - 1999 Ford F150 | Owner Guide 1st Printing - Page 199
or a qualified service technician. Refer to the Scheduled Maintenance Guide for the appropriate intervals for changing the fuel filter. If you replace the fuel filter, replace it with an authorized Motorcraft part. The customer warranty may be void for any damage to the fuel system if an authorized - 1999 Ford F150 | Owner Guide 1st Printing - Page 200
economy: Multiply liters used by 100, then divide by total kilometers traveled. Divide total miles traveled by total gallons used. Keep a record for • Steady speeds without stopping will usually give the best fuel economy. • Idling for long periods of time (greater than one minute) may waste fuel. - 1999 Ford F150 | Owner Guide 1st Printing - Page 201
15% more fuel than traveling at 88 km/h [55 mph]). • Revving the engine before turning it off may reduce fuel economy. • Use of the air conditioner or defroster may reduce fuel economy. • Use of speed control (if equipped) may improve fuel economy. Speed control can help maintain a constant speed - 1999 Ford F150 | Owner Guide 1st Printing - Page 202
vehicle and to its emissions system. If other than Ford, Motorcraft or Ford-authorized parts are used for maintenance replacements or for service of components affecting emission control, such non-Ford parts should be equivalent to genuine Ford Motor Company parts in performance and durability. 202 - 1999 Ford F150 | Owner Guide 1st Printing - Page 203
not park, idle, or drive your vehicle in dry grass or other dry ground cover. The emission system heats up the engine compartment and exhaust system, which can start a fire. Illumination of the charging system warning light, Check Engine indicator light or the temperature warning light, fluid leaks - 1999 Ford F150 | Owner Guide 1st Printing - Page 204
High-mount brakelamp • Brakelamps • Turn signals • License plate lamp • Tail lamps • Back-up lamps Do not remove lamp bulbs unless they can be replaced immediately control is in the OFF position. 2. Open the hood. 3. At the back of the headlamp, pull clips rearward and up (about 3⁄4 inch) to release the - 1999 Ford F150 | Owner Guide 1st Printing - Page 205
ring over the plastic base and lock the ring into the socket by turning it clockwise until you feel a "stop." 10. Connect the electrical connector into the plastic base until inserted into the proper holes and into the guide ribs. 13. Hold the headlamp assembly snugly against the vehicle and push down on - 1999 Ford F150 | Owner Guide 1st Printing - Page 206
Maintenance and care Replacing front parking lamp/turn signal bulbs 1. Remove screw from the lamp assembly. 2. Disengage lamp assembly (it has a snap fit). 3. Remove bulb socket from the parking lamp assembly by turning it counterclockwise about 1⁄4 turn. 4. Pull bulb straight out of socket and - 1999 Ford F150 | Owner Guide 1st Printing - Page 207
backup lamp bulbs are located in the same portion of the tail lamp assembly, one just below the other. Follow the same steps to replace either bulb: 1. not snap into place.) 6. Secure the tail lamp with two screws. High-mount brakelamp bulbs To remove the brakelamp assembly: 1. Remove the two screws - 1999 Ford F150 | Owner Guide 1st Printing - Page 208
bulb socket in lamp assembly by turning it clockwise. Using the right bulbs Number of bulbs Front park/turn lamps 2 Foglamps 2 Headlamps 2 Backup lamp 2 Rear stop/turn/sidemarker/tail lamp 2 High-mount brakelamp 2 License plate lamp 2 To replace all instrument panel lights - see your dealer Function - 1999 Ford F150 | Owner Guide 1st Printing - Page 209
alignment of your headlamps should be checked by a qualified service technician if: • Oncoming motorists frequently signal you to deactivate your high beams, and your high beams are not activated. • The headlamps do not seem to provide enough light for clear night vision. • The headlamp beams are - 1999 Ford F150 | Owner Guide 1st Printing - Page 210
accessory line. Observe the application instructions on the products. Remove particles such as bird droppings, tree sap, insect remains, tar spots, road salt and industrial fallout immediately. Cleaning the wheels Wash with the same detergent as the body of your vehicle. Do not use acid-based or - 1999 Ford F150 | Owner Guide 1st Printing - Page 211
normal. When washing: • Take care when using a power washer to clean the engine. The high pressure fluid could penetrate the sealed parts and cause damage. • Do not spray with cold water to avoid cracking the engine block or other engine components. • Cover the highlighted areas to prevent water - 1999 Ford F150 | Owner Guide 1st Printing - Page 212
on the windshield such as tree sap and some hot wax treatments used by commercial car washes. Clean the outside of the windshield with a blades should be cleaned on a regular basis, and blades or rubber elements replaced when worn. Cleaning the instrument panel Clean with a damp cloth, then dry - 1999 Ford F150 | Owner Guide 1st Printing - Page 213
To avoid damage to the vinyl tonneau cover, do not use any silicone based cleaner or conditioner. Do not use stiff bristle brushes or abrasive materials or cleaners. Hot waxes applied by commercial car washes can affect the cleanability of vinyl material. Using high water pressure or wand-type car - 1999 Ford F150 | Owner Guide 1st Printing - Page 214
PART NUMBERS Component Air filter element Fuel filter Oil filter PCV valve Battery (standard) Battery (heavy duty) Spark plugs-platinum* 4.2L V6 engine 4.6L V8 engine 5.4L V8 engine needs to be replaced, use only spark plugs with the service number suffix letter ЉEEЉ as shown on the engine decal. *** - 1999 Ford F150 | Owner Guide 1st Printing - Page 215
Fluid Ford Part Application Name High All Performance DOT 3 Motor Vehicle Brake Fluid 4.2L V6 engine with 1 row radiator 4.2L V6 engine with 2 row radiator Premium 4.6L V8 engine with Engine 1 row radiator Coolant 4.6L V8 engine with 2 row radiator 5.4L V8 engine with 1 row radiator 5.4L V8 engine - 1999 Ford F150 | Owner Guide 1st Printing - Page 216
Part Name Application 5-speed manual Automatic- 4R100 (4x2)4 Automatic- 4R100 (4x4)4 Automatic- 4R70W 4x4 vehicles 3 Capacity 3.5L (3.75 quarts) 15.0L (15.9 quarts)5 15.5L (16.4 quarts)5 13.1L (13.9 quarts) 1.8-2.0L (3.5-3.7 pints) 2.6-2.7L (5.5-5.8 pints) Motorcraft MERCON Transmission ATF fluid - 1999 Ford F150 | Owner Guide 1st Printing - Page 217
SAE 75W90 Axle Lubricant Motorcraft SAE 75W140 High Performance Synthetic Rear Axle Lube1 High Performance DOT 3 Motor Vehicle Brake Fluid Ford part number XY-75W90-QL F1TZ-19580-B Ford specification WSP-M2C201-A WSL-M2C192-A Rear axle C6AZ-19542-AB Brake fluid and clutch fluid ESA-M6C25 - 1999 Ford F150 | Owner Guide 1st Printing - Page 218
Ford part number Ford specification Engine oil Hinges, latches, striker plates, fuel filler door hinge and seat tracks. Transmission /steering/parking brake linkages and pivots, brake and clutch pedal shaft (if equipped) Power steering fluid, transfer case fluid (4X4) and transmission fluid (manual - 1999 Ford F150 | Owner Guide 1st Printing - Page 219
MERCON may cause transmission damage. Use of any fluid other than the recommended fluid may cause transmission damage. ENGINE DATA Engine Cubic inches Horsepower Torque Recommended fuel Firing order Spark plug gap Ignition system Compression ratio 1 1 4.2L V6 engine 4.6L V8 engine 256 281 205 - 1999 Ford F150 | Owner Guide 1st Printing - Page 220
) 3 518 mm (138.5 in) (LWB) 1 661 mm (65.4 in) 1 661 mm (65.4 in) Body Regular Cab 4x4 5 250 mm (206.7 in) (SWB) 5 716 mm (225.0 in) (LWB) 2 019 mm (79.5 65.4 in) 1 661 mm (65.4 in) Style Super Cab 4x2 5 607 mm (220.7 in) (SWB) 6 150 mm (242.1 in) (LWB) 1 989 mm (78.3 in)1 1 846 mm (72.7 in) (SWB) 1 - 1999 Ford F150 | Owner Guide 1st Printing - Page 221
.3 in)1 1 846 mm (72.7 in) 3 046 mm (119.9 in) 1 661 mm (65.4 in) Body Regular Cab 4x4 5 250 mm (206.7 in) 2 028 mm (79.8 in)1 1 917 mm (75.5 in) 3 053 in)1 1 846 mm (72.7 in) 3 518 mm (138.5 in) 1 661 mm (65.4 in) Super Cab 4x4 5 722 mm (225.3 in) 2 019 mm (79.5 in)1 1 917 mm (75.5 in) 3 526 mm - 1999 Ford F150 | Owner Guide 1st Printing - Page 222
Capacities and specifications 4 1 3 5 2 222 - 1999 Ford F150 | Owner Guide 1st Printing - Page 223
number The vehicle identification number is attached to a metal tag and is located on the driver side instrument panel. AIR BAG XXXXXXXXXXXXXXXXX Engine number The engine number (the last eight numbers of the vehicle identification number) is stamped on the engine block and transmission. 223 - 1999 Ford F150 | Owner Guide 1st Printing - Page 224
safety defect exists in a group of vehicles, it may order a recall and remedy campaign. However, NHTSA cannot become involved in individual problems between you, your dealer or Ford Motor Company. To contact NHTSA, you may either call the Auto Safety Hotline toll-free at 1-800-424-9393 (202-366-0123 - 1999 Ford F150 | Owner Guide 1st Printing - Page 225
filter ...188,189 Air suspension ...119 warning light ...11 Anti-theft system ...76,77,78 Armrests ...88 Automatic transmission driving an automatic overdrive ...121,122,123 Axle refill capacities ...215 Battery voltage gauge ...14 Brakes ...115 anti-lock ...115,116 anti-lock brake system (ABS - 1999 Ford F150 | Owner Guide 1st Printing - Page 226
air suspension ...119 anti-lock brakes (ABS) ...9 anti-theft ...9 brake ...8 charging system ...9 door ajar ...11 engine oil pressure ...10 fuel reset ...11 low fuel ...6 safety belt ...8 service engine soon ...7 turn signal indicator ...9 Lumbar support, seats ...87,88 Manual transmission reverse - 1999 Ford F150 | Owner Guide 1st Printing - Page 227
...167 Traction-lok rear axle ...118 Transfer case fluid checking ...185 Transmission automatic operation ...120 fluid, checking and adding (automatic) ...182,183,184 fluid, checking and adding (manual) ...184 manual operation ...123 Transmission control indictor light ...10 Trip odometer ...14 - 1999 Ford F150 | Owner Guide 1st Printing - Page 228
228 - 1999 Ford F150 | Owner Guide 1st Printing - Page 229
229 - 1999 Ford F150 | Owner Guide 1st Printing - Page 230
230 - 1999 Ford F150 | Owner Guide 1st Printing - Page 231
231 - 1999 Ford F150 | Owner Guide 1st Printing - Page 232
and specifications chapter. 1 Use Ford Premium Cooling System Fluid (green in color). DO NOT USE Ford Extended Life Engine Coolant (orange in color). Refer to Adding engine coolant, in the Maintenance and Care chapter. 2 Ensure correct automatic transmission fluid is used for a specific application
-
 1
1 -
 2
2 -
 3
3 -
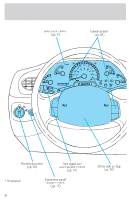 4
4 -
 5
5 -
 6
6 -
 7
7 -
8
-
9
-
10
-
11
-
12
-
13
-
14
-
15
-
16
-
17
-
18
-
19
-
20
-
21
-
22
-
23
-
24
-
25
-
26
-
27
-
28
-
29
-
30
-
31
-
32
-
33
-
34
-
35
-
36
-
37
-
38
-
39
-
40
-
41
-
42
-
43
-
44
-
45
-
46
-
47
-
48
-
49
-
50
-
51
-
52
-
53
-
54
-
55
-
56
-
57
-
58
-
59
-
60
-
61
-
62
-
63
-
64
-
65
-
66
-
67
-
68
-
69
-
70
-
71
-
72
-
73
-
74
-
75
-
76
-
77
-
78
-
79
-
80
-
81
-
82
-
83
-
84
-
85
-
86
-
87
-
88
-
89
-
90
-
91
-
92
-
93
-
94
-
95
-
96
-
97
-
98
-
99
-
100
-
101
-
102
-
103
-
104
-
105
-
106
-
107
-
108
-
109
-
110
-
111
-
112
-
113
-
114
-
115
-
116
-
117
-
118
-
119
-
120
-
121
-
122
-
123
-
124
-
125
-
126
-
127
-
128
-
129
-
130
-
131
-
132
-
133
-
134
-
135
-
136
-
137
-
138
-
139
-
140
-
141
-
142
-
143
-
144
-
145
-
146
-
147
-
148
-
149
-
150
-
151
-
152
-
153
-
154
-
155
-
156
-
157
-
158
-
159
-
160
-
161
-
162
-
163
-
164
-
165
-
166
-
167
-
168
-
169
-
170
-
171
-
172
-
173
-
174
-
175
-
176
-
177
-
178
-
179
-
180
-
181
-
182
-
183
-
184
-
185
-
186
-
187
-
188
-
189
-
190
-
191
-
192
-
193
-
194
-
195
-
196
-
197
-
198
-
199
-
200
-
201
-
202
-
203
-
204
-
205
-
206
-
207
-
208
-
209
-
210
-
211
-
212
-
213
-
214
-
215
-
216
-
217
-
218
-
219
-
220
-
221
-
222
-
223
-
224
-
225
-
226
-
227
-
228
-
229
-
230
-
231
-
232
 |
 |

Before driving
Introduction
2
Instrumentation
4
Controls and features
15
Seating and safety restraints
79
Starting and driving
Starting
106
Driving
111
Roadside emergencies
145
Servicing
Maintenance and care
165
Capacities and specifications
211
Customer assistance
222
Reporting safety defects
234
Index
235
All rights reserved. Reproduction by any means, electronic or mechanical
including photocopying, recording or by any information storage and retrieval
system or translation in whole or part is not permitted without written
authorization from Ford Motor Company.
Copyright
°
1998 Ford Motor Company
Contents
1