2002 Mercury Sable Owner Guide 4th Printing - Page 91
2002 Mercury Sable Manual

Page 91 highlights
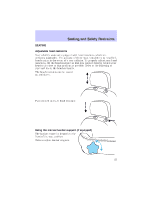
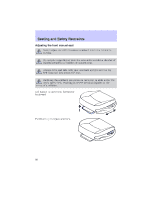
Locks and Security Please read and understand the entire procedure before you begin. 1. Insert the first previously programmed coded key into the 4 ignition and turn the ignition from 3 3 (OFF) to 4 (ON) (maintain ignition 5 in 4 (ON) for at least one second). 2. Turn ignition to 3 (OFF) then 2 2 (LOCK) and remove the first coded key from the ignition. 1 3. Within ten seconds of removing the first coded key, insert the second previously programmed coded key into the ignition and turn the ignition from 3 (OFF) to 4 (ON) (maintain ignition in 4 (ON) for at least one second but no more than ten seconds). 4. Turn the ignition to 3 (OFF) then 2 (LOCK) and remove the second coded key from the ignition. 5. Within 20 seconds of removing the second coded key, insert the new unprogrammed key (new key/valet key) into the ignition and turn the ignition from 3 (OFF) to 4 (ON) (maintain ignition in 4 (ON) for at least one second). This step will program your new key to a coded key. 6. To program additional new unprogrammed key(s), repeat this procedure from step 1. If successful, the new coded key(s) will start the vehicle's engine and the theft indicator will illuminate for three seconds and then go out. If not successful, the new coded key(s) will not start the vehicle's engine and the theft indicator will flash on and off and you may repeat steps 1 through 6. If failure repeats, bring your vehicle to your dealership to have the new spare key(s) programmed. PERIMETER ALARM SYSTEM (IF EQUIPPED) The perimeter anti-theft system will help prevent your vehicle from unauthorized entry. If there is any potential perimeter anti-theft problem with your vehicle, ensure ALL remote entry transmitters are brought to the dealership, to aid in troubleshooting. Arming the system When armed, this system will help protect your vehicle from unauthorized entry. When unauthorized entry occurs, the system will flash the headlamps and/or parking lamps, and will chirp the horn. 91
-
 1
1 -
2
-
3
-
4
-
5
-
6
-
7
-
8
-
9
-
10
-
11
-
12
-
13
-
14
-
15
-
16
-
17
-
18
-
19
-
20
-
21
-
22
-
23
-
24
-
25
-
26
-
27
-
28
-
29
-
30
-
31
-
32
-
33
-
34
-
35
-
36
-
37
-
38
-
39
-
40
-
41
-
42
-
43
-
44
-
45
-
46
-
47
-
48
-
49
-
50
-
51
-
52
-
53
-
54
-
55
-
56
-
57
-
58
-
59
-
60
-
61
-
62
-
63
-
64
-
65
-
66
-
67
-
68
-
69
-
70
-
71
-
72
-
73
-
74
-
75
-
76
-
77
-
78
-
79
-
80
-
81
-
82
-
83
-
84
-
85
-
 86
86 -
 87
87 -
 88
88 -
 89
89 -
 90
90 -
 91
91 -
 92
92 -
 93
93 -
 94
94 -
 95
95 -
 96
96 -
97
-
98
-
99
-
100
-
101
-
102
-
103
-
104
-
105
-
106
-
107
-
108
-
109
-
110
-
111
-
112
-
113
-
114
-
115
-
116
-
117
-
118
-
119
-
120
-
121
-
122
-
123
-
124
-
125
-
126
-
127
-
128
-
129
-
130
-
131
-
132
-
133
-
134
-
135
-
136
-
137
-
138
-
139
-
140
-
141
-
142
-
143
-
144
-
145
-
146
-
147
-
148
-
149
-
150
-
151
-
152
-
153
-
154
-
155
-
156
-
157
-
158
-
159
-
160
-
161
-
162
-
163
-
164
-
165
-
166
-
167
-
168
-
169
-
170
-
171
-
172
-
173
-
174
-
175
-
176
-
177
-
178
-
179
-
180
-
181
-
182
-
183
-
184
-
185
-
186
-
187
-
188
-
189
-
190
-
191
-
192
-
193
-
194
-
195
-
196
-
197
-
198
-
199
-
200
-
201
-
202
-
203
-
204
-
205
-
206
-
207
-
208
-
209
-
210
-
211
-
212
-
213
-
214
-
215
-
216
-
217
-
218
-
219
-
220
-
221
-
222
-
223
-
224
-
225
-
226
-
227
-
228
-
229
-
230
-
231
-
232
-
233
-
234
-
235
-
236
-
237
-
238
-
239
-
240
 |
 |
