2001 Saab 9-5 Owner's Manual - Page 228
2001 Saab 9-5 Manual
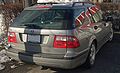
Page 228 highlights
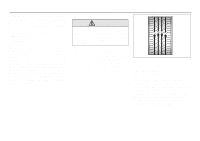
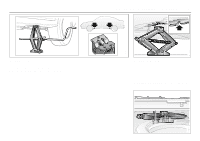
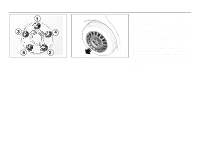
228 Car care and technical information 2 Wind the jack up to a suitable height before placing it under the recess in the sill. Make sure that the jack fully engages the recess in the sill and that the base of the jack is steady and flat on the ground. 3 Remove the wheel cover (where applicable). Loosen the wheel bolts by half a turn. 4 Wind the jack to raise the wheel clear of the ground. Remove the wheel bolts and lift off the wheel. 5 Fit the wheel and screw in the bolts in the sequence shown (opposite pairs). Tighten the bolts enough for the bolts and wheel to be seated correctly. 6 Lower the car and tighten the wheel bolts to the correct torque in the sequence shown (opposite pairs). Tightening torque Light-alloy wheels: 80 ft.lbs. (110 Nm) Steel wheels: 80 ft.lbs. (110 Nm) Do not overtighten the bolts using a percussion nut tightener: not only can this damage the wheels but it can also make it impossible to undo the bolts using the wheel wrench in the car's toolkit. 7 Check-tighten the wheel bolts after a few miles. Tightening torque Light-alloy wheels: 80 ft.lbs. (110 Nm) Steel wheels: 80 ft.lbs. (110 Nm) Jacking points for a trolley jack If a floor jack is used, it can be applied to the standard jacking points used by the dealer. A floor jack can lift both front wheels or both rear wheels off the ground simultaneously. A jack stand must then be applied underneath the front of the engine subframe (at the fixing point for the towrope-attachment eye) or to the rear towrope-attachment eye (or under the trailer hitch, if fitted). NOTE Apply the jack only to the jacking points indicated. 1 Put the car in 1st gear (automatic transmission: move selector to the P position) and apply the parking brake. IB1130 NOTE When refitting wheel covers (where applicable), make sure that the valve protrudes through the hole in the wheel cover.
-
 1
1 -
2
-
3
-
4
-
5
-
6
-
7
-
8
-
9
-
10
-
11
-
12
-
13
-
14
-
15
-
16
-
17
-
18
-
19
-
20
-
21
-
22
-
23
-
24
-
25
-
26
-
27
-
28
-
29
-
30
-
31
-
32
-
33
-
34
-
35
-
36
-
37
-
38
-
39
-
40
-
41
-
42
-
43
-
44
-
45
-
46
-
47
-
48
-
49
-
50
-
51
-
52
-
53
-
54
-
55
-
56
-
57
-
58
-
59
-
60
-
61
-
62
-
63
-
64
-
65
-
66
-
67
-
68
-
69
-
70
-
71
-
72
-
73
-
74
-
75
-
76
-
77
-
78
-
79
-
80
-
81
-
82
-
83
-
84
-
85
-
86
-
87
-
88
-
89
-
90
-
91
-
92
-
93
-
94
-
95
-
96
-
97
-
98
-
99
-
100
-
101
-
102
-
103
-
104
-
105
-
106
-
107
-
108
-
109
-
110
-
111
-
112
-
113
-
114
-
115
-
116
-
117
-
118
-
119
-
120
-
121
-
122
-
123
-
124
-
125
-
126
-
127
-
128
-
129
-
130
-
131
-
132
-
133
-
134
-
135
-
136
-
137
-
138
-
139
-
140
-
141
-
142
-
143
-
144
-
145
-
146
-
147
-
148
-
149
-
150
-
151
-
152
-
153
-
154
-
155
-
156
-
157
-
158
-
159
-
160
-
161
-
162
-
163
-
164
-
165
-
166
-
167
-
168
-
169
-
170
-
171
-
172
-
173
-
174
-
175
-
176
-
177
-
178
-
179
-
180
-
181
-
182
-
183
-
184
-
185
-
186
-
187
-
188
-
189
-
190
-
191
-
192
-
193
-
194
-
195
-
196
-
197
-
198
-
199
-
200
-
201
-
202
-
203
-
204
-
205
-
206
-
207
-
208
-
209
-
210
-
211
-
212
-
213
-
214
-
215
-
216
-
217
-
218
-
219
-
220
-
221
-
222
-
 223
223 -
 224
224 -
 225
225 -
 226
226 -
 227
227 -
 228
228 -
 229
229 -
 230
230 -
 231
231 -
 232
232 -
 233
233 -
234
-
235
-
236
-
237
-
238
-
239
-
240
-
241
-
242
-
243
-
244
-
245
-
246
-
247
-
248
-
249
-
250
-
251
-
252
-
253
-
254
-
255
-
256
-
257
-
258
-
259
-
260
-
261
-
262
-
263
-
264
-
265
-
266
-
267
-
268
-
269
-
270
-
271
-
272
 |
 |
