3Com 3C905-TX Installation Guide - Page 7
Installing the Network Interface Card - wol
 |
View all 3Com 3C905-TX manuals
Add to My Manuals
Save this manual to your list of manuals |
Page 7 highlights
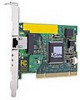
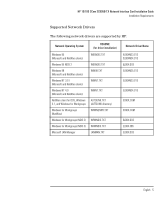
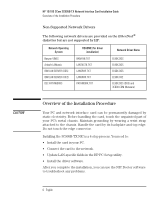
WARNING HP 10/100 3Com 3C905B-TX Network Interface Card Installation Guide Installing the Network Interface Card Installing the Network Interface Card For your safety, never remove the PC's cover without first removing the power cord, data cables and any connection to a telecommunications network. Always replace the cover before switching on again. For complete information on how to install an accessory card, refer to your PC's documentation. This is available from your PC's support web site (refer to page 18.) The following steps are given as a guide: 1 With the PC turned off, disconnect the power cord and any connection to a telecommunications network, and then remove the cover. 2 Choose an empty PCI slot. If you do not know how to identify a PCI slot, refer to your PC's documentation. 3 Remove the metal slot cover. 4 Depending on the PC model, you may need to remove the accessory slot's retaining bracket. Refer to your PC's documentation, if necessary. 5 Insert the card into the accessory slot without bending it. Example position of WOL connector. 6 Connect the Remote Wake-Up cable to the connector on the card and to connector on the system board or backplane. For the position of the Remote Wake-Up connector, refer to "3C905B-TX NIC Specifications" on page 19. Refer to your PC's documentation for the position of the connector on the system board or backplane. English 7
-
 1
1 -
 2
2 -
 3
3 -
 4
4 -
 5
5 -
 6
6 -
 7
7 -
 8
8 -
 9
9 -
 10
10 -
 11
11 -
 12
12 -
13
-
14
-
15
-
16
-
17
-
18
-
19
-
20
-
21
-
22
-
23
-
24
-
25
-
26
 |
 |
