3Com 3CRWDR100U-72 User Guide - Page 74
Routing Table, Authentication Code
 |
UPC - 662705484914
View all 3Com 3CRWDR100U-72 manuals
Add to My Manuals
Save this manual to your list of manuals |
Page 74 highlights
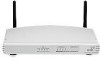
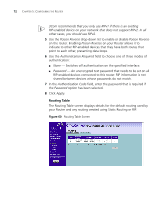
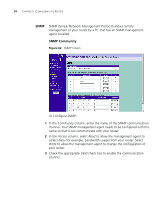
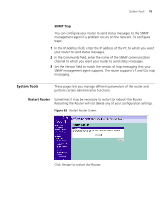
72 CHAPTER 5: CONFIGURING THE ROUTER 3Com recommends that you only use RIPv1 if there is an existing RIP-enabled device on your network that does not support RIPv2. In all other cases, you should use RIPv2. 5 Use the Poison Reverse drop-down list to enable or disable Poison Reverse on the router. Enabling Poison Reverse on your Router allows it to indicate to other RIP-enabled devices that they have both routes that point to each other, preventing data loops. 6 Use the Authentication Required field to choose one of three modes of authentication: ■ None - Switches off authentication on the specified interface. ■ Password - An unencrypted text password that needs to be set on all RIP-enabled devices connected to this router. RIP information is not shared between devices whose passwords do not match. 7 In the Authentication Code field, enter the password that is required if the Password option has been selected. 8 Click Apply. Routing Table The Routing Table screen displays details for the default routing used by your Router and any routing created using Static Routing or RIP. Figure 60 Routing Table Screen
-
 1
1 -
2
-
3
-
4
-
5
-
6
-
7
-
8
-
9
-
10
-
11
-
12
-
13
-
14
-
15
-
16
-
17
-
18
-
19
-
20
-
21
-
22
-
23
-
24
-
25
-
26
-
27
-
28
-
29
-
30
-
31
-
32
-
33
-
34
-
35
-
36
-
37
-
38
-
39
-
40
-
41
-
42
-
43
-
44
-
45
-
46
-
47
-
48
-
49
-
50
-
51
-
52
-
53
-
54
-
55
-
56
-
57
-
58
-
59
-
60
-
61
-
62
-
63
-
64
-
65
-
66
-
67
-
68
-
 69
69 -
 70
70 -
 71
71 -
 72
72 -
 73
73 -
 74
74 -
 75
75 -
 76
76 -
 77
77 -
 78
78 -
 79
79 -
80
-
81
-
82
-
83
-
84
-
85
-
86
-
87
-
88
-
89
-
90
-
91
-
92
-
93
-
94
-
95
-
96
-
97
-
98
-
99
-
100
-
101
-
102
-
103
-
104
-
105
-
106
-
107
-
108
-
109
-
110
-
111
-
112
-
113
-
114
-
115
-
116
-
117
-
118
-
119
-
120
-
121
-
122
-
123
-
124
 |
 |