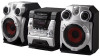
AIWA JAX-S77 Operating Instructions
AIWA JAX-S77 Manual
 |
View all AIWA JAX-S77 manuals
Add to My Manuals
Save this manual to your list of manuals |
AIWA JAX-S77 manual content summary:
- AIWA JAX-S77 | Operating Instructions - Page 1
4-253-931-11(2) Operating Instructions Owner's Record The model and serial numbers are located on the rear of the unit. Record the serial number in the space provided below. Refer to them whenever you call upon your Aiwa dealer regarding this product. Model No Serial No ©2004 Sony - AIWA JAX-S77 | Operating Instructions - Page 2
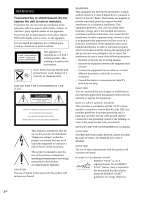
the user to the presence of important operating and maintenance (servicing) instructions in the literature accompanying the appliance. CAUTION The use of manual could void your authority to operate this equipment. Note to CATV system installer: This reminder is provided to call the CATV system - AIWA JAX-S77 | Operating Instructions - Page 3
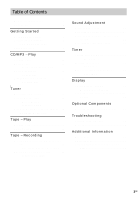
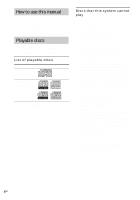
to use this manual 4 Playable discs 4 Getting Started Hooking up the system 6 Positioning the speakers 8 (JAX-N88/PK88 only) Setting the clock 9 CD/MP3 - Optional Components Hooking up optional components......... 27 Troubleshooting Problems and remedies 29 Messages 32 Additional Information - AIWA JAX-S77 | Operating Instructions - Page 4
List of playable discs Format of discs Audio CDs Disc logo CD-R/CD-RW (audio data/MP3 files*) * Except for JAX-N44/S44 Discs that this system cannot play • CD-ROMs • CD-Rs/CD-RWs other than those recorded in the following formats: - music CD format - MP3 format that conforms to ISO96601) Level - AIWA JAX-S77 | Operating Instructions - Page 5
instructions for the recording device. • Discs recorded on CD-R/CD-RW CD-R and CD-RW discs recorded in multisession that have not ended by "closing the session" are not supported. • The system and playback continues until a CD-DA (audio) session is encountered. • The playback range of an MP3 disc is - AIWA JAX-S77 | Operating Instructions - Page 6
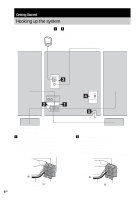
5 to hook up your system using the supplied cords and accessories. A model equipped with surround speakers are used for illustration purpose. AM loop antenna Front speaker (right) FM lead antenna Front speaker (left) RL RL + + - - Surround speaker* (right) * JAX-N88/PK88 only 1 Connect the - AIWA JAX-S77 | Operating Instructions - Page 7
horizontally Plug type C AM loop antenna 5 Connect the power cord to a wall outlet. The demonstration appears in the display. When you press ?/1, the system turns on and the demonstration automatically ends. If the plug does not fit the wall socket, detach the supplied plug adaptor (only for models - AIWA JAX-S77 | Operating Instructions - Page 8
(JAX-N88/PK88 only) 1 Place the front speakers at an angle of 45 degrees from your listening position. Front speaker (L) Front speaker (R) 45˚ Surround speaker (L) Surround speaker (R) 2 Place the surround speakers. When carrying this system Perform the following procedure to protect the CD - AIWA JAX-S77 | Operating Instructions - Page 9
Getting Started Setting the clock Use buttons on the remote for the operation. 1 Press ?/1 to turn on the system. 2 Press CLOCK/TIMER SET. 3 Press . or > repeatedly to set the hour. 4 Press ENTER. 5 Press . or > repeatedly to set the minute. 6 Press ENTER. The clock starts - AIWA JAX-S77 | Operating Instructions - Page 10
unit for the operation. 1 Press Z. 2 Place a disc with the label side up on the disc tray. Playing a disc - Normal Play/Shuffle Play This system lets you play audio CDs and discs with MP3 audio tracks. MP3 audio tracks cannot be played on JAXN44/S44. Example: When a disc is loaded Track number - AIWA JAX-S77 | Operating Instructions - Page 11
at the desired point. Select a disc in stop mode Press DISC SKIP (or DISC 1 - 3 or DISC SKIP/EX-CHANGE on the unit). Switch to CD function from other function Press DISC 1 - 3 on the unit (Automatic Source Selection). Exchange other Press DISC SKIP/EX-CHANGE discs while on the unit. playing - AIWA JAX-S77 | Operating Instructions - Page 12
on the encoding/writing software, recording device, or the recording media used at the time an MP3 audio track is recorded, you may encounter such problems as disabled playback, sound interruptions, and noise. Playing repeatedly - Repeat Play You can play all the tracks or a single track on a disc - AIWA JAX-S77 | Operating Instructions - Page 13
can synchro record the programmed tracks onto a cassette tape (page 19). MP3 audio tracks cannot be played on JAXN44/S44. 1 Press CD (or FUNCTION repeatedly) to switch the function to CD. 2 Press PLAY MODE repeatedly in stop mode until "PGM" appears. 3 Press DISC SKIP (or DISC 1 - 3 or DISC SKIP/EX - AIWA JAX-S77 | Operating Instructions - Page 14
- or + (or turn TUNING operation dial on the unit). The frequency changes as the system scans for a station. Scanning stops automatically when a station is tuned in. At that time, "TUNED" and "STEREO" (for an FM stereo program) appear. If "TUNED" does not appear and the scanning does not stop Set - AIWA JAX-S77 | Operating Instructions - Page 15
Tune in a station Follow the procedure described with a weak signal in "Manual tuning preset" (page 15). Set another station to the existing preset number AM tuning interval, tune in any AM station first, then turn off the system. While holding TUNING MODE on the unit, press ?/1 on the unit. - AIWA JAX-S77 | Operating Instructions - Page 16
-preset radio station - Manual Tuning 1 Press TUNER stereo effect, but the reception will improve. • Press TUNING MODE repeatedly until "AUTO" appears in step 3 above, then press - or + (or turn TUNING operation dial on the unit). The frequency indication changes and scanning stops when the system - AIWA JAX-S77 | Operating Instructions - Page 17
or if the signal is weak. * Not all FM stations provide RDS service, nor do they provide the same types of services. If you are not familiar with the RDS system, check with your local radio stations for details on RDS services in your area. Receiving RDS broadcasts Simply select a station from the - AIWA JAX-S77 | Operating Instructions - Page 18
want to play/record facing forward. With the side you want to play/record facing forward. Playing a tape You can use TYPE I (normal) tape. For JAX-N88/N77/N66/N33/PK88/ PK77/PK66 1 Load a tape. 2 When you load a tape in deck B, press PLAY MODE repeatedly to select "g" to play one side - AIWA JAX-S77 | Operating Instructions - Page 19
space between songs is less than 4 seconds long. - When the system is placed near a television. Tip When a tape is inserted, only for JAX-N88/N77/N66/N33/PK88/ PK77/PK66. Tape - Recording Recording your favorite CD tracks on a tape - CD-TAPE Synchro Recording You can record a whole CD on - AIWA JAX-S77 | Operating Instructions - Page 20
press x. 3 Press one of the following buttons to select the desired source to record. • CD: To record from this system's CD player. • TAPE A/B: To record from this system's tape deck A. • TUNER/BAND: To record from this system's tuner. • VIDEO/MD: To record from the connected VCR or MD deck to VIDEO - AIWA JAX-S77 | Operating Instructions - Page 21
stop recording Press x. Note You cannot listen to other sources while recording. Tips • For JAX-N88/N77/N66/N33/PK88/PK77/PK66, when you record on both sides, be sure to EQ* Effect Standard music sources * "SURR" appears if you select "MP3 EQ". For JAX-N44/S44, you can not select "MP3 EQ". 21GB - AIWA JAX-S77 | Operating Instructions - Page 22
Adjusting the graphic equalizer and storing You can adjust the sound by raising or lowering the levels of specific frequency ranges, then store up to three personal files (P FILE) in the memory. Before operation, first select the audio emphasis you want for your basic sound. Use - AIWA JAX-S77 | Operating Instructions - Page 23
90MIN t 80MIN t 70MIN t ... t 10MIN t OFF * The system automatically turns off in 100 minutes or after the current disc or tape buttons on the remote for the operation. 1 Prepare the sound source you want to play. • CD: Load a disc. To start from a specific track, make a program (see "Creating your - AIWA JAX-S77 | Operating Instructions - Page 24
TIMER"), the start time, the stop time, and the sound source appear in turn, before the original display returns. 9 Press ?/1 to turn off the system. Other Operations To Check the setting Change the setting Cancel the timer Do this 1 Press CLOCK/TIMER SELECT. 2 Press . or > repeatedly until "PLAY - AIWA JAX-S77 | Operating Instructions - Page 25
Saving Mode. - setting the clock - changing the AM tuning interval (except for European and Russian models) - turning on the system by pressing the function buttons (e.g., CD) Tips • The timer continues to operate in Power Saving Mode. • ?/1 indicator lights up even in Power Saving Mode. Display - AIWA JAX-S77 | Operating Instructions - Page 26
track or that of the disc. Checking the remaining time and titles (CD/MP3) Press DISPLAY during Normal Play. Each time you press the button, volume label may not be displayed depending on the play mode. 26GB x When a CD/MP3 is in Program Play mode The last track number of the program and the total - AIWA JAX-S77 | Operating Instructions - Page 27
Optional Components Hooking up optional components To enhance your system, you can connect optional components. Refer to the operating instructions provided with each component. A model equipped with surround speakers are used for illustration purpose. VCR or MD deck From the audio output of the VCR - AIWA JAX-S77 | Operating Instructions - Page 28
MD function, just press VIDEO/MD. Notes • If you cannot select "VIDEO" when you press VIDEO/MD, press ?/1 while holding down VIDEO/MD when the system is on. "MD" will be switched to "VIDEO". To return to "MD", do the same procedure. • When you connect a VIDEO - AIWA JAX-S77 | Operating Instructions - Page 29
your system, do the following: 1 Make sure the power cord and speaker cords are correctly and firmly connected. 2 Find your problem in the troubleshooting checklist below and take the indicated corrective action. If the problem persists after doing all of the above, consult your nearest Aiwa dealer - AIWA JAX-S77 | Operating Instructions - Page 30
Aiwa service facility. The disc tray does not close. • Place the disc correctly. • Always close the tray by pressing Z on the unit. Trying to press the tray closed with your fingers may cause problems with the player. The disc does not eject. • You cannot eject the disc during CD the system reads - AIWA JAX-S77 | Operating Instructions - Page 31
Try turning off surrounding electrical equipment. A stereo FM program cannot be received in stereo. • Press FM MODE repeatedly until "STEREO" appears. If the system still does not operate properly after performing with adhesive tape (page 34). • The tape has wound to the end. Troubleshooting 31GB - AIWA JAX-S77 | Operating Instructions - Page 32
NO DISC There is no disc in the player or you have loaded a disc that cannot be played on this system (such as DVD, VCD, or CD-ROM without MP3 audio tracks, etc.). OVER You have reached the end of the disc while pressing M during playback or pause. PUSH STOP You pressed - AIWA JAX-S77 | Operating Instructions - Page 33
only at the qualified service shop. On placement • Do not place the system in an inclined position. • Do not place the system in locations where it you move the system, take out any disc. If you have any questions or problems concerning your system, please consult your nearest Aiwa dealer. Notes - AIWA JAX-S77 | Operating Instructions - Page 34
of use with a separately sold demagnetizing cassette. For details, refer to the instructions of the demagnetizing cassette. Specifications Main unit Amplifier section AUDIO POWER SPECIFICATIONS (JAX-S77/S44 USA models only) JAX-S77 POWER OUTPUT AND TOTAL HARMONIC DISTORTION: With 6 ohm loads, both - AIWA JAX-S77 | Operating Instructions - Page 35
power output (reference): 65 + 65 watts (6 ohms at 1 kHz, 10% THD) Music power output (reference): 130 + 130 watts (6 ohms at 1 kHz, 10% THD) Other models: JAX-N88 The following measured at AC 120, 220, 240 V 50/60 Hz DIN power output (rated): 144 + 144 watts (6 ohms at 1 kHz, DIN) Continuous RMS - AIWA JAX-S77 | Operating Instructions - Page 36
PHONES (stereo mini jack): accepts headphones of 8 ohms or more SPEAKER: accepts impedance of 6 to 16 ohms SURROUND SPEAKER (JAX-N88/PK88 only): accepts impedance of 6 to 16 ohms CD player section System Laser Frequency response Wavelength Signal-to-noise ratio Dynamic range Compact disc - AIWA JAX-S77 | Operating Instructions - Page 37
models: Front speaker SSX-JN77 for JAX-S77 Speaker system Speaker units Woofer: Tweeter: Super tweeter 242 mm Approx. 3.8 kg net per speaker Surround speaker SSX-JN77R for JAX-N88 Speaker system Speaker units Full range: Nominal impedance Dimensions (w/h/d) Mass 1-way, 1-unit, close type 8 - AIWA JAX-S77 | Operating Instructions - Page 38
kg net per speaker Surround speaker SSX-JN77R for JAX-N88/ PK88 Speaker system Speaker units Full range: Nominal impedance Dimensions (w/h/d) Mass 1-way, 1-unit, JAX-S77: 165 watts JAX-S44: 205 watts Canadian models: JAX-S77: 165 watts JAX-S44: 260 VA European and Russian models: JAX - AIWA JAX-S77 | Operating Instructions - Page 39
buttons and other parts of the system that are mentioned in the text. 13) ALBUM -1) wl (11, 13) BASS control 5 (22) CD qh (8, 10, 13, 19, 20) CD SYNC qs (19) Deck A 9 (18) Deck B wk (18 fast forward) wl (11, 19) 1) Except for JAX-N44/S44 2) JAX-N88/N77/N66/N33/ PK88/PK77/PK66 only 1234 5 6 7 qh - AIWA JAX-S77 | Operating Instructions - Page 40
- E ALBUM +* qa (11, 13) ALBUM -* qd (11, 13) CD qk (10, 13) CLEAR qg (13) CLOCK/TIMER SELECT 2 (24, 11, 19) -/+ (tuning) qh (14) ./> (go back/go forward) qh (9, 11, 19, 23) * Except for JAX-N44/S44 ws 1 wa 2 w; 3 ql 4 qk 5 qj 6 qh 7 8 qg 9 qf q; qd qa qs Sony Corporation Printed
-
 1
1 -
 2
2 -
 3
3 -
 4
4 -
 5
5 -
 6
6 -
 7
7 -
8
-
9
-
10
-
11
-
12
-
13
-
14
-
15
-
16
-
17
-
18
-
19
-
20
-
21
-
22
-
23
-
24
-
25
-
26
-
27
-
28
-
29
-
30
-
31
-
32
-
33
-
34
-
35
-
36
-
37
-
38
-
39
-
40
 |
 |
©2004 Sony Corporation
4-253-931-
11
(2)
Operating Instructions
Owner’s Record
The model and serial numbers are located on the rear of the unit. Record the
serial number in the space provided below. Refer to them whenever you call
upon your Aiwa dealer regarding this product.
Model No. ______________
Serial No. ______________