ASRock K7VT6-C Quick Installation Guide
ASRock K7VT6-C Manual
 |
View all ASRock K7VT6-C manuals
Add to My Manuals
Save this manual to your list of manuals |
ASRock K7VT6-C manual content summary:
- ASRock K7VT6-C | Quick Installation Guide - Page 1
for backup purpose, without written consent of ASRock Inc. Products and corporate names appearing in this guide may or may not be registered trademarks or ASRock Website: http://www.asrock.com Published December 2004 Copyright©2004 ASRock INC. All rights reserved. 1 ASRock K7VT6-C Motherboard - ASRock K7VT6-C | Quick Installation Guide - Page 2
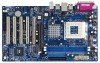
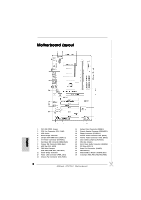
Connector: AUX1 (White) 19 Clear CMOS Jumper (CLRCMOS2) 20 JR1 / JL1 Jumpers 21 Front Panel Audio Connector (AUDIO1) 22 PCI Slots (PCI1- 5) 23 Game Port Connector (GAME1) 24 Flash Memory 25 Shared USB 2.0 Header (JUSB45, Blue) 26 J1 Jumper (FID0, FID1, FID2, FID3, FID4) 2 ASRock K7VT6-C Motherboard - ASRock K7VT6-C | Quick Installation Guide - Page 3
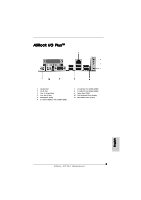
ASRock I/O PlusTM 1 Parallel Port 2 RJ-45 Port 3 Line In (Light Blue) 4 Line Out (Lime) 5 Microphone (Pink) 6 2 x Shared USB 2.0 Port (USB4, USB5) ) 8 2 x USB 2.0 Port (USB2, USB3) 9 Serial Port: COM1 10 PS/2 Keyboard Port (Purple) 11 PS/2 Mouse Port (Green) English 3 ASRock K7VT6-C Motherboard - ASRock K7VT6-C | Quick Installation Guide - Page 4
latest memory and CPU support lists on ASRock website as well. ASRock website http://www.asrock.com 1.1 Package Contents 1 x ASRock K7VT6-C Motherboard (ATX Form Factor: 12.0-in x 7.0-in, 30.5 cm x 17.8 cm) 1 x ASRock K7VT6-C Quick Installation Guide 1 x ASRock K7VT6-C Support CD 1 x Ultra ATA 66 - ASRock K7VT6-C | Quick Installation Guide - Page 5
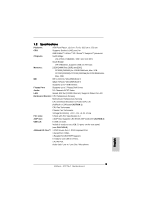
Factor: 12.0-in x 7.0-in, 30.5 cm x 17.8 cm CPU: Supports Socket A (462 pins) for AMD AthlonTM / AthlonTM XP / DuronTM/ SempronTM processor Chipsets: North Bridge: VIA KT600, FSB@200 / 266 / 333 / 400 MHz South Bridge: VIA VT8235CE, Supports USB 2.0, ATA 133 Memory: 2 DDR DIMM Slots: DDR1 - ASRock K7VT6-C | Quick Installation Guide - Page 6
according to the FSB of your AMD CPU before you set the "CPU Host Frequency" configuration as "Manual" in BIOS. See page 9 for the details of "FSB Select Jumpers" adjustment, and page 22 of "User Manual" in the Support CD for "CPU Host Frequency" configuration. English 6 ASRock K7VT6-C Motherboard - ASRock K7VT6-C | Quick Installation Guide - Page 7
while you push down the socket lever to secure the CPU. The lever clicks on the side tab to indicate that it is locked. Install CPU fan and heatsink. For proper installation, please kindly refer to the instruction manuals of your CPU fan and heatsink vendors. English 7 ASRock K7VT6-C Motherboard - ASRock K7VT6-C | Quick Installation Guide - Page 8
2.2 Installation of Memory Modules (DIMM) K7VT6-C motherboard provides two 184-pin DDR (Double Data Rate) slot. The DIMM only fits in one correct orientation. It will cause permanent damage to the motherboard and the DIMM if you force the DIMM into the slot at incorrect orientation. Step 3. Firmly - ASRock K7VT6-C | Quick Installation Guide - Page 9
, FSB_SEL1, FSB_SEL2) (see p.2 item 10) Setting Note: The CPU FSB frequency of this motherboard is determined by jumper-setting. You must adjust "FSB Select Jumpers" according to the FSB of your AMD CPU. Please follow the figures above to set the CPU FSB frequency. 9 ASRock K7VT6-C Motherboard - ASRock K7VT6-C | Quick Installation Guide - Page 10
finish updating the BIOS, you must boot up the system first, and then shut it down before you do the clear-CMOS action. J1 Jumper (FID0, FID1, FID2, FID3, FID4) (see p.2 item 26) Note: The set of J1 Jumper allows users to adjust the multiplier of CPU. See page 14 of User Manual in the Support CD - ASRock K7VT6-C | Quick Installation Guide - Page 11
function. Internal Audio Connectors These connectors allow you to (4-pin CD1, 4-pin AUX1) receive stereo audio input from (CD1: see p.2 item 17) sound sources such as a CD- (AUX1: see p.2 item 18) AUX1 CD1 ROM, DVD-ROM, TV tuner card, or MPEG card. 11 ASRock K7VT6-C Motherboard English - ASRock K7VT6-C | Quick Installation Guide - Page 12
audio devices. This connector accommodates several system front panel functions. Please connect the chassis speaker to this connector. Please connect a chassis fan cable to this connector and match the black wire to the ground pin. Please connect a CPU . English 12 ASRock K7VT6-C Motherboard - ASRock K7VT6-C | Quick Installation Guide - Page 13
about BIOS Setup, please refer to the User Manual (PDF file) contained in the Support CD. 4. Software Support CD information This motherboard supports various Microsoft® Windows® operating systems: 98 SE/ ME / 2000 / XP. The Support CD that came with the motherboard contains necessary drivers and - ASRock K7VT6-C | Quick Installation Guide - Page 14
14 ASRock K7VT6-C Motherboard - ASRock K7VT6-C | Quick Installation Guide - Page 15
® ® " " " " " " " " " " " " 15 ASRock K7VT6-C Motherboard - ASRock K7VT6-C | Quick Installation Guide - Page 16
16 ASRock K7VT6-C Motherboard - ASRock K7VT6-C | Quick Installation Guide - Page 17
17 ASRock K7VT6-C Motherboard - ASRock K7VT6-C | Quick Installation Guide - Page 18
" " 18 ASRock K7VT6-C Motherboard - ASRock K7VT6-C | Quick Installation Guide - Page 19
19 ASRock K7VT6-C Motherboard - ASRock K7VT6-C | Quick Installation Guide - Page 20
" " AUX1 CD1 20 ASRock K7VT6-C Motherboard - ASRock K7VT6-C | Quick Installation Guide - Page 21
21 ASRock K7VT6-C Motherboard - ASRock K7VT6-C | Quick Installation Guide - Page 22
® ® "PC-DIY Live Demo" ASRock PC "PC-DIY Live Demo" Microsoft® Media Player® ..\ MPEGAV \ AVSEQ01.DAT 22 ASRock K7VT6-C Motherboard - ASRock K7VT6-C | Quick Installation Guide - Page 23
CPUs finden Sie ebenfalls auf der Webseite von ASRock. ASRock-Website: http://www.asrock.com 1.1 Kartoninhalt ASRock K7VT6-C Motherboard (ATX-Formfaktor: 30.5 cm x 17.8 cm; 12.0 Zoll x 7.0 Zoll) ASRock K7VT6-C Schnellinstallationsanleitung ASRock K7VT6-C Support-CD Ein 80-adriges Ultra-ATA 66/100 - ASRock K7VT6-C | Quick Installation Guide - Page 24
VORSICHT 3) ASRock I/O PlusTM: 1 PS/2-Mausanschluss, 1 PS/2-Tastaturanschluss, 1 serieller port: COM 1, 1 paralleler port: Unterstützung für ECP / EPP, 6 betriebsfertigen USB 2.0-Anschlüsse, 1 RJ-45 port, Audioanschlüsse: Line In / Line Out / Mikrofon Deutsch 24 ASRock K7VT6-C Motherboard - ASRock K7VT6-C | Quick Installation Guide - Page 25
, bevor Sie "CPU Host Frequency" im BIOS auf "Manual" (Manuell) einstellen. Siehe Seite 13 für detaillierte Anweisungen zur Einstellung des FSB-Auswahljumpers und Seite 29 im Benutzerhandbuch auf der Support CD für die CPU Host-Frequenz-Konfiguration. Deutsch 25 ASRock K7VT6-C Motherboard - ASRock K7VT6-C | Quick Installation Guide - Page 26
. Schritt 5: Installieren Sie einen aktiven CPU-Kühler, der die gesamte Fläche der CPU abdeckt und eine ausreichende Wärmeableitung für den von Ihnen verwendeten CPU-Typ bietet. Weitere Hinweise finden Sie der Installationsanleitung für Ihren CPU-Kühler. 26 ASRock K7VT6-C Motherboard Deutsch - ASRock K7VT6-C | Quick Installation Guide - Page 27
2.2 Installation der Speichermodule (DIMM) Das K7VT6-C-Motherboard hat zwei 184-pol. DDR- (Double Data Rate) DIMMSteckplätze. Achten Sie darauf, das Netzteil abzustecken, bevor an beiden Enden des Moduls einschnappen und das DIMM-Modul fest an Ort und Stelle sitzt. 27 ASRock K7VT6-C Motherboard - ASRock K7VT6-C | Quick Installation Guide - Page 28
und AGP-Slots): Es gibt 5 PCI-Steckplätze und 1 AGP-Steckplatz auf dem K7VT6-C-Motherboard. PCI-Slots: PCI-Slots werden zur Installation von Erweiterungskarten mit dem 32bit PCI-Interface genutzt 4: Befestigen Sie die Karte mit der Schraube aus Schritt 2. 28 ASRock K7VT6-C Motherboard Deutsch - ASRock K7VT6-C | Quick Installation Guide - Page 29
Hinweis: Die CPU FSB-Frequenz dieses Motherboards wird über die Jumpereinstellung festgelegt. Sie müssen den FSB-Auswahljumper entsprechend der FSB Ihrer AMD CPU einstellen. Bitte folgen Audioanschlüsse an dem Frontfeld sowie an der Rückwand arbeiten. Deutsch 29 ASRock K7VT6-C Motherboard - ASRock K7VT6-C | Quick Installation Guide - Page 30
der CPU-Frequenz fest. Siehe Seite 14 im Benutzerhandbuch auf der Support CD für Details. Ohne Einstellung des Multiplikators wird das System auch eine gute Arbeit leisten. Normalerweise müssen Sie die Einstellung des Multiplikators nicht vornehmen. Deutsch 30 ASRock K7VT6-C Motherboard - ASRock K7VT6-C | Quick Installation Guide - Page 31
den USB 2.0-Anschlüssen 4,5 auf ASRock I/O Plus™ gemeinsam genutzt. Bei Verwendung der vorderseitigen USBAnschlüsse durch Verbinden des vorseitigen USB-Kabels mit diesem Header (JUSB45) werden die USB-Anschlüsse 4,5 auf ASRock I/O Plus™ nicht funktionieren. 31 ASRock K7VT6-C Motherboard Deutsch - ASRock K7VT6-C | Quick Installation Guide - Page 32
CD-ROM, DVD-ROM, TV-Tuner oder MPEG-Karten mit Ihrem System zu verbinden. Dieses Interface zu einem Audio-Panel CPU Lüfterkabel mit diesem Anschluss und passen Sie den schwarzen Draht dem Erdungsstift an. Verbinden Sie die ATXStromversorgung mit diesem Header. Deutsch 32 ASRock K7VT6-C Motherboard - ASRock K7VT6-C | Quick Installation Guide - Page 33
K7VT6-C Motherboard ASRock präsentiert Ihnen eine Multimedia PC-DIY Live Demo, die Ihnen verdeutlicht, wie man Schritt für Schritt ein eigenes PC-System montiert. Um sich dieses Demo-Programm anschauen zu können, bitte den Microsoft® Media Player® starten. Sie finden die Datei auf der Support-CD - ASRock K7VT6-C | Quick Installation Guide - Page 34
ATX: 12.0 pouces x 7.0 pouces, 30.5 cm x 17.8 cm) Guide d'installation rapide ASRock K7VT6-C CD de soutien ASRock K7VT6-C Un câble ruban IDE Ultra ATA 66/100/133 80 conducteurs Un câble ruban pour un lecteur de disquettes 3,5 pouces Un écran ASRock I/O PlusTM 34 ASRock K7VT6-C Motherboard Français - ASRock K7VT6-C | Quick Installation Guide - Page 35
I/O PlusTM:1 port clavier PS/2, 1 port souris PS/2, 1 Port série: COM 1, 1 Port parallèle: Support ECP/EPP, 6 ports USB 2.0 par défaut, 1 port RJ-45, Jack audio: entrée ligne / sortie ligne / microphone BIOS: BIOS AMI; Support du "Plug and Play"; Français 35 ASRock K7VT6-C Motherboard - ASRock K7VT6-C | Quick Installation Guide - Page 36
processeur" sur "Manuel" dans le BIOS. Voir la page 40 pour les détails sur les réglages des "Cavaliers de sélection de bus frontal", et la page 22 du "Manuel de l'utilisateur" sur le CD d'assistance pour la configuration de la "Fréquence hôte de processeur". Français 36 ASRock K7VT6-C Motherboard - ASRock K7VT6-C | Quick Installation Guide - Page 37
support CPU. Le verrouillage du levier dans son encoche latérale est annoncé par un clic. Etape 5. Installez le ventilateur et le radiateur du CPU. Pour une installation correcte, reportez-vous aux manuels du fabricant du ventilateur et du radiateur de CPU. Français 37 ASRock K7VT6-C Motherboard - ASRock K7VT6-C | Quick Installation Guide - Page 38
2.2 Installation des modules mémoire (DIMM) La carte mère K7VT6-C propose deux emplacements DIMM DDR (Double Débit de données) à 184 broches. Ayez bien le soin de débrancher és aux deux extrémités se ferment complètement et que le module DIMM soit inséré correctement. 38 ASRock K7VT6-C Motherboard - ASRock K7VT6-C | Quick Installation Guide - Page 39
32 bits. Slot AGP: Le slot AGP est utilisé pour installer une carte graphique. Le slot AGP ASRock utilise un design de fermoir spécial qui permet de fixer correctement la carte graphique insérée. Ne PAS 4. Fixez la carte sur le châssis à l'aide d'une vis. 39 ASRock K7VT6-C Motherboard Français - ASRock K7VT6-C | Quick Installation Guide - Page 40
standby supérieur fourni par l'alimentation. Cavaliers JR1 / JL1 (voir p.2 fig. 20) Note: Si les cavaliers JR1 et JL1 sont en court-circuit, les connecteurs audio des panneaux avant et arrière peuvent fonctionner. Français 40 ASRock K7VT6-C Motherboard - ASRock K7VT6-C | Quick Installation Guide - Page 41
. Voir la page 14 du manuel de l'utilisateur sur le CD d'assistance pour les détails. Toutefois, le système fonctionnera correctement sans réglage du multiplieur. Vous n'avez pas besoin d'ajuster le multiplieur dans le cadre de l'utilisation normale. Français 41 ASRock K7VT6-C Motherboard - ASRock K7VT6-C | Quick Installation Guide - Page 42
Maître". Veuillez vous reporter aux instructions du fabricant de votre IDE pé connecteur IDE principal (IDE1, bleu) et votre CD- ROM sur le connecteur IDE secondaire (IDE2, noir est partagé avec les ports USB 2.0 4 et 5 sur ASRock I/O Plus™. Lorsque vous utilisez les ports USB du panneau frontal - ASRock K7VT6-C | Quick Installation Guide - Page 43
permettent de gérer des entrées audio à partir de sources stéréo comme un CD-ROM, DVDROM, un tuner TV ou une carte MPEG. C'est une interface pour un câble audio en façade qui permet le connecter un câble pour indicateur d'alimentation 3 broches sur connecteur. 43 ASRock K7VT6-C Motherboard Français - ASRock K7VT6-C | Quick Installation Guide - Page 44
parmi les choix prédéterminés. Pour des informations détaillées sur le BIOS, veuillez consulter le Guide de l'utilisateur (fichier PDF) dans le CD technique. 4. Informations sur le CD de support Cette carte mère supporte divers systèmes d'exploitation Microsoft Windows: 98 SE / ME / 2000 / XP. Le - ASRock K7VT6-C | Quick Installation Guide - Page 45
Scheda madre ASRock K7VT6-C (ATX Form Factor: 12.0-in x 7.0-in, 30.5 cm x 17.8 cm) Guida di installazione rapida ASRock K7VT6-C CD di supporto ASRock K7VT6-C Un cavo IDE 80-pin Ultra ATA 66/100/133 Un cavo per floppy drive a 1,44 Mb Un ASRock I/O PlusTM Shield 45 ASRock K7VT6-C Motherboard Italiano - ASRock K7VT6-C | Quick Installation Guide - Page 46
posteriore (vedi ATTENZIONE 3) ASRock I/O PlusTM: 1 porta PS/2 per mouse, 1 porta PS/2 per tastiera, 1 Porta seriale: COM 1, 1 Porta parallela: supporto ECP/EPP, 6 porte USB 2.0 già integrate, 1 porta RJ-45, Audio Jack: Line In / Line Out / Microfono Italiano 46 ASRock K7VT6-C Motherboard - ASRock K7VT6-C | Quick Installation Guide - Page 47
configurazione della "Frequenza Host della CPU" su "Manuale" nel BIOS. Si veda pagina 51 per avere maggiori informazioni sulla regolazione "Selezione Jumper FSB", e pagina 22 del "Manuale utente" nel CD per la configurazione della "Frequenza Host della CPU". Italiano 47 ASRock K7VT6-C Motherboard - ASRock K7VT6-C | Quick Installation Guide - Page 48
ventola del processore e l'heatsink. Per una corretta installazione, per favore fare riferimento ai manuali di istruzione dei produttori della ventola e dell'heatsink del processore. 48 ASRock K7VT6-C Motherboard Italiano - ASRock K7VT6-C | Quick Installation Guide - Page 49
2.2 Installazione dei moduli di memoria (DIMM) La motherboard K7VT6-C mette a disposizione due slot DIMM DDR (Double Data Rate) da 184 pin. Scollegare l'alimentazione elettrica alle due estremità e fino ad installare correttamente la DIMM nella sua sede. 49 ASRock K7VT6-C Motherboard Italiano - ASRock K7VT6-C | Quick Installation Guide - Page 50
(PCI e slot AGP) La motherboard K7VT6-C dispone di cinque slot PCI e uno slot AGP. Slot PCI: Sono utilizzati per installare schede di espansione con Interfaccia PCI a 32-bit. Slot AGP: Lo slot AGP viene usato per l'installazione di una scheda grafica. Lo slot AGP ASRock usa uno speciale gancio che - ASRock K7VT6-C | Quick Installation Guide - Page 51
CPU FSB di questa scheda madre è determinata dalle impostazioni dei jumper. È necessario regolare i "Jumper selezione FSB" in relazione all'FSB della CPU JL1 sono in corto, possono funzionare i connettori audio del pannello frontale e del pannello posteriore. Italiano 51 ASRock K7VT6-C Motherboard - ASRock K7VT6-C | Quick Installation Guide - Page 52
della CPU. Si veda pagina 14 del Manuale utente nel CD per avere maggiori informazioni. Tuttavia, il sistema funziona correttamente anche senza la regolazione del moltiplicatore. Il moltiplicatore non deve essere regolato per il funzionamento normale. Italiano 52 ASRock K7VT6-C Motherboard - ASRock K7VT6-C | Quick Installation Guide - Page 53
IDE1, blu) e il CD-ROM al connettore IDE ASRock I/O Plus™. Quando si utilizzano le porte USB del pannello frontale, attaccando il cavo USB pannello frontale a questo collettore (JUSB45), le porte 4 e 5 su ASRock I/O Plus™ non saranno in grado di funzionare. Italiano 53 ASRock K7VT6-C Motherboard - ASRock K7VT6-C | Quick Installation Guide - Page 54
AUX1 CD1 Connettore audio sul pannello frontale (9-pin AUDIO1) (vedi p.2 item 21) Permettono di ricevere input stereo audio da fonti di suono come CD-ROM, DVD al pin terra. Collegare il cavo della ventolina CPU a questo connettore e far combaciare il filo 54 ASRock K7VT6-C Motherboard Italiano - ASRock K7VT6-C | Quick Installation Guide - Page 55
premendo + + , o premi il tasto di reset sullo chassis del sistema. El BIOS Setup Utility es diseñádo "user-friendly". Es un programa guido al file ASSETUP. EXE nel CESTINO del CD di supporto e cliccare due volte per visualizzare i menù. Italiano 55 ASRock K7VT6-C Motherboard - ASRock K7VT6-C | Quick Installation Guide - Page 56
ATX: 30,5 cm x 17,8 cm, 12,0" x 7,0") Guía de instalación rápida de ASRock K7VT6-C CD de soporte de ASRock K7VT6-C Una cinta de datos IDE de conducción 80 Ultra ATA 66/100/133 Una cinta de datos para una unidad de disco de 3,5" Una protección ASRock I/O PlusTM 56 ASRock K7VT6-C Motherboard Español - ASRock K7VT6-C | Quick Installation Guide - Page 57
parte trasera (vea ATENCIÓN 3) ASRock I/O PlusTM: 1 puerto de ratón PS/2, 1 puerto de teclado PS/2, 1 puerto serial: COM 1, 1 puerto paralelo: soporta ECP/EPP, 6 puertos USB 2.0 predeterminados, 1 puerto RJ-45, Audio Jack: Line In / Line Out / Micrófono Español 57 ASRock K7VT6-C Motherboard - ASRock K7VT6-C | Quick Installation Guide - Page 58
ón detallada sobre los ajustes de "FSB Select Jumpers" (Jumpers de selección de FSB) y la página 22 del "User Manual" (Manual del usuario) en el CD de soporte para obtener información sobre la configuración de "CPU Host Frequency" (Frecuencia de host de CPU). Español 58 ASRock K7VT6-C Motherboard - ASRock K7VT6-C | Quick Installation Guide - Page 59
del CPU. Si no puede encajar el CPU, examine su orientación o examine si los pins están ya encorvados. Paso 4. Encierre el zócalo bajando la palanca. Paso 5. Instale el disipador de calor con ventilador del CPU ( consulte la documentación del disipador de calor). 59 ASRock K7VT6-C Motherboard Espa - ASRock K7VT6-C | Quick Installation Guide - Page 60
2.2 Instalación de Memoria La placa base K7VT6-C proporciona dos zócalos DIMM DDR (Doble velocidad de datos) de 184 contactos Asegúrese de desconectar la de ambos lados queden completamente introducidos en su sitio y la DIMM se haya asentado apropiadamente. 60 ASRock K7VT6-C Motherboard Español - ASRock K7VT6-C | Quick Installation Guide - Page 61
desea utilizar. Paso 3. Encaje el conector de la tarjeta a la ranura. Empuje firmemente la tarjeta en la ranura. Paso 4. Asegure la tarjeta con tornillos. 61 ASRock K7VT6-C Motherboard Español - ASRock K7VT6-C | Quick Installation Guide - Page 62
"FSB Select Jumpers" (Jumpers de selección de FSB) según la FSB de su CPU AMD. Siga las figuras anteriores para configurar la frecuencia FSB de la CPU. y JL1 son cortos, los conectores de audio del panel frontal y los del panel posterior podrán funcionar. Español 62 ASRock K7VT6-C Motherboard - ASRock K7VT6-C | Quick Installation Guide - Page 63
de CPU. Consulte la página 14 del manual del usuario en el CD de soporte para obtener información más detallada. En cualquier caso, el sistema funcionará bien sin ajustar el multiplicador. No es necesario que ajuste el multiplicador para un uso normal. Español 63 ASRock K7VT6-C Motherboard - ASRock K7VT6-C | Quick Installation Guide - Page 64
IDE primaria, (IDE1, azul) y el CD-ROM a la conexión IDE secundaria ( ASRock I/O PlusTM. Al usar los puertos USB del panel frontal conectando el cable USB del panel frontal a este cabezal (JUSB45), los puertos USB 4 y 5 en el ASRock I/O PlusTM no funcionarán. Español 64 ASRock K7VT6-C Motherboard - ASRock K7VT6-C | Quick Installation Guide - Page 65
AUX1 Permite recepción de input audio de fuente sónica como CD-ROM, DVD-ROM, TV tuner, o tarjeta MPEG. CD1 Conector de audio de panel frontal (9-pin AUDIO1) conector de tierra. Conecte el cable del ventilador de la CPU a este conector y haga coincidir el cable negro con el ASRock K7VT6-C Motherboard - ASRock K7VT6-C | Quick Installation Guide - Page 66
como configurar la BIOS, por favor refiérase al Manual del Usuario (archivo PDF) contenido en el CD. 4.Información de Software Support CD Esta placa-base la instalación. "PC-DIY Live Demo" ASRock presenta Usted un multimedia PC-DIY live demo, que muestra Español 66 ASRock K7VT6-C Motherboard - ASRock K7VT6-C | Quick Installation Guide - Page 67
67 ASRock K7VT6-C Motherboard - ASRock K7VT6-C | Quick Installation Guide - Page 68
68 ASRock K7VT6-C Motherboard - ASRock K7VT6-C | Quick Installation Guide - Page 69
69 ASRock K7VT6-C Motherboard - ASRock K7VT6-C | Quick Installation Guide - Page 70
70 ASRock K7VT6-C Motherboard - ASRock K7VT6-C | Quick Installation Guide - Page 71
71 ASRock K7VT6-C Motherboard - ASRock K7VT6-C | Quick Installation Guide - Page 72
72 ASRock K7VT6-C Motherboard
-
 1
1 -
 2
2 -
 3
3 -
 4
4 -
 5
5 -
 6
6 -
 7
7 -
8
-
9
-
10
-
11
-
12
-
13
-
14
-
15
-
16
-
17
-
18
-
19
-
20
-
21
-
22
-
23
-
24
-
25
-
26
-
27
-
28
-
29
-
30
-
31
-
32
-
33
-
34
-
35
-
36
-
37
-
38
-
39
-
40
-
41
-
42
-
43
-
44
-
45
-
46
-
47
-
48
-
49
-
50
-
51
-
52
-
53
-
54
-
55
-
56
-
57
-
58
-
59
-
60
-
61
-
62
-
63
-
64
-
65
-
66
-
67
-
68
-
69
-
70
-
71
-
72
 |
 |
1
ASRock
K7VT6-C
Motherboard
English
English
English
English
English
Copyright Notice:
Copyright Notice:
Copyright Notice:
Copyright Notice:
Copyright Notice:
No part of this installation guide may be reproduced, transcribed, transmitted, or
translated in any language, in any form or by any means, except duplication of
documentation by the purchaser for backup purpose, without written consent of
ASRock Inc.
Products and corporate names appearing in this guide may or may not be registered
trademarks or copyrights of their respective companies, and are used only for
identification or explanation and to the owners’ benefit, without intent to infringe.
Disclaimer:
Disclaimer:
Disclaimer:
Disclaimer:
Disclaimer:
Specifications and information contained in this guide are furnished for informational
use only and subject to change without notice, and should not be constructed as a
commitment by ASRock. ASRock assumes no responsibility for any errors or
omissions that may appear in this guide.
With respect to the contents of this guide, ASRock does not provide warranty of any
kind, either expressed or implied, including but not limited to the implied warranties or
conditions of merchantability or fitness for a particular purpose.
In no event shall ASRock, its directors, officers, employees, or agents be liable for
any indirect, special, incidental, or consequential damages (including damages for
loss of profits, loss of business, loss of data, interruption of business and the like),
even if ASRock has been advised of the possibility of such damages arising from any
defect or error in the guide or product.
This device complies with Part 15 of the FCC Rules. Operation is subject to the
following two conditions:
(1)
this device may not cause harmful interference, and
(2)
this device must accept any interference received, including interference that
may cause undesired operation.
ASRock Website: http://www.asrock.com
Published December 2004
Copyright
©
2004 ASRock INC. All rights reserved.