Acer H6535i User Manual Media - Page 2
Get Started, English
 |
View all Acer H6535i manuals
Add to My Manuals
Save this manual to your list of manuals |
Page 2 highlights
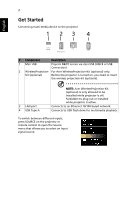
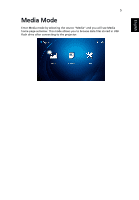
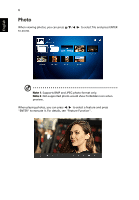
English 2 Get Started Connecting multi-media device to the projector 1 23 4 # Component Description 1 Mini USB Projects NB/PC screen via mini USB (USB B or USB Connection). 2 WirelessProjection- For Acer WirelessProjection-Kit (optional) only. Kit (optional) Before the projector is turned on, you need to insert the wireless projection-kit (optional). 3 LAN port 4 USB Type A NOTE: Acer WirelessProjection-Kit (optional) is only allowed to be installed while projector is off; forbidden to plug out or installed while projector is active. Connects to an Ethernet 10/100-based network. Connects to USB flash drive for multimedia playback. To switch between different inputs, press SOURCE on the projector or remote control to open the Source menu that allows you to select an input signal source.
-
 1
1 -
 2
2 -
 3
3 -
 4
4 -
 5
5 -
 6
6 -
 7
7 -
 8
8 -
9
-
10
-
11
-
12
-
13
-
14
-
15
-
16
-
17
-
18
-
19
-
20
-
21
-
22
-
23
-
24
-
25
-
26
-
27
 |
 |
