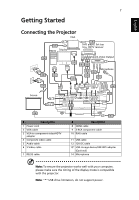
Acer P5207B User Manual - Page 16
English, Rewinds/Plays/Pauses/Stops/Fast-forwards the playing
 |
View all Acer P5207B manuals
Add to My Manuals
Save this manual to your list of manuals |
Page 16 highlights
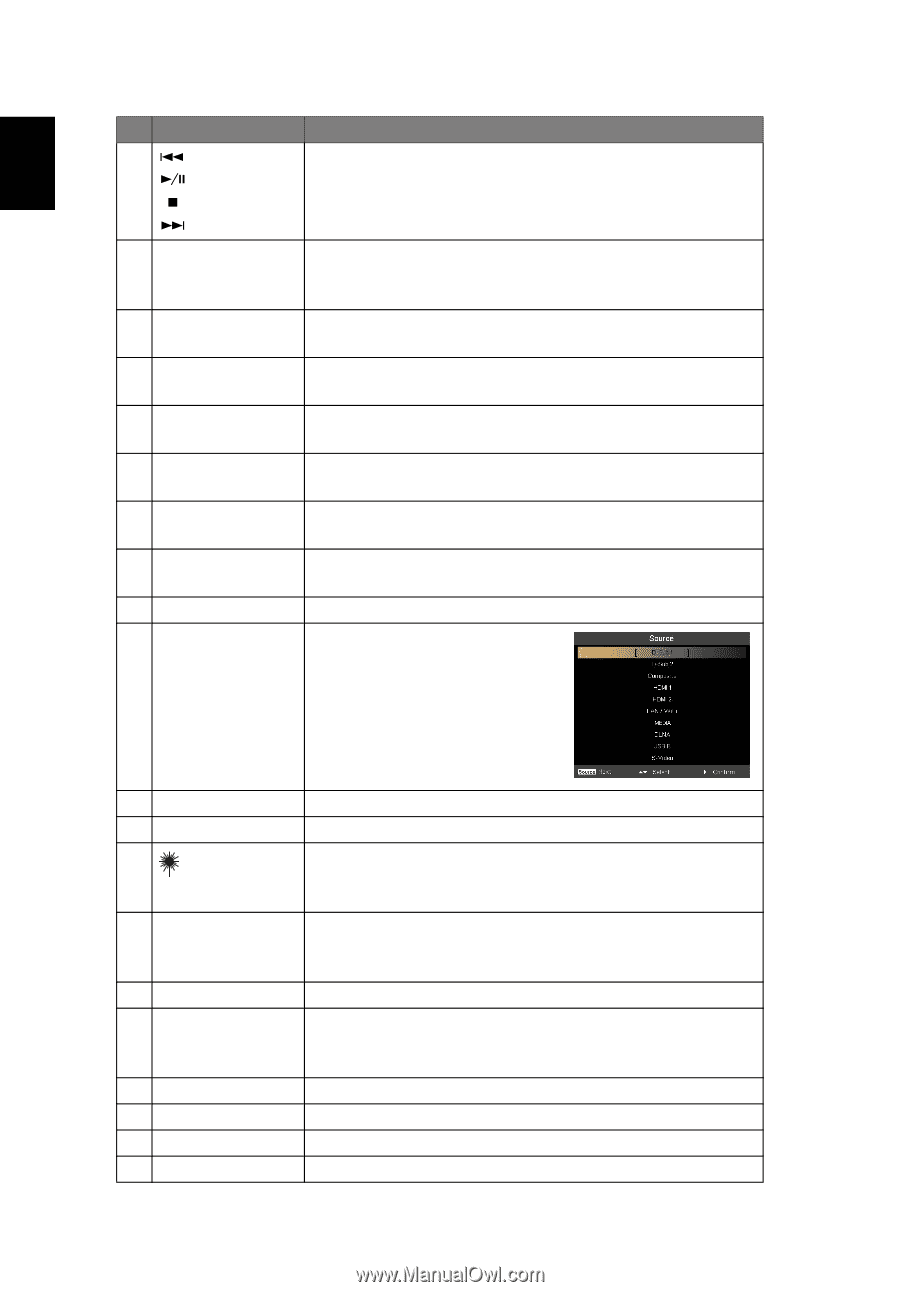
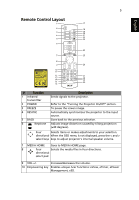
English 6 # Function Description 11 Rewind Rewinds/Plays/Pauses/Stops/Fast-forwards the playing Play/Pause media files. Stop Fast-forward 12 VGA To change source to VGA. This connector supports analog RGB, YPbPr (480p/576p/720p/1080i/1080p), and YCbCr (480i/576i). 13 COMPONENT To change source to Component video. This connector supports YPbPr. 14 SD/USB A To change source to SD/USB A. This projector only supports files in JPEG/BMP format. 15 HDMI™/DVI To change source to HDMI™/DVI (for the model with HDMI™/DVI connector). 16 Keypad 0~9 Press "0~9" to input a password in the "Setting > Security" OSD. 17 Laser pointer window Shines the laser point light when the Laser button is pressed. 18 HIDE Press "HIDE" to hide screen image; press again to display the image. 19 ASPECT RATIO To choose the desired aspect ratio. 20 SOURCE Press to open the Source menu that allows you to select an input signal source. 21 ZOOM 22 ENTER 23 Laser 24 MENU 25 MEDIA SETUP 26 PAGE ^/v 27 S-VIDEO 28 VIDEO 29 USB B 30 LAN/WiFi Zooms the projector display in or out. Confirms your selection of items. Emits visible laser pointer light for presentation purposes. This function is not available for the projectors sold in the Japanese market. Launches the Onscreen Display (OSD) menu, returns to the previous step for the OSD menu operation or exits the OSD menu. Opens MEDIA SETUP page. For computer mode only. Use the button to select the next or previous page. This function is only available when connected to a computer via a USB cable. To change source to S-Video. To change source to Composite video. To change source to USB B. To change source to LAN/WiFi.
-
 1
1 -
2
-
3
-
4
-
5
-
6
-
7
-
8
-
9
-
10
-
 11
11 -
 12
12 -
 13
13 -
 14
14 -
 15
15 -
 16
16 -
 17
17 -
 18
18 -
 19
19 -
 20
20 -
 21
21 -
22
-
23
-
24
-
25
-
26
-
27
-
28
-
29
-
30
-
31
-
32
-
33
-
34
-
35
-
36
-
37
-
38
-
39
-
40
-
41
-
42
-
43
-
44
-
45
-
46
-
47
-
48
-
49
-
50
-
51
-
52
-
53
-
54
-
55
-
56
-
57
-
58
-
59
-
60
 |
 |