Airlink AICAP650 Quick Installation Guide - Page 10
Step 3, Step 4
 |
View all Airlink AICAP650 manuals
Add to My Manuals
Save this manual to your list of manuals |
Page 10 highlights
Step 3 The welcome page appears. If you did not change the default password, you will be prompted to do so before accessing the camera. Step 4 The Main menu along with the live video appears on screen. The IP camera is ready for use now. Note: ActiveX must be installed and enabled on your Web Browser (Internet Explorer) before you can view the live videos. For more information, please refer to the next section.
-
 1
1 -
2
-
3
-
4
-
 5
5 -
 6
6 -
 7
7 -
 8
8 -
 9
9 -
 10
10 -
 11
11 -
 12
12 -
 13
13 -
 14
14 -
 15
15
 |
 |

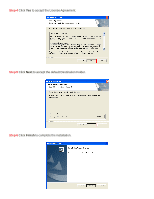
Note:
ActiveX must be installed and enabled on your Web Browser (Internet Explorer)
before you can view the live videos. For more information, please refer to the next section.
Step 3
The welcome page appears. If you did not change the default password, you will be prompted to
do so before accessing the camera.
Step 4
The Main menu along with the live video appears on screen. The IP camera is ready for use now.