Airlink AICN500 User Manual
Airlink AICN500 Manual
 |
View all Airlink AICN500 manuals
Add to My Manuals
Save this manual to your list of manuals |
Airlink AICN500 manual content summary:
- Airlink AICN500 | User Manual - Page 1
SkyIPCam500 Night Vision Network Camera Model # AICN500 User's Manual Ver. 1.0 - Airlink AICN500 | User Manual - Page 2
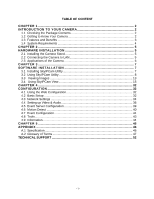
the Camera 6 CHAPTER 3 ...7 SOFTWARE INSTALLATION 7 3.1 Installing SkyIPCam Utility 7 3.2 Using SkyIPCam Utility 8 3.3 Viewing Images 13 3.4 Using SkyIPCam View 15 CHAPTER 4 ...32 CONFIGURATION ...32 4.1 Using the Web Configuration 32 4.2 Basic Setup ...32 4.3 Network Settings 34 4.4 Setting - Airlink AICN500 | User Manual - Page 3
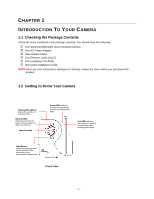
in the package carefully. You should have the following: 5 One SkyIPCam500 Night Vision Network Camera. 5 One AC Power Adapter. 5 One Camera Stand. 5 One Ethernet Cable (Cat.5). 5 One Installation CD-ROM. 5 One Quick Installation Guide. NOTE Once any item contained is damaged or missing, contact the - Airlink AICN500 | User Manual - Page 4
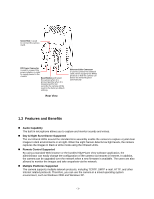
Internet. In addition, the camera can be upgraded over the network when a new firmware is available. The users are also allowed to monitor the images and take snapshots via the network. „ Multiple Platforms Supported The camera supports multiple network protocols, including TCP/IP, SMTP e-mail, HTTP - Airlink AICN500 | User Manual - Page 5
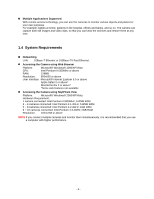
clips, so that you can keep the archives and restore them at any time. 1.4 System Requirements „ Networking LAN: 10Base-T Ethernet or 100Base-TX Fast Ethernet. „ Accessing the Camera using Web Browser Platform: Microsoft® Windows® 2000/XP/Vista CPU: Intel Pentium III 350MHz or above RAM - Airlink AICN500 | User Manual - Page 6
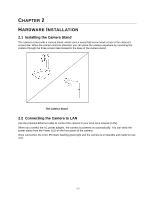
three screw holes located in the base of the camera stand. The Camera Stand 2.2 Connecting the Camera to LAN Use the provided Ethernet cable to connect the camera to your local area network (LAN). When you connect the AC power adapter, the camera is powered on automatically. You can verify the power - Airlink AICN500 | User Manual - Page 7
Connecting the Ethernet Cable 2.3 Applications of the Camera The camera can be applied in multiple applications, including: „ Monitor explains some of the typical applications for your camera and provides a basic example for installing the camera. * *Camera is not waterproof Home Applications -6- - Airlink AICN500 | User Manual - Page 8
CHAPTER 3 SOFTWARE INSTALLATION 3.1 Installing SkyIPCam Utility Step 1 Insert the provided CD and wait for the auto-run screen to appear. Step 2 Click on Install SkyIPCam Utility. Note: If the autorun screen does not appear automatically, go to Start, Run, type D:\ Utility\Setup.exe (where D is the - Airlink AICN500 | User Manual - Page 9
(All) Programs > AirLink101 > AirLink101 SkyIPCam Utiliy Step 2 Select the IP Camera you want to configure from the list and click on the Change IP button. Note: If the Camera's IP address does not show up in the window, make sure the camera is properly connected to the same network as your computer - Airlink AICN500 | User Manual - Page 10
suggested one has already been used by another device in the same network. Another option is that if your router's DHCP server is enabled, you can select DCHP, so the router will automatically assign a dynamic IP address to your camera. Enter "admin" for both the ID and password, and click Change - Airlink AICN500 | User Manual - Page 11
and password, enter "admin" for both User name and Password, and click OK. Step 6 The camera viewing window will appear. Click on Setup, and then click Smart Wizard. Step 7 Enter a name for your camera and a location if you like. Then enter "admin" for both Admin Password and Confirm Password. Click - Airlink AICN500 | User Manual - Page 12
may also change the camera's IP settings in the below window, and click Next. Step 9 If you would like to set up email alerts that you can receive in the future, Please enter your email information here. You can get this information from your internet service provider. If you want to set this up at - Airlink AICN500 | User Manual - Page 13
Step 10 Confirm your settings at the last window. If everything is correct, click Apply and the configuration is complete. - 12 - - Airlink AICN500 | User Manual - Page 14
Images Method 1 --- Access from Web Browser Step 1 If you know the IP address of your network camera, you may open the Web Browser on your computer. Step 2 Type the IP address of your camera (the default IP is 192.168.1.240) in the Address bar, and then press [Enter]. Step 3 Enter "admin" for both - Airlink AICN500 | User Manual - Page 15
Step 5 Click on Install, and then you may be able to view images. Step 6 To get a clear view of images, you can simply rotate the camera's lens clockwise or counterclockwise to adjust the focus. - 14 - - Airlink AICN500 | User Manual - Page 16
Method 2 --- Access from SkyIPCam Utility Step 1 Go to Start > (All) Programs > AirLink101 > AirLink101 SkyIPCam Utiliy, and open the Airlink101 SkyIPCam Utility. Step 2 Select your camera from the list and click Link Step 3 Follow Step 3 to Step 6 mentioned in Method 1. 3.4 Using SkyIPCam View To - Airlink AICN500 | User Manual - Page 17
Step 2 Keep clicking Next on the following windows. Step 3 Click Close to complete the installation. - 16 - - Airlink AICN500 | User Manual - Page 18
the Program This section describes the user interface and operating instructions of SkyIPCam View. To launch the program, click Start > Programs > AirLink101 > AirLink101 SkyIPCam View, and the main screen will appear as below: NOTE Please set the resolution to 1024x768 or above on your computer - Airlink AICN500 | User Manual - Page 19
player on the computer (for example, Windows Media Player by default). - LOCK: Click to lock the camera controls. Click again to resume controls for the camera. If you have set ID and Password in SETTING > Account, you will be asked to enter the required information to unlock. - ALL RECORD: Click to - Airlink AICN500 | User Manual - Page 20
, click this button to switch the video view to the previous camera. - NEXT: When you connect multiple cameras, click this button to switch the video view to the next camera. TIP To set the time interval of scanning, click SETTING > Other and then adjust the time from 1 to 10 seconds in the Time - Airlink AICN500 | User Manual - Page 21
OUT: Click to turn on the trigger out connector of the camera. This button is available only when the connected camera supports the trigger out connector, which is used to control the external device connected to the camera, such as a light. - SNAPSHOT: Click to capture a still image using the - Airlink AICN500 | User Manual - Page 22
Panel This panel displays the current date and time. „ PAN-TILT CONTROL Panel (optional) When you connect a pan/tilt camera, the system will detect the camera's function automatically and the PAN-TILT CONTROL buttons will become functional. Otherwise, these buttons are displayed as gray out buttons - Airlink AICN500 | User Manual - Page 23
panel to display the Setting screen. 2. Click Add New Camera. 3. In the pop-up Add New Camera dialog window, you can: z Select the Search tab if you are not sure of the camera's IP address. Click Search camera to search the available camera within the network. Once the camera is found and is - Airlink AICN500 | User Manual - Page 24
User name and Password for the camera, and then click OK. The connected camera will be displayed in the Camera List. 5. Click SETTING to return to the Video View Window. The video view of the selected camera will be displayed now. To Remove a Camera 1. Click SETTING in the CONTROLS panel to display - Airlink AICN500 | User Manual - Page 25
of the selected camera. To Record Video SkyIPCam View provides three methods to record video clips: one is to click the RECORD/ALL RECORD button to record manually; the second is to record by motion detection; the third is to set the recording schedule in Setting > Recording Configuration > Schedule - Airlink AICN500 | User Manual - Page 26
Recording Configuration. The recording schedule can be defined by Schedule Period or Recording Time. - Schedule Period: First, select the camera from the pull-down list. Then, click Add to set the Start/Stop date and time and then click OK to add the recording schedule to the list. Click Apply to - Airlink AICN500 | User Manual - Page 27
the recording file reaches the specified size limit. z Reserved HDD space for each camera: This option allows you to set to reserve the storage space on the hard disk drive for the recording of each camera. Before setting the reserve space on the hard disk drive, you can check the available storage - Airlink AICN500 | User Manual - Page 28
the CONTROLS panel, and the following dialog screen will appear, allowing you to select the file to playback. Select the recorded video file under the [camera] path and then click Open to launch the media player to playback. NOTE If your player on the computer don't have video codec to playback - Airlink AICN500 | User Manual - Page 29
the selected camera is enabled, you can set the Motion Options by selecting Alarm, Recording, Send e-Mail, and Trigger Out under SETTING > Motion Configuration information in SETTING > Motion Configuration > EMail Configuration. - Mail Server: Enter the mail server address. For example, mymail.com. - - Airlink AICN500 | User Manual - Page 30
the email address of the user who will receive the email. - User Name: Enter the user name to login the mail server. - Password: Enter the password to login the mail server. - Subject: Enter a subject for the notification email. Account You can set a username and password for the camera here. - 29 - Airlink AICN500 | User Manual - Page 31
Other Allows you to set the rotation interval if monitoring multiple cameras. - 30 - - Airlink AICN500 | User Manual - Page 32
Information Click SETTING > About to display the information of the software application. - 31 - - Airlink AICN500 | User Manual - Page 33
You can access and manage the camera through the Web browser and the provided software application SkyIPCam View. This chapter describes the Web Configuration, and guides you through the configuration of the camera by using the web browser. To configure the camera, click Setup on the main page of - Airlink AICN500 | User Manual - Page 34
Synchronize with PC: Select this option and the date & time settings of the camera will be synchronized with the connected computer. - Synchronize with IP address of the server and select the update interval in the following two boxes. - Manual: Select this option to set the date and time manually. - Airlink AICN500 | User Manual - Page 35
while accessing the camera. Only the "Administrator" is allowed to configure the camera through the Web Configuration. 4.3 Network Settings The Network menu contains three sub-menus that provide the network settings for the camera, such as the IP Setting, DDNS Setting, and IP Filter. - 34 - Airlink AICN500 | User Manual - Page 36
the camera. The default setting is 192.168.1.1. DNS (Domain Name System) translates domain names into IP addresses. Enter the Primary DNS and Secondary DNS that are provided by ISP. It is usually recommended that you input the Default Gateway of your network, which is the IP address of your router - Airlink AICN500 | User Manual - Page 37
problems, you can change it to some other port. The suggested port to be used is anything between 1024 to 65535 Network >> IP Filter The IP Filter setting allows the administrator of the camera to limit the users within a certain range of IP addresses to access the camera. „ Start/End IP Address - Airlink AICN500 | User Manual - Page 38
. Select the Vertical option to mirror the image vertically. - Light Frequency: Select the proper frequency according to the camera's location: 50Hz, 60Hz, or Outdoor. „ Overlay Setting - Includes Date & Time: Select this option to display the date & time stamp on the live view image. - Enable - Airlink AICN500 | User Manual - Page 39
(VGA) obtains better video quality while it uses more resource within your network. QQVGA is the lowest video quality setting but it provides the best speed over the network. - Video Quality: Select the desired image quality from five levels: Lowest, Low, Normal, High, and Highest. - Frame Rate - Airlink AICN500 | User Manual - Page 40
can receive the on-site sound and voice from the camera. 4.5 Event Server Configuration The Event Server menu contains two sub-menus that allow you to upload images to FTP, and send emails that include still images. When you complete the required settings for FTP, or Email, click Test to find out - Airlink AICN500 | User Manual - Page 41
option to enable passive mode. If you are having trouble, you can enable/disable this mode. Event Server Setting >> Email „ Email - SMTP Server Address: Enter the mail server address. For example, mymail.com. - Sender Email Address: Enter the email address of the user who will send the email. For - Airlink AICN500 | User Manual - Page 42
Snapshot/Recording Subfolder: You can assign a given sub-folder for captured file. Otherwise, leave this option blank to use the default setting. Event Configuration >> Schedule Profile This sub-menu displays the scheduled profile(s). To customize the profile, click Add and then enter a descriptive - Airlink AICN500 | User Manual - Page 43
Trigger Select the Enable option to enable the trigger function of the camera, so that you can send captured images within the detecting area to the FTP server, or email receiver. You have to configure corresponding settings, such as FTP server and email server, to enable this feature. - - Airlink AICN500 | User Manual - Page 44
option on each item, and then select a Schedule Profile from the pull-down list and set the Interval time. 4.8 Tools The Tools menu provides the commands that allow you to restart or reset the camera. You can also backup and restore your configuration, and upgrade the firmware for the camera. - 43 - - Airlink AICN500 | User Manual - Page 45
of upgrading firmware. Otherwise, the camera might be damaged because of failure of upgrading firmware. 4.9 Information The Information menu displays the current configuration and events log of the camera. „ Device Info Display the Basic, Video & Audio, and Network settings of the camera. - 44 - Airlink AICN500 | User Manual - Page 46
„ System Log The Logs table displays the events log recorded by the system. - 45 - - Airlink AICN500 | User Manual - Page 47
TCP/IP, UDP, ICMP, DHCP, NTP, DNS, DDNS, SMTP, FTP, PPPoE, UPnP „ User Interface LAN Reset LEDs One RJ-45 port One Reset button Power LED (amber); Link LED (green) „ Audio Input Codec „ Software OS Support Browser Built-in MIC PCM Windows 2000/XP/Vista Internet Explorer 6.0 or above Apple - Airlink AICN500 | User Manual - Page 48
for speech coding, which is software keeps track of IP addresses rather than requiring an administrator to manage the task. A new computer can be added to a network without the hassle of manually assigning it a unique IP address. DHCP allows the specification for the service provided by a router - Airlink AICN500 | User Manual - Page 49
Internet service provider controls the IP address of any device it connects to the Internet. The IP addresses in your network must conform to IP addressing rules. In smaller LANs, most people will allow the DHCP function of a router or gateway to assign the IP addresses on internal networks. - 48 - Airlink AICN500 | User Manual - Page 50
mobile telephones. Network Address Translator generally applied by a router that makes many different IP addresses on an internal network appear to the Internet as a single address. For routing messages properly within your network, each device requires a unique IP address. But the addresses - Airlink AICN500 | User Manual - Page 51
part of the Transmission Control Protocol/Internet Protocol (TCP/IP) suite, forwards packets from one network to another using the same network protocol. RJ-45 connector is used for Ethernet cable connections. A router is the network software or hardware entity charged with routing packets between - Airlink AICN500 | User Manual - Page 52
is a graphical user interface for workstations that use DOS. WPA (Wi-Fi Protected Access ) is used to improve the security of Wi-Fi networks, replacing the current WEP standard. It uses its own encryption, Temporal Key Integrity Protocol (TKIP), to secure data during transmission. Wi-Fi Protected - Airlink AICN500 | User Manual - Page 53
1 2 3 Technical Support E-mail: [email protected] Toll Free: 1-888-746-3238 Web Site: www.airlink101.com * Actual data throughput will vary. Network conditions and environmental factors lower actual data throughput rate. Specifications are subject to change without notice. All products and
-
 1
1 -
 2
2 -
 3
3 -
 4
4 -
 5
5 -
 6
6 -
 7
7 -
8
-
9
-
10
-
11
-
12
-
13
-
14
-
15
-
16
-
17
-
18
-
19
-
20
-
21
-
22
-
23
-
24
-
25
-
26
-
27
-
28
-
29
-
30
-
31
-
32
-
33
-
34
-
35
-
36
-
37
-
38
-
39
-
40
-
41
-
42
-
43
-
44
-
45
-
46
-
47
-
48
-
49
-
50
-
51
-
52
-
53
 |
 |

SkyIPCam500
Night Vision Network Camera
Model # AICN500
User’s Manual
Ver. 1.0