Airlink AML001 Quick installation guide - Page 1
Airlink AML001 Manual
 |
View all Airlink AML001 manuals
Add to My Manuals
Save this manual to your list of manuals |
Page 1 highlights
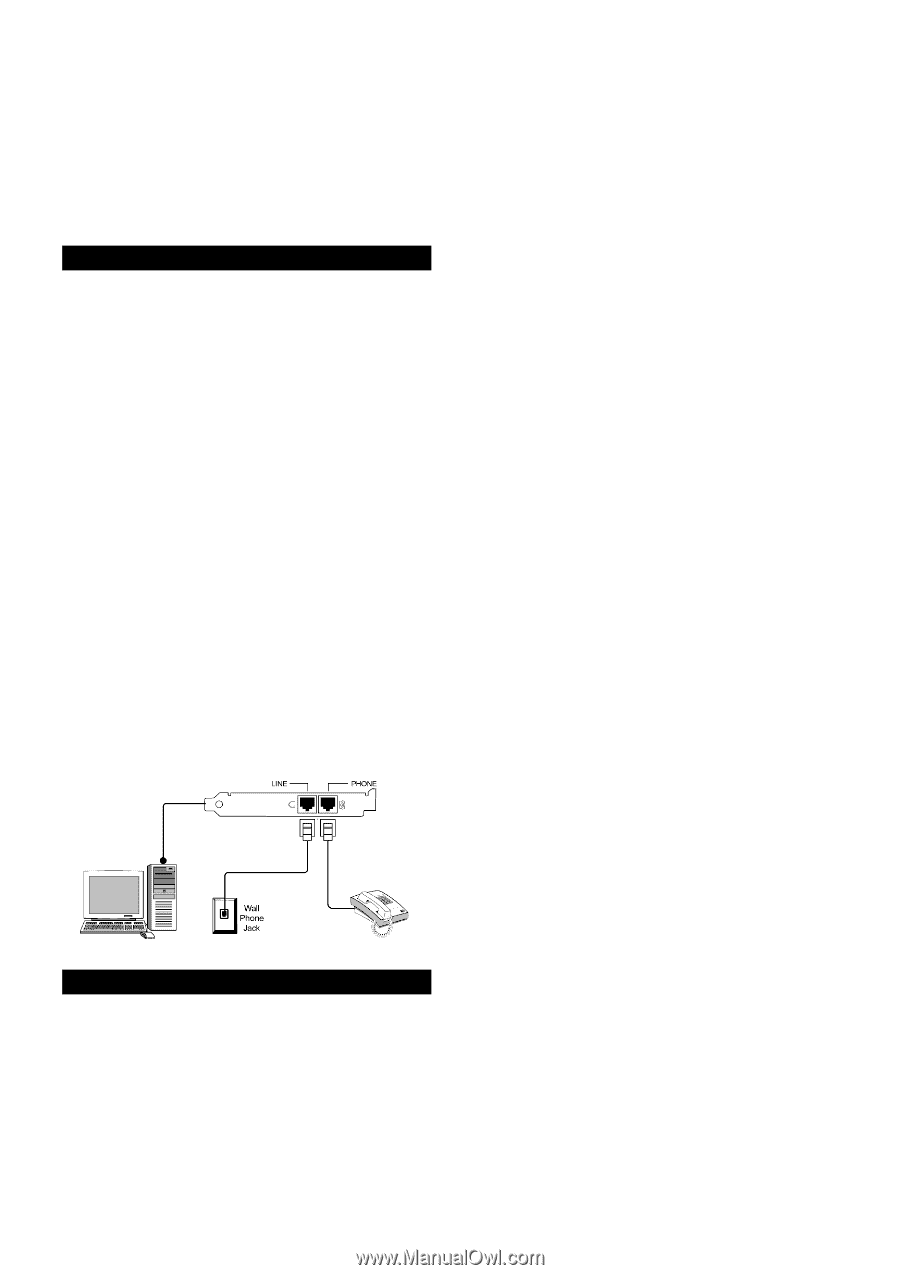
PCI Modem Card Quick Installation Note: If you encounter any problem during the installation process, please refer to Manual in the provided CD. For safety, before installing and uninstalling your modem, please make sure the telephone line is UNPLUGGED from your modem. 1. Hardware Installation System Requirements Before installation, please check the following requirements with your equipment. ! Pentium® III or above ! 32MB RAM or more ! One available PCI slot ! CD-ROM drive ! Windows 95® / 98® / Me®/ NT4.0®/ 2000® / XP® Installing the Card 1. With the power to your PC disconnected, remove the PC's casing. 2. Press the modem card firmly into the PCI slot, and secure it with screws to your PC. 3. Reinstall the casing on your PC. Connecting Your Modem 1. Plug one end of the phone cord into LINE jack and the other end to the wall phone jack. 2. When you are not using the modem, you can use a telephone on the modem's phone line. Plug your telephone's cord into the modem's PHONE jack. The figure below illustrates the typical connection of internal modem card. 2. Driver Installation Once the hardware installation is finished, turn on your computer and the system should detect the modem upon startup. Insert the provided CD into your CD-ROM drive to start driver installation. For Windows 95 1. Start Windows 95. When Update Device Driver Wizard screen appears, click Next. 2. Click Other Locations. 3. Click Browse to locate the path of the driver: X:\Driver\Win9x (where X is your CD-ROM drive letter) and click OK. 4. Windows will find the location of driver; click Finish. 5. When Insert Disk window appears, click OK. 6. Click Browse to locate the path of the driver: X:\Driver\Win9x (where X is your CD-ROM drive letter) and click OK. 7. Windows will continue to detect another device. Click Next. 8. Repeat steps 2-4 to complete installation. For Windows 98 1. Start Windows 98. When Add New Hardware Wizard screen appears, click Next. 2. Select Search for the best driver for your device and click Next. 3. Check Specify a location. Click Browse to locate the path of the driver: X:\Driver\Win9x (where X is your CD-ROM drive letter) and click OK. Click Next. 4. Windows will find the location of driver; click Next. 5. Click Finish. 6. Windows will continue to detect another device. Click Next. 7. Repeat steps 2-5 to complete installation. For Windows Me 1. Start Windows Me. When Add New Hardware Wizard screen appears, select Specify the location of the driver and click Next. 2. Select Search for the best driver for your device and then check only the Specify a location box. Click Browse to locate the path of the driver: X:\Driver\WinME (where X is your CD-ROM drive letter) and click Next. 3. Windows will find the driver file for the device. Click Next. 4. Click Finish. 5. Windows will continue to detect another device. Repeat Steps 1-4. 6. When New Hardware Found message appears, wait for Windows to complete the installation. For Windows NT4.0 1. Click Start menu and then click Run. Click Browse to open the file Setup.exe from X:\Driver\NT40 where X is your CDROM drive letter and click OK. 2. When confirm message appears, click OK. 3. When prompted to restart your computer, click OK. For Windows 2000 1. Start Windows 2000. Windows will detect a new hardware device, click Next to continue. 2. Select Search for a suitable driver... and click Next. 3. Check ONLY Specify a location and click Next. 4. Click Browse to locate the path of the driver: X:\Driver\W2K (where X is your CD-ROM drive letter) and click OK. 5. When Windows finds the location of the driver, click Next. 6. If Digital Signature Not Found window appears, click Yes to continue. 7. Click Finish. When Found New Hardware window appears, wait for Windows to complete the installation.
-
 1
1 -
 2
2
 |
 |