Alpine HCE-RCAM-WRA Quick Guide - Page 2
Download the full detailed version of the installation manual
 |
View all Alpine HCE-RCAM-WRA manuals
Add to My Manuals
Save this manual to your list of manuals |
Page 2 highlights
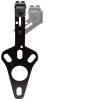
Jeep Wrangler HCE-RCAM-WRA ˜ 2/2 Remove B-Pillar Panel 1) Remove B-Pillar panel by disengaging 4 clips on both front and rear passenger sides. 2) Using panel removing tool, unclip the B-Pillar. Be careful not to damage the panel. 3) Lift the carpet up on both front and rear passenger sides to expose the OEM cables. Remove Right Side Panel 1) Using T25 Torx, remove the screws on the rear right side panel. 2) Using panel removing tools, pry off seatbelt cover and remove the roll cage cover. 3) Using 10mm socket to remove the panel. 4) Unclip the cigarette lighter socket from the harness. 5) Remove the Rear Right Side Panel. Remove Spare Tire 1) Using 19mm socket, extract the lug nuts. 2) Using panel removing tools, unclip and remove wire cover on the rear gate. Bracket Installation 1) Attach camera bracket (which already uses the M6x8 & Lock Washer preassembled) to spare tire bracket using the supplied allen wrench, M6x12 torx screw, lock washer, and nut. 2) Adjust the bracket for the camera height. 3) Place bracket with camera over the studs and slide to the back. There's usually 2 on the top and 1 on the bottom. 4) Slide retaining clips over the studs to hold the bracket in place. 5) Check the spacing of the bracket by placing the spare tire back over the studs. 6) If spacing is correct use 19mm socket to re-install spare tire. Route Extension Cable And Power & Video Unit 1) Route the wires starting at the head unit, to behind the glove box, down the passenger kick panel, along the door sill, through the right side panel area, and along the factory door handle cable. 2) Secure the cables. 3) Go through factory grommet. 4) Run cables to camera. Download the full detailed version of the installation manual at www.alpine-usa.com/support.
-
 1
1 -
 2
2
 |
 |
