Alpine HDA-M80 Owners Manual - Page 6
Connections
 |
View all Alpine HDA-M80 manuals
Add to My Manuals
Save this manual to your list of manuals |
Page 6 highlights
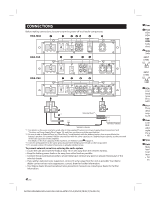
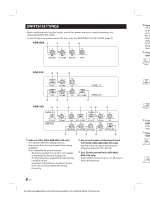
CONNECTIONS Before making connections, be sure to turn the power off to all audio components. Powe Fuse HDA-M HDA-F USE T REPLA Failure shock Speak Switch *1 External Fuse*2 *3, 4 Vehicle's battery Vehicle's chassis *1 For details on the wires size to be used, refer to the supplied "Cautions on Power Supply Wires Connection" and "Cautions on Power Supply Wires" (page 18), and then use the wire of the specified size. *2 Be sure to add an External Fuse (e.g. Fuse Block, Circuit Breaker) with the battery lead as close as possible to the battery's positive (+) terminal. Add an external fuse with the same capacity, or a slightly larger capacity, as the sum total of the fuse capacities of the amplifier. For details on the fuse capacity of this machine, see "Battery Lead ( )" (page 5). *3 Connect all equipment to the same ground point while keeping wire length as short as possible. *4 To securely connect the ground lead, use an already installed screw. To prevent external noise from entering the audio system • Locate the unit and route the leads at least 10 cm (4") away from the vehicle's harness. • Keep the battery power leads as far away from other leads as possible. • Connect the ground lead securely to a bare metal spot (remove any paint or grease if necessary) of the vehicle's chassis. • If you add an optional noise suppressor, connect it as far away from the unit as possible. Your Alpine dealer carries various noise suppressors, contact them for further information. • Your Alpine dealer knows best about noise prevention measures so consult your dealer for further information. 4-EN ALPINE HDA-M80/HDA-F60/HDA-V90 68-44781Z25-A (EN/DE/FR/ES/IT/SE/RU/CS) RCA I Conne head Speak Be sur Left to Pre-O These ideal o amp. T by the Remo Conne RUX-K adjust replac the am • HDA Speak Batte Make lead c Conne Insert • For d on w
-
 1
1 -
 2
2 -
 3
3 -
 4
4 -
 5
5 -
 6
6 -
 7
7 -
 8
8 -
 9
9 -
 10
10 -
 11
11 -
 12
12 -
13
-
14
-
15
-
16
-
17
-
18
-
19
-
20
-
21
-
22
-
23
-
24
-
25
-
26
-
27
-
28
-
29
-
30
-
31
-
32
-
33
-
34
-
35
-
36
-
37
-
38
-
39
-
40
-
41
-
42
-
43
-
44
-
45
-
46
-
47
-
48
-
49
-
50
-
51
-
52
-
53
-
54
-
55
-
56
-
57
-
58
-
59
-
60
-
61
-
62
-
63
-
64
-
65
-
66
-
67
-
68
-
69
-
70
-
71
-
72
-
73
-
74
-
75
-
76
-
77
-
78
-
79
-
80
-
81
-
82
-
83
-
84
-
85
-
86
-
87
-
88
-
89
-
90
-
91
-
92
-
93
-
94
-
95
-
96
-
97
-
98
-
99
-
100
-
101
-
102
-
103
-
104
-
105
-
106
-
107
-
108
-
109
-
110
-
111
-
112
-
113
-
114
-
115
-
116
-
117
-
118
-
119
-
120
-
121
-
122
-
123
-
124
-
125
-
126
-
127
-
128
-
129
-
130
-
131
-
132
-
133
-
134
-
135
-
136
-
137
-
138
-
139
-
140
-
141
-
142
-
143
-
144
-
145
-
146
-
147
-
148
-
149
-
150
-
151
-
152
-
153
-
154
-
155
-
156
-
157
-
158
-
159
-
160
-
161
-
162
-
163
-
164
-
165
-
166
-
167
-
168
-
169
-
170
-
171
-
172
-
173
-
174
-
175
-
176
-
177
-
178
-
179
-
180
 |
 |
