Alpine X009-U Installation Manual (english) - Page 5
Kit Assembly Process
 |
View all Alpine X009-U manuals
Add to My Manuals
Save this manual to your list of manuals |
Page 5 highlights
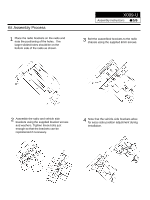
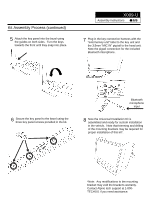
Kit Assembly Process 1 Place the radio brackets on the radio and note the positioning of the holes. The larger slotted holes should be on the bottom side of the radio as shown. X009-U Assembly Instructions 5/6 3 Bolt the assembled brackets to the radio chassis using the supplied 8mm screws. 2 Assemble the radio and vehicle side brackets using the supplied bracket screws and washers. Tighten these bolts just enough so that the brackets can be repositioned if necessary. 4 Note that the vehicle-side brackets allow for easy radio position adjustment during installation.
-
 1
1 -
 2
2 -
 3
3 -
 4
4 -
 5
5 -
 6
6
 |
 |

X009-U
Assembly Instructions
5/6
Kit Assembly Process
Place the radio brackets on the radio and
note the positioning of the holes.
The
larger slotted holes should be on the
bottom side of the radio as shown.
1
Assemble the radio and vehicle side
brackets using the supplied bracket screws
and washers. Tighten these bolts just
enough so that the brackets can be
repositioned if necessary.
2
Bolt the assembled brackets to the radio
chassis using the supplied 8mm screws.
3
Note that the vehicle-side brackets allow
for easy radio position adjustment during
installation.
4