Alpine X009-U Installation Manual (english) - Page 6
Kit Assembly Process continued
 |
View all Alpine X009-U manuals
Add to My Manuals
Save this manual to your list of manuals |
Page 6 highlights
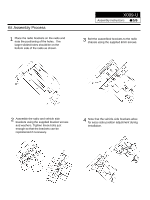
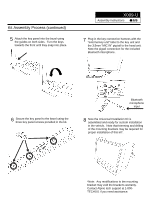
Kit Assembly Process (continued) 5 Attach the key panel into the bezel using the guides on both sides. Turn the keys towards the front until they snap into place. X009-U Assembly Instructions 6/6 7 Plug in the key connection harness with the "external key unit" label to the key unit and the 3.5mm "MIC IN" pig tail to the head unit. Note the pigtail connection for the included Bluetooth microphone. 6 Secure the key panel to the bezel using the three key panel screws provided in the kit. Bluetooth microphone input 8 Now the Universal Installation Kit is assembled and ready for custom installation in the vehicle. Note that trimming and drilling of the mounting brackets may be required for proper installation of this kit*. *Note: Any modifications to the mounting bracket may void the bracket's warranty. Contact Alpine tech support at 1-800TECH101 if you need assistance.
-
 1
1 -
 2
2 -
 3
3 -
 4
4 -
 5
5 -
 6
6
 |
 |
