Amana AGG222VD Installation Instruction
Amana AGG222VD Manual
 |
View all Amana AGG222VD manuals
Add to My Manuals
Save this manual to your list of manuals |
Amana AGG222VD manual content summary:
- Amana AGG222VD | Installation Instruction - Page 1
with Standard Clean Oven Table of Contents RANGE SAFETY 2 INSTALLATION REQUIREMENTS 4 Tools and Parts 4 Location Requirements 4 Electrical Requirements 6 Gas Supply Requirements 6 INSTALLATION INSTRUCTIONS 8 Unpack Range 8 Install Anti-Tip Bracket 8 Make Gas Connection 9 Verify Anti-Tip - Amana AGG222VD | Installation Instruction - Page 2
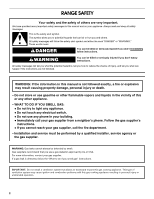
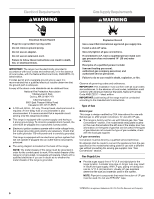
safety messages in this manual and on your appliance. Always read and obey instructions. IMPORTANT: Do not install a ventilation system that blows air downward toward this gas cooking appliance. This type of ventilation system may cause ignition and combustion problems with this gas cooking appliance - Amana AGG222VD | Installation Instruction - Page 3
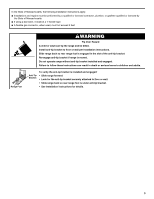
be killed. Install anti-tip bracket to floor or wall per installation instructions. Slide range back so rear range foot is engaged in the slot range without anti-tip bracket installed and engaged. Failure to follow these instructions can result in death or serious burns to children and adults. Anti - Amana AGG222VD | Installation Instruction - Page 4
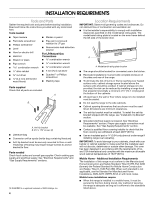
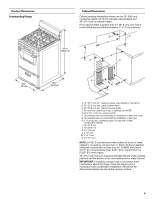
REQUIREMENTS Tools and Parts Gather the required tools and parts before starting installation. Read and follow the instructions provided with any tools of flooring may require longer screws to anchor bracket to floor. Parts needed Check local codes and consult gas supplier. Check existing gas - Amana AGG222VD | Installation Instruction - Page 5
wood or metal cabinet. IMPORTANT: If installing a range hood or microwave hood combination above the range, follow the range hood or microwave hood combination installation instructions for dimensional clearances above the cooktop surface. 5 - Amana AGG222VD | Installation Instruction - Page 6
to follow these instructions can result in death Association 1 Batterymarch Park Quincy, MA water column. Examples of a qualified person include: licensed heating personnel, authorized gas company personnel, and authorized service service technician. No attempt shall be made to convert the appliance - Amana AGG222VD | Installation Instruction - Page 7
female pipe threads of the inlet to the appliance pressure regulator. ■ Do not kink or damage The supply line must be equipped with a manual shutoff valve. This valve should be located in pressure for testing regulator must be at least 1" water column pressure above the manifold pressure shown on - Amana AGG222VD | Installation Instruction - Page 8
bottom under range. 3. Remove oven racks and parts package from inside oven. 4. To place range them lengthwise on the floor behind the range to support the range when it is laid on its back. bracket installed and engaged. Failure to follow these instructions can result in death or serious burns to - Amana AGG222VD | Installation Instruction - Page 9
cm) water column. Examples of a qualified person include: licensed heating personnel, authorized gas company personnel, and authorized service personnel. Front View Front Side View Shutoff valve "ON" Position 3. Open the manual shutoff valve in the gas supply line. The valve is open when the - Amana AGG222VD | Installation Instruction - Page 10
door. 6. Remove cooktop burner caps and grates from parts package. Align notches in burner caps with pins in Please reference the "Assistance or Service" section of the Use and Care Guide, or the cover or "Warranty" section of the User Instructions, to contact service. Level Range 1. Place a - Amana AGG222VD | Installation Instruction - Page 11
Check Operation of Cooktop Burners 1. If control panel and knobs were removed earlier, reinstall knobs. 2. Push in and turn each surface unit control knob to the "LITE" position. The flame should light within 4 seconds. OFF LITE LO HI MED 3. Turn control knob to the "HI" position after burner lights - Amana AGG222VD | Installation Instruction - Page 12
Care Guide for specific instruction on range operation. If range does not operate, check the following: ■ Household fuse is intact and tight, or circuit breaker has not tripped. ■ Range is plugged into a grounded 3 prong outlet. ■ Electrical supply is connected. ■ See the "Troubleshooting" section - Amana AGG222VD | Installation Instruction - Page 13
caps and burners. A Standard Burner 78 Super Burner 88 Super Burner 88 Standard Burner 78 B 5. Place the Natural gas orifice spuds in the parts bag for future use and keep with the bag containing literature. 6. Reinstall burners, burner caps and burner grates. A. Burner cap B. Burner 2. Locate LP - Amana AGG222VD | Installation Instruction - Page 14
anti-tip bracket to floor or wall per installation instructions. Slide range back so rear range foot is Place Natural gas oven burner spud in plastic parts bag along with Natural gas cooktop burner spuds for range to the gas supply. 2. Turn the manual shutoff valve in the gas supply line to the - Amana AGG222VD | Installation Instruction - Page 15
gas spuds are stamped "149" and two "125." 3. Remove the LP gas orifice spuds using a 7 mm combination wrench. 5. Place LP gas orifice spuds in the parts bag for future use and keep with the package containing literature. 6. Reinstall burners, burner caps and burner grates. 15 - Amana AGG222VD | Installation Instruction - Page 16
number "51" LP gas spud. 6. Place LP gas oven burner spud in plastic parts bag along with LP gas cooktop burner spuds for future use and keep with the section for properly connecting the range to the gas supply. 2. Turn the manual shutoff valve in the gas supply line to the "open" position. 3.
-
 1
1 -
 2
2 -
 3
3 -
 4
4 -
 5
5 -
 6
6 -
 7
7 -
8
-
9
-
10
-
11
-
12
-
13
-
14
-
15
-
16
 |
 |

INSTALLATION INSTRUCTIONS
20" (50.8 CM) FREESTANDING GAS RANGE
with Standard Clean Oven
Table of Contents
RANGE SAFETY
.............................................................................
2
INSTALLATION REQUIREMENTS
...............................................
4
Tools and Parts
............................................................................
4
Location Requirements
...............................................................
4
Electrical Requirements
...............................................................
6
Gas Supply Requirements
..........................................................
6
INSTALLATION INSTRUCTIONS
.................................................
8
Unpack Range
.............................................................................
8
Install Anti-Tip Bracket
................................................................
8
Make Gas Connection
.................................................................
9
Verify Anti-Tip Bracket Is Installed and Engaged
.....................
10
Level Range
...............................................................................
10
Electronic Ignition System
.........................................................
10
Complete Installation
.................................................................
12
GAS CONVERSIONS
...................................................................
12
LP Gas Conversion
....................................................................
12
Complete Conversion
................................................................
14
Natural Gas Conversion
............................................................
14
Complete Conversion
................................................................
16
W10459123B
IMPORTANT:
Save for local inspector's use.
Installer:
Leave installation instructions with the homeowner.
Homeowner:
Keep installation instructions for future reference.