Apple MA970LL User Manual - Page 54
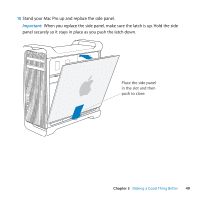
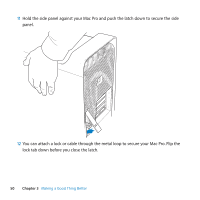
Replace the side panel and push the latch down to secure it.
 |
UPC - 885909168606
View all Apple MA970LL manuals
Add to My Manuals
Save this manual to your list of manuals |
Page 54 highlights
6 Lift the latch and slide the carrier over the guides and into the drive bay, until it's seated in the bay and snaps into the hard drive connectors. Hard drive connectors 7 Replace the side panel and push the latch down to secure it. 54 Chapter 3 Making a Good Thing Better
-
 1
1 -
2
-
3
-
4
-
5
-
6
-
7
-
8
-
9
-
10
-
11
-
12
-
13
-
14
-
15
-
16
-
17
-
18
-
19
-
20
-
21
-
22
-
23
-
24
-
25
-
26
-
27
-
28
-
29
-
30
-
31
-
32
-
33
-
34
-
35
-
36
-
37
-
38
-
39
-
40
-
41
-
42
-
43
-
44
-
45
-
46
-
47
-
48
-
 49
49 -
 50
50 -
 51
51 -
 52
52 -
 53
53 -
 54
54 -
 55
55 -
 56
56 -
 57
57 -
 58
58 -
 59
59 -
60
-
61
-
62
-
63
-
64
-
65
-
66
-
67
-
68
-
69
-
70
-
71
-
72
-
73
-
74
-
75
-
76
-
77
-
78
-
79
-
80
-
81
-
82
-
83
-
84
-
85
-
86
-
87
-
88
-
89
-
90
-
91
-
92
-
93
-
94
-
95
-
96
-
97
-
98
-
99
-
100
-
101
-
102
-
103
-
104
-
105
-
106
-
107
-
108
-
109
-
110
-
111
-
112
-
113
-
114
-
115
-
116
-
117
-
118
-
119
-
120
 |
 |

54
Chapter 3
Making a Good Thing Better
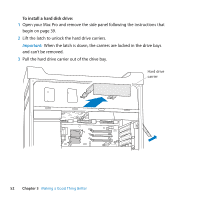
6
Lift the latch and slide the carrier over the guides and into the drive bay, until it’s
seated in the bay and snaps into the hard drive connectors.
7
Replace the side panel and push the latch down to secure it.
Hard drive
connectors