Ariens 34-Ton Log Splitter Owners Manual - Page 8
ASSEMBLY, Unpack Unit, Assemble Tongue Assembly - hydraulic log splitter
 |
View all Ariens 34-Ton Log Splitter manuals
Add to My Manuals
Save this manual to your list of manuals |
Page 8 highlights
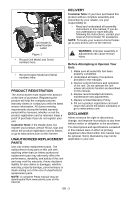
ALWAYS maintain unit in safe operating condition. Damaged or worn out muffler can cause fire or explosion. Disconnect unit from tow vehicle before using. Use wheel chocks to prevent movement of unit during operation. Logs should be cut with square ends before placing on splitter. When placing logs on unit position hands on sides (bark side) of logs and not on the ends. Never place hands or any part of the body between a log and any part of the log splitter. Do not attempt to stabilize logs with legs or feet while operating. Moving parts can cut off or crush body parts. Do not split more than one log at a time unless the cylinder has been fully extended and a second log is needed to complete the separation of the first log. Position logs against end plate grips before operating hydraulic cylinder. Split logs end to end in the direction of the grain, not against the grain. Keep fingers and hands away from cracks in logs while splitting. These can quickly close and pinch or crush body parts. On logs that are not square place the longest portion of the log closest to the beam and the most square end against the splitter wedge. Use only your hand to operate the control lever. ASSEMBLY WARNING: AVOID INJURY. Read and understand the entire Safety section before proceeding. Tongue Assembly Tools Required: • Two 3/4" wrenches or sockets. • Thin-nosed pliers. Unpack Unit Remove unit and all other components from the shipping container and move onto a level surface. Assemble Tongue Assembly CAUTION: DO NOT start engine until all assembly steps have been completed. 1. Ensure that jack stand is down and in locked position. 2. Remove rear hex bolt and nut from frame and retain (see figure 4). 3. Remove front hex bolt and nut retaining tongue assembly to frame and retain. Safety Chain Jack Stand Remove and retain hex bolts and nuts. Figure 4 4. Position tongue assembly in operating position on frame. 5. Insert hex bolts through tongue assembly and frame (see figure 5). 6. Secure hex bolts with hex nuts. 7. Tighten all hardware. GB - 8
-
 1
1 -
2
-
 3
3 -
 4
4 -
 5
5 -
 6
6 -
 7
7 -
 8
8 -
 9
9 -
 10
10 -
 11
11 -
 12
12 -
 13
13 -
14
-
15
-
16
-
17
-
18
-
19
-
20
-
21
-
22
-
23
-
24
-
25
-
26
-
27
-
28
 |
 |
