Asko DBI664IXXLS Instructions for installation - Page 2
Installation instructions
 |
View all Asko DBI664IXXLS manuals
Add to My Manuals
Save this manual to your list of manuals |
Page 2 highlights
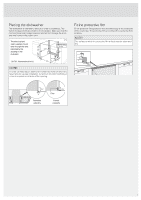
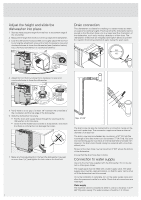
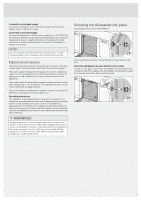
Installation instructions 48 3/4B) [''] 24* 22A) 29 3/4 34 1/4 - 36 3/8 5 1/8 - 7 3/8 29 5/8 2 1 1/8 - 3 3/4 * If European widths of 23 5/8'' (600 mm) is required, remove the trim kit. DBI675 XXLS A) 22 5/8 B) 49 3/8 Nominal dimensions. Actual measurements may vary. Important safety instructions • Connections to electricity, water, and drainage must be performed by a qualified professional. • Always follow applicable regulations for water, drainage, and electricity. • Take care during installation! Wear protective gloves! There must always be two people! • Place a drip tray on the floor beneath the dishwasher to prevent damage from any water leaks. • Before screwing the dishwasher into place, test the dishwasher by running the Rinse and hold program. Check that the dishwasher fills with water and drains. Also check that none of the connections leak. WARNING! Turn off the water supply when installing the dishwasher! The plug must be disconnected or power to the outlet turned off while installing the dishwasher! Transport protection for the door Do not forget to remove the transport protection for the door when unpacking the dishwasher. REMOVE Trim kit The dishwasher is equipped with a trim kit to fit the 24'' (610 mm) cutout standard. If a European width of 23 5/8'' (600 mm) is required, remove the trim kit. Adjust the trim kit The trim kit can be adjusted backward to level the dishwasher tub. 2
-
 1
1 -
 2
2 -
 3
3 -
 4
4 -
 5
5 -
 6
6 -
 7
7 -
 8
8
 |
 |
