Asko T702C User manual Use & Care Guide Asko T702C EN - Page 23
Adjusting the feet, Condensed water, Electrical installation - washer
 |
View all Asko T702C manuals
Add to My Manuals
Save this manual to your list of manuals |
Page 23 highlights
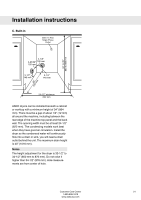
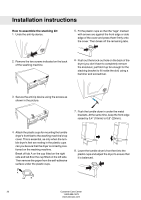
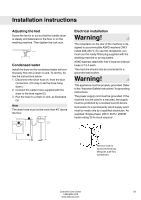
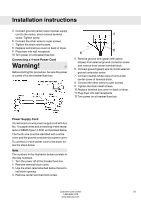
Installation instructions Adjusting the feet Screw the feet in or out so that the tumble dryer is steady and balanced on the floor or on the washing machine. Then tighten the lock nuts. Lock nut Condensed water Install the dryer so the condensed water will continuously flow into a drain or sink. To do this, follow the instructions below: 1. Disconnect the short hose (1) from the blue connection. (It's okay to let the hose hang down.) 2. Connect the rubber hose supplied with the dryer to the blue nipple (2). 3. Run the hose to a drain or sink, as illustrated (3). Note The drain hose must not be more than 40" above the floor. 2 1 Maximum height 40" Electrical installation Warning! The receptacle on the rear of the machine is designed to accommodate ASKO washers ONLY (rated 208-240 V.) To use this receptacle, you must use the ready-fitted plug supplied with the washing machine or an equivalent. ASKO washers rated 208-240 V have two internal fuses of 15 A each. The machine should only be connected to a grounded wall socket. Warning! This appliance must be properly grounded. Refer to the "Important Safety Instructions" for grounding instructions. The power supply cord must be grounded. If the machine is to be used in a wet area, the supply must be protected by a residual current device. Connection to a permanently wired supply point must be made only by a qualified electrician. As supplied: Single-phase, 230 V, 60 Hz, 2500W heater rating 30 A circuit required 2a Remove cover to access terminal box. (Requires a 20-Torx screwdriver.) Customer Care Center 23 1-800-898-1879 www.askousa.com
-
 1
1 -
2
-
3
-
4
-
5
-
6
-
7
-
8
-
9
-
10
-
11
-
12
-
13
-
14
-
15
-
16
-
17
-
 18
18 -
 19
19 -
 20
20 -
 21
21 -
 22
22 -
 23
23 -
 24
24 -
 25
25 -
 26
26 -
 27
27 -
 28
28
 |
 |
