Asus M4N78 PRO User Guide
Asus M4N78 PRO - Motherboard - ATX Manual
 |
UPC - 610839169771
View all Asus M4N78 PRO manuals
Add to My Manuals
Save this manual to your list of manuals |
Asus M4N78 PRO manual content summary:
- Asus M4N78 PRO | User Guide - Page 1
M4N78 PRO Motherboard - Asus M4N78 PRO | User Guide - Page 2
Product warranty or service will not be extended if: (1) the product is repaired, modified or altered, unless such repair, modification of alteration is authorized in writing by ASUS; or (2) the serial number of the product is defaced or missing. ASUS PROVIDES THIS MANUAL "AS IS" WITHOUT WARRANTY - Asus M4N78 PRO | User Guide - Page 3
1-15 1.10 Connectors 1-16 1.10.1 Rear panel connectors 1-16 1.10.2 Internal connectors 1-18 1.11 Software support 1-26 1.11.1 Installing an operating system 1-26 1.11.2 Support DVD information 1-26 Chapter 2 BIOS setup 2.1 Managing and updating your BIOS 2-1 2.2 BIOS setup program - Asus M4N78 PRO | User Guide - Page 4
[Disabled 2-17 2.5 Advanced menu 2-18 2.5.1 CPU Configuration 2-18 2.5.2 Chipset 2-19 2.5.3 Onboard Devices Configuration 2-20 2.5.4 PCIPnP 2-21 2.5.5 USB Configuration 2-21 2.6 Power menu 2-22 2.7 Boot menu 2-24 2.8 Tools menu 2-26 2.8.1 ASUS EZ Flash 2 2-26 2.8.2 Express Gate [Enabled - Asus M4N78 PRO | User Guide - Page 5
installation. This equipment generates, uses and can radiate radio frequency energy and, if not installed and used in accordance with manufacturer's instructions technician for help. The use of shielded cables for connection of the monitor to 003. DO NOT throw the motherboard in municipal waste. This - Asus M4N78 PRO | User Guide - Page 6
information you need when installing and configuring the motherboard. How this guide is organized This guide contains the following parts: • Chapter 1: Product introduction This chapter describes the features of the motherboard and the new technology it supports. • Chapter 2: BIOS setup This chapter - Asus M4N78 PRO | User Guide - Page 7
guide To ensure that you perform certain tasks properly, take note of the following symbols used throughout this manual task. IMPORTANT: Instructions that you MUST updates. 1. ASUS websites The ASUS website provides updated information on ASUS hardware and software products. Refer to the ASUS - Asus M4N78 PRO | User Guide - Page 8
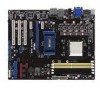
Chipset System bus Memory VGA Expansion Slots LAN USB AMD® Phenom™ X4 / Phenom™ X3 / Athlon™ X2 / Athlon™ / Sempron™ processors (socket AM2+/AM2) Compatible with AMD® Phenom™ II / Athlon™ X4/ Athlon™ X3 / Athlon™ X2 (AM3 CPU) AMD® 45nm CPU support AMD Cool'n'Quiet™ Technology NVIDIA GeForce® 8300 - Asus M4N78 PRO | User Guide - Page 9
Definition Audio ASUS Unique Features Special Features ASUS Exclusive Overclocking Features NVIDIA GeForce 8300 - 1 x Ultra DMA 133/100 - 6 x SATA 3.0 Gb/s connectors (Legacy IDE operation is only supported on SATA_1/2/3/4 connectors) - NVIDIA® MediaShield™ RAID supports RAID 0, 1, 5, 10 and - Asus M4N78 PRO | User Guide - Page 10
M4N78 PRO specifications summary Rear panel I/O ports Internal I/O connectors BIOS features Support DVD contents Form factor 1 x PS/2 keyboard port (purple) 1 x PS/2 mouse port (green) 1 x S/PDIF Out (Optical) 1 x HDMI Out 1 x D-Sub 1 x DVI 1 x LAN (RJ-45) 4 x USB 2.0/1.1 8-channel audio I/O 4 x - Asus M4N78 PRO | User Guide - Page 11
the following items. Motherboard Cables Accessories Application DVD Documentations ASUS M4N78 PRO motherboard 2 x Serial ATA cable 1x Ultra DMA 133/100/66 cable 1 x I/O shield 1 x 2 in 1 Q-connector (USB, System Panel; Retail Version only) ASUS motherboard support DVD User manual If any of the - Asus M4N78 PRO | User Guide - Page 12
GeForce 8300® chipset NVIDIA® GeForce 8300 offers the latest support of Hybrid SLI Technology, DirectX® 10 graphics features, HD video playback with HDMI/DVI output. It also supports HyperTransport™ 3.0 interface, PCI Express™ 2.0 bus architecture, Serial ATA 3 Gb/s devices and is optimized with AMD - Asus M4N78 PRO | User Guide - Page 13
lets you view your pictures without entering Windows at anytime! The actual boot time depends on the system configuration. 1.4 Before you proceed Take note of the following precautions before you install motherboard components or change any motherboard settings. • Unplug the power cord from the - Asus M4N78 PRO | User Guide - Page 14
overview 1.5.1 Placement direction When installing the motherboard, ensure that you place it into the by circles to secure the motherboard to the chassis. Do not overtighten the screws! Doing so can damage the motherboard. Place this side towards the rear of the chassis. 1-4 ASUS M4N78 PRO - Asus M4N78 PRO | User Guide - Page 15
USBPW5-8, USBPW9-12) 13. USB connectors (10-1 pin USB56, USB78, USB910, USB1112) 14. Floppy disk drive connector (34-1 pin FLOPPY) 15. Digital audio connector (4-1 pin SPDIF_OUT) 16. Optical drive audio in connector (4-pin CD) 17. Front panel audio connector (10-1 pin AAFP) 18. Serial - Asus M4N78 PRO | User Guide - Page 16
™ X3 / Athlon™ X2 / Athlon™ / Sempron™ processors. The CPU socket is not compatible with AMD® Opteron™ processors. Do not install an Opteron™ processor on this motherboard. 1.6.1 Installing the CPU To install a CPU: 1. Locate the CPU socket on the motherboard. 2. Press the lever sideways to unlock - Asus M4N78 PRO | User Guide - Page 17
for instructions. 7. Connect the CPU fan cable to the CPU_FAN connector on the motherboard. Do not forget to connect the CPU fan connector! Hardware monitoring errors can occur if you fail to plug this connector. 1.6.2 Installing the heatsink and fan Ensure that you use only AMD-certified heatsink - Asus M4N78 PRO | User Guide - Page 18
and fan to the module base. 5. When the fan and heatsink assembly is in place, connect the CPU fan cable to the connector on the motherboard labeled CPU_FAN. Do not forget to connect the CPU fan connector! Hardware monitoring errors can occur if you fail to plug this connector. 1-8 ASUS M4N78 PRO - Asus M4N78 PRO | User Guide - Page 19
a 64-bit Windows OS when having 4GB or more memory installed on the motherboard. • This motherboard does not support DIMMs made up of 256 megabit (Mb) chips or less. • The default memory operation frequency is dependent on its SPD. Under the default state, some memory modules for overclocking may - Asus M4N78 PRO | User Guide - Page 20
DIMM socket support (Optional) (Bios) A* B* C* • •• 4-4-4-12 • •• • 4-4-4-12 1.9~2.1V • 5 • 5 • 4 • 5 • • 4 • 5-5-5-15 • 4 • 5 • 4 • 5 • 5 • 5 • 5 • 4 • 5 • 4 • 5 • 4 • 5 • 5 • 5 • 4 • 5 • 4 • 5 • 4 • 5 • 1-10 ASUS M4N78 PRO - Asus M4N78 PRO | User Guide - Page 21
SLZ2128M8-JGE 28V0H8 M2Y1G64TU88D5B-AC 0828.GS M2Y1G64TU8HB0B-25C M2Y2G64TU8HD5B-AC 0826.SG MDT 512MB TMS51B264C081-805EP D48001GP3-63BJU D48002GP0-73BCU M2GVD6G3H3160Q1E52 Timing Dimm Voltage (Bios) 5 5 DIMM socket support (Optional - Asus M4N78 PRO | User Guide - Page 22
. DS ADATA M2OAD5G314170Q1C58 Timing Dimm (Bios) DIMM socket Voltage support (Optional) A• * B• * Supports four modules inserted into both the yellow slots and the black slots as two pairs of Dual-channel memory configuration. Visit the ASUS website for the latest QVL. 1-12 ASUS M4N78 PRO - Asus M4N78 PRO | User Guide - Page 23
Installing a DIMM Unplug the power supply before adding or removing DIMMs or other system components. Failure to do so can cause severe damage to both the motherboard press the retaining clips outward to unlock the DIMM. Support the DIMM lightly with your fingers when pressing the retaining clips. - Asus M4N78 PRO | User Guide - Page 24
x1 slots This motherboard supports PCI Express x1 network cards, SCSI cards, and other cards that comply with the PCI Express specifications. 1.8.5 PCI Express x16 slot This motherboard supports a PCI Express x16 graphics card that complies with the PCI Express specifications. 1-14 ASUS M4N78 PRO - Asus M4N78 PRO | User Guide - Page 25
RTC when the system hangs due to overclocking. For system failure due to overclocking, use the C.P.R. (CPU Parameter Recall) feature. Shut down and reboot the system so the BIOS can automatically reset parameter settings to default values. • Due to the chipset behavior, AC power off is required to - Asus M4N78 PRO | User Guide - Page 26
port LED indications Status OFF 10 Mbps connection 100 Mbps connection 1 Gbps connection Left LED OFF Orange (blinking during data activity) OFF OFF Right LED OFF OFF Orange (blinking during data activity) Green (blinking during data activity) Left Right LED LED LAN port 1-16 ASUS M4N78 PRO - Asus M4N78 PRO | User Guide - Page 27
This port connects the side speakers in an 8-channel audio configuration. Refer to the audio configuration table below for the function of the audio ports in 2, 4, 6, or 8-channel configuration. Audio 2, 4, 6-channel configuration Port Light Blue Lime Pink Orange Black Gray Headset 2-channel Line - Asus M4N78 PRO | User Guide - Page 28
in the suggested list below. CPU DIMM BIOS setup Playback software Suggested list AMD® Athlon 64 x2 5000+ DDR2 800MHz 2GB Frame Buffer Size--256MB or higher CyberLink® PowerDVD 8.0 Ultra • To play HD DVD or Blu-Ray Disc, ensure to use an HDCP compliant monitor. Troubleshooting on HDTV - Asus M4N78 PRO | User Guide - Page 29
. Insufficient air flow inside the system may damage the motherboard components. These are not jumpers! DO NOT place jumper caps on the fan connectors. Only the CPU_FAN and CHA_FAN1 connectors support the ASUS Q FAN 2 feature. 3. Chassis intrusion connector (4-1 pin CHASSIS) This connector - Asus M4N78 PRO | User Guide - Page 30
. 5. Serial port connector (10-1 pin COM1) The connector is for a serial (COM) port. Connect the serial port module cable to the connector, then install the module to a slot opening at the back of the system chassis. The serial port bracket (COM1) is purchased separately. 1-20 ASUS M4N78 PRO - Asus M4N78 PRO | User Guide - Page 31
. There are three connectors on each Ultra DMA 133 / 100 / 66 signal cable: blue, black, and gray. Connect the blue connector to the motherboard's IDE connector, then select one of the following modes to configure your devices: Single device Two devices Drive jumper setting Cable-Select or Master - Asus M4N78 PRO | User Guide - Page 32
® GeForce 8300 controller. • SATA1-4 connectors are set to [SATA Mode] by default. If you intend to create a Serial ATA RAID set using these connectors, set the SATA Mode select item in the BIOS to [RAID Mode]. • Before creating a RAID set, refer to the manual bundled in the motherboard support DVD - Asus M4N78 PRO | User Guide - Page 33
(10-1 pin PANEL) This connector supports several chassis-mounted functions. • System power LED (2-pin PWRLED) This 2-pin connector is for the system power LED. Connect the chassis power LED cable to this connector. The system power LED lights up when you turn on the system power, and blinks when - Asus M4N78 PRO | User Guide - Page 34
install the module to a slot opening at the back of the system chassis. These USB connectors comply with USB 2.0 specification that supports up to 480 Mbps connection speed. Never connect a 1394 cable to the USB connectors. Doing so will damage the motherboard! The USB . 1-24 ASUS M4N78 PRO - Asus M4N78 PRO | User Guide - Page 35
an AC'97 front panel audio module to this connector, set the item to [AC97]. See page 2-20 for details. ASUS Q-Connector (system panel) Use the ASUS Q-Connector to connect/disconnect the chassis front panel cables. Refer to the following instructions to install the ASUS Q-Connector. 1. Connect the - Asus M4N78 PRO | User Guide - Page 36
that you can install to avail all motherboard features. • The contents of the Support DVD are subject to change at any time without notice. Visit the ASUS website at www.asus.com for updates. • For detailed software instructions, see the Manual menu in the Support DVD or download the latest software - Asus M4N78 PRO | User Guide - Page 37
Chapter 2 BIOS setup 2.1 2.1.1 Managing and updating your BIOS Save a copy of the original motherboard BIOS file to a bootable floppy disk or a USB flash disk in case you need to restore the BIOS in the future. Copy the original motherboard BIOS using the ASUS Update or AFUDOS utilities. Creating - Asus M4N78 PRO | User Guide - Page 38
with the motherboard package. Installing ASUS Update To install ASUS Update: 1. Place the support DVD in the optical drive. The Drivers menu appears. 2. Click the Utilities tab, and then click Install ASUS Update. 3. Follow the onscreen instructions to complete the installation. Quit all Windows - Asus M4N78 PRO | User Guide - Page 39
2 performs the BIOS update process and automatically reboots the system when done. • This function can support devices such as USB flash disk, or floppy disk with FAT 32/16 format and single partition only. • Do not shut down or reset the system while updating the BIOS to prevent system boot failure - Asus M4N78 PRO | User Guide - Page 40
floppy disk. A:\>afudos /iM4N78PRO.ROM Press . Do not shut down or reset the system while updating the BIOS to prevent system boot failure! 4. The utility returns to the DOS prompt after the BIOS updating process is completed. Reboot the system from the hard disk drive. 2-4 ASUS M4N78 PRO - Asus M4N78 PRO | User Guide - Page 41
a corrupted BIOS file using the motherboard support DVD or a floppy disk that contains the BIOS file. The BIOS file in the motherboard support DVD may be older than the BIOS file published on the ASUS official website. If you want to use the newer BIOS file, download the file at support.asus.com and - Asus M4N78 PRO | User Guide - Page 42
under the Exit Menu. See section 2.9 Exit Menu. • The BIOS setup screens shown in this section are for reference purposes only, and may not exactly match what you see on your screen. • Visit the ASUS website at www.asus.com to download the latest BIOS file for this motherboard. 2-6 ASUS M4N78 PRO - Asus M4N78 PRO | User Guide - Page 43
on the keyboard until the desired item is highlighted. • The BIOS setup screens shown in this chapter are for reference purposes only, and may not exactly match what you see on your screen. • Visit the ASUS website at www.asus.com to download the latest BIOS information. Chapter 2: BIOS setup 2-7 - Asus M4N78 PRO | User Guide - Page 44
items on the screen. BIOS SETUP UTILITY Main Advanced Power Boot Tools Exit Suspend Mode Auto] ACPI Version Features [Disabled] ACPI APIC support [EDniasbalbelde]d Enabled APM Configuration 1985-2009, American Megatrends, Inc. Scroll bar Pop-up window 2-8 ASUS M4N78 PRO - Asus M4N78 PRO | User Guide - Page 45
BIOS SETUP UTILITY Main Ai Tweaker Advanced Power Boot Tools Exit System Time System Date Legacy Diskette A Language Primary IDE Master Primary IDE Slave SATA1 SATA2 SATA3 SATA4 Storage Configuration System Information [10 drive installed. Configuration - Asus M4N78 PRO | User Guide - Page 46
device is installed in the system. LBA/Large Mode [Auto] Enables or disables the LBA mode. Setting to [Auto] enables the LBA mode if the device supports this mode, and if the device was not previously formatted with LBA mode disabled. Configuration options: [Disabled] [Auto] 2-10 ASUS M4N78 PRO - Asus M4N78 PRO | User Guide - Page 47
Data Transfer [Enabled] Enables or disables 32-bit data transfer. Configuration options: [Disabled] [Enabled BIOS, only SATA port 1-4 can be detected. Ensure to install the AHCI driver to detect and use SATA port 5-6 in AHCI mode under OS. • If you want to create a RAID 0, RAID 1, RAID 5, and RAID 10 - Asus M4N78 PRO | User Guide - Page 48
, American Megatrends, Inc. 2.4.1 AI Overclocking [Auto] Allows selection of CPU overclocking options to achieve desired CPU internal frequency. Configuration options: [Manual] [Auto] The following three (3) items appear only when you set the Ai Overclocking item to [Manual]. 2-12 ASUS M4N78 PRO - Asus M4N78 PRO | User Guide - Page 49
set the DRAM frequency. Configuration options: [667MHz] [800MHz] [1066MHz] CPU/NB Frequency [Auto] This item appears only when you set the AI Overclocking item to [Manual] and allows selection of the CPU frequency. Configuration options: [Auto] [800MHz] [1000MHz] [1200MHz] [1400MHz] [1600MHz - Asus M4N78 PRO | User Guide - Page 50
Overclocking item to [Manual] and allows you to change the advanced DRAM timing settings. The configuration options for some of the following items vary depending on the DIMMs you install on the motherboard ] Configuration options: [11 CLK] [12 CLK] - [25 CLK] [26 CLK] [Auto] 2-14 ASUS M4N78 PRO - Asus M4N78 PRO | User Guide - Page 51
] [1.25x] [1.5x] DCT0:Processor on-die termination [Auto] DCT1:Processor on-die termination [Auto] Configuration options: [Auto] [300 ohms +/- 20%] [150 ohms +/- 20%] [75 ohms +/- 20%] DQS Timing Configuration This item appears only when you set the AI Overclocking item to [Manual] and allows you to - Asus M4N78 PRO | User Guide - Page 52
you to set the voltage between the CPU and Northbridge. The following four (4) items appear only when you set the Ai Overclocking item to [Manual]. 2.4.6 CPU VDDA Voltage [Auto] Allows you to set the CPU VDDA voltage. The values range from 2.50V to 2.80V with a 0.10V interval. 2-16 ASUS M4N78 PRO - Asus M4N78 PRO | User Guide - Page 53
100V to 1.400V with a 0.10V interval. 2.4.10 CPU/LDT Spread Spectrum [Disabled] Set to [Disabled] to enhance CPU/LDT overclocking ability or [Enabled] for EMI control. Configuration 2.4.13 PCI Spread Spectrum [Disabled] Configuration options: [Disabled] [Linear Down] Chapter 2: BIOS setup 2-17 - Asus M4N78 PRO | User Guide - Page 54
: [Enabled] [Disabled] AMD Live! [Disabled] Enables or disables the AMD Live! technology support. Configuration options: [Disabled] [Enabled] C1E Support [Disabled] Allows you to enable or disable the Enhanced Halt State support. Configuration options: [Disabled] [Enable] 2-18 ASUS M4N78 PRO - Asus M4N78 PRO | User Guide - Page 55
processor's overclocking ability. Configuration options: [Disabled] [Auto] [All Cores] [Per Cores] 2.5.2 Chipset The Chipset menu allows you to change the advanced chipset sub-item manually. You may Bit 10.2us] [20.5us] [41.0us] [81.9us] [163.8us] [327.7us] [655.4us] [1.31ms] [2.62ms] [5.24ms] [10 - Asus M4N78 PRO | User Guide - Page 56
depending on the audio standard that the front panel audio module supports. Configuration options: [AC97] [HD Audio] Serial Port1 Address [3F8/IRQ4] Allows you to select the Serial Port1 base address. Configuration options: [Disabled] [3F8/IRQ4][2F8/IRQ3] [3E8/IRQ4] [2E8/IRQ3] 2-20 ASUS M4N78 PRO - Asus M4N78 PRO | User Guide - Page 57
Play O/S [No] When set to [Yes] and if you install a Plug and Play operating system, the operating system configures the Plug and Play devices not required for boot. When set to [No], BIOS configures all the devices in the system. 2.5.5 USB Configuration The items in this menu allows you to change - Asus M4N78 PRO | User Guide - Page 58
ATX power supply that provides at least 1A on the +5VSB lead. Configuration options: [Disabled] [Space Bar] [Power Key] [Ctrl-Esc] Power On By PS/2 Mouse [Disabled] Allows you to enable or disable the Power On by PS/2 mouse function. Configuration options: [Disabled] [Enabled] 2-22 ASUS M4N78 PRO - Asus M4N78 PRO | User Guide - Page 59
only when you set the CPU Q-Fan Function item to [Enabled] and allows you to select the CPU fan type you installed on the motherboard. Configuration options: [PWM Fan] [DC Fan] • If you install a PWM (4-pin) fan . Configuration options: [Performance] [Optimal] [Silent] Chapter 2: BIOS setup 2-23 - Asus M4N78 PRO | User Guide - Page 60
devices installed in the system. Configuration options: [1st FLOPPY DRIVE] [Hard Drive] [ATAPI CD-ROM] [Disabled] 2.7.2 Boot Settings Configuration Quick Boot [Enabled] Enabling this item allows the BIOS to pressed when error occurs. Configuration options: [Disabled] [Enabled] 2-24 ASUS M4N78 PRO - Asus M4N78 PRO | User Guide - Page 61
"Password Uninstalled" appears. If you forget your BIOS password, you can clear it by erasing the CMOS Real Time Clock (RTC) RAM. See section item on top of the screen shows the default Not Installed. After you set a password, this item shows Installed. To set a User Password: 1. Select the Change - Asus M4N78 PRO | User Guide - Page 62
UTILITY Main Ai Tweaker Advanced Power Boot Tools Exit ASUS EZ Flash 2 Express Gate Enter OS Timer Reset User Data ASUS O.C. Profile AI NET 2 [Enabled] [10 Seconds] [No] Press ENTER to run the utility to select and update BIOS. This utility supports 1.FAT 12/16/32 - Asus M4N78 PRO | User Guide - Page 63
NOT shut down or reset the system while updating the BIOS to prevent the system boot failure! • Suggest only to update the BIOS file coming from the same memory/CPU configuration and BIOS version. • Only the "xxx.CMO" file can be loaded. 2.8.4 AI NET 2 Check Marvell Phy LAN cable [Disabled] Enables - Asus M4N78 PRO | User Guide - Page 64
default values for each of the parameters on the Setup menus. When you select this option or if you press , a confirmation window appears. Select OK to load default values. Select Exit & Save Changes or make other changes before saving the values to the non-volatile RAM. 2-28 ASUS M4N78 PRO
-
 1
1 -
 2
2 -
 3
3 -
 4
4 -
 5
5 -
 6
6 -
 7
7 -
8
-
9
-
10
-
11
-
12
-
13
-
14
-
15
-
16
-
17
-
18
-
19
-
20
-
21
-
22
-
23
-
24
-
25
-
26
-
27
-
28
-
29
-
30
-
31
-
32
-
33
-
34
-
35
-
36
-
37
-
38
-
39
-
40
-
41
-
42
-
43
-
44
-
45
-
46
-
47
-
48
-
49
-
50
-
51
-
52
-
53
-
54
-
55
-
56
-
57
-
58
-
59
-
60
-
61
-
62
-
63
-
64
 |
 |

Motherboard
M4N78 PRO