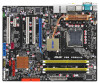
Asus P5B PREMIUM VIST Motherboard Installation Guide - Page 126
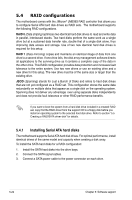
Entering the JMB363 RAID BIOS utility, Creating a RAID set
 |
View all Asus P5B PREMIUM VIST manuals
Add to My Manuals
Save this manual to your list of manuals |
Page 126 highlights
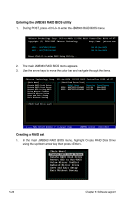
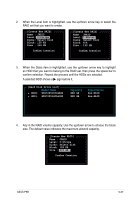
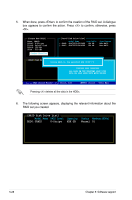
Entering the JMB363 RAID BIOS utility 1. During POST, press to enter the JBM363 RAID BIOS menu. JMicron Technology Corp. PCI-to-SATA II/IDE RAID Controller BIOS v0.97 Copyright (C) 2004-2005 JMicron Technology http://www. jmicron.com HDD0 : HDS722516VLSA80 HDD1 : HDS722516DLA380 164 GB Non-RAID 164 GB Non-RAID Press to enter RAID Setup Utility... 2. The main JMB363 RAID BIOS menu appears. 3. Use the arrow keys to move the color bar and navigate through the items. JMicron Technology Corp. PCI-to-SATA II/IDE RAID Controller BIOS v0.97 [Main Menu] [Hard Disk Drive List] Create RAID Disk Drive Delete RAID Disk Drive Revert HDD to Non-RAID Solve Mirror Conflict Rebuild Mirror Drive Save and Exit Setup Exit Without Saving Model Name Capacity Type/Status HDD0: HDS722516VLSA80 164 GB Non-RAID HDD1: HDS722516DLA380 164 GB Non-RAID [RAID Disk Drive List] [ TAB]-Switch Window [↑↓]-Select Item [ENTER]-Action [ESC]-Exit Creating a RAID set 1. In the main JMB363 RAID BIOS menu, highlight Create RAID Disk Drive using the up/down arrow key then press . [Main Menu] Create RAID Disk Drive Delete RAID Disk Drive Revert HDD to Non-RAID Solve Mirror Conflict Rebuild Mirror Drive Save and Exit Setup Exit Without Saving 5-26 Chapter 5: Software support
-
 1
1 -
2
-
3
-
4
-
5
-
6
-
7
-
8
-
9
-
10
-
11
-
12
-
13
-
14
-
15
-
16
-
17
-
18
-
19
-
20
-
21
-
22
-
23
-
24
-
25
-
26
-
27
-
28
-
29
-
30
-
31
-
32
-
33
-
34
-
35
-
36
-
37
-
38
-
39
-
40
-
41
-
42
-
43
-
44
-
45
-
46
-
47
-
48
-
49
-
50
-
51
-
52
-
53
-
54
-
55
-
56
-
57
-
58
-
59
-
60
-
61
-
62
-
63
-
64
-
65
-
66
-
67
-
68
-
69
-
70
-
71
-
72
-
73
-
74
-
75
-
76
-
77
-
78
-
79
-
80
-
81
-
82
-
83
-
84
-
85
-
86
-
87
-
88
-
89
-
90
-
91
-
92
-
93
-
94
-
95
-
96
-
97
-
98
-
99
-
100
-
101
-
102
-
103
-
104
-
105
-
106
-
107
-
108
-
109
-
110
-
111
-
112
-
113
-
114
-
115
-
116
-
117
-
118
-
119
-
120
-
 121
121 -
 122
122 -
 123
123 -
 124
124 -
 125
125 -
 126
126 -
 127
127 -
 128
128 -
 129
129 -
 130
130 -
 131
131 -
132
-
133
-
134
-
135
-
136
-
137
-
138
-
139
-
140
 |
 |
